
Frequently Asked Questions
Can I use a boxed brownie mix for the base?
Absolutely. A boxed brownie mix, prepared according to package directions for “fudgy” brownies (usually with an extra egg or less water), will work perfectly. Bake in an 8×8 or 9×9 pan as directed, then proceed with cooling, cutting, and dipping. The from-scratch version gives you more control over the flavor and texture, but a mix is a great time-saver. This is a wonderful way to elevate a simple boxed mix into something truly special.
What’s the best way to get the chocolate coating to set with a shine?
For the shiniest, most professional-looking finish, use chocolate melting wafers or candy melts, which are formulated to set with a gloss without tempering. If you’re using real chocolate, adding a teaspoon of coconut oil or shortening helps, but real chocolate may still develop a slight matte finish or bloom if not tempered. Tempering is the process of heating and cooling chocolate to specific temperatures to stabilize the cocoa butter crystals, which results in a shiny, snappy coating. It’s a bit technical, but if you want the ultimate finish, you can look up a simple tempering method using the seeding technique. However, even untempered chocolate tastes amazing and will have a nice snap, especially if you add the coconut oil. Don’t let the lack of perfect tempering stop you from making these bars—they’ll be delicious and beautiful regardless.
Why did my brownies fall apart when I dipped them?
They may have been overbaked, making them dry and crumbly, or they weren’t cold enough. Chilling the brownies is essential for clean dipping. If they still crumble, try using two forks to support the bar as you dip it rather than just a single fork. You can also freeze the cut bars for 30 minutes before dipping; they’ll be extremely firm and less likely to break. If the issue persists, your brownie recipe may be too cakey. For future batches, reduce the flour slightly and make sure not to overbake. A fudgier brownie is more cohesive and holds together better.
Can I make these dairy-free?
Yes. For the brownies, use a high-quality dairy-free butter or coconut oil in place of the butter, and ensure your chocolate chips are dairy-free (many semi-sweet and dark chocolate chips are naturally dairy-free, but check the label). For the coating, use dairy-free chocolate. The rest of the ingredients are naturally dairy-free. The flavor will be slightly different but still deliciously rich and chocolatey. Coconut oil in the brownies will give them a slight coconut flavor, which can be lovely or can be mitigated by using a refined coconut oil that has no coconut taste.
What size should I cut the bars for dipping?
There’s no strict rule, but bars that are about 2 inches by 1 inch are an ideal size—large enough to feel substantial, small enough to dip and eat in a few bites. You can cut 16 squares (4×4) from an 8×8 pan. If you prefer smaller, bite-sized treats, cut 5 rows by 5 rows for 25 mini bars. Just adjust the amount of chocolate you melt accordingly. Smaller bars can be dipped with a toothpick inserted into the center, which is fun and makes them look like little pops. The key is to make them uniform so they look professional.
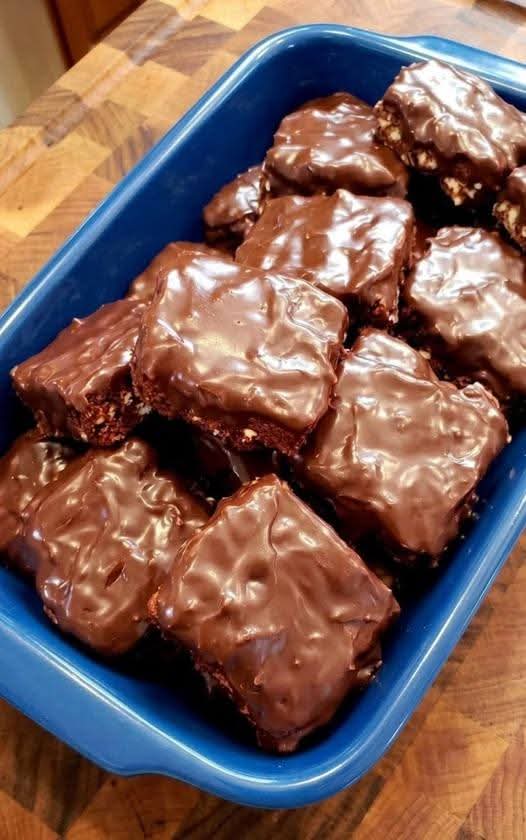
Chocolate Covered Brownie Bars
Ultra-fudgy brownie bars dipped in a glossy chocolate coating and decorated with your favorite toppings. The perfect make-ahead treat for holidays, gifting, or satisfying your chocolate cravings.
Prep Time:
20 minutes
Cook Time:
22–28 minutes
Chill Time:
1–2 hours (for firm brownies)
Dipping & Setting:
20–30 minutes
Total Time:
About 2 hours 45 minutes
Yield:
16 bars (or more, depending on size)
Ingredients
For the Brownie Base:
- ½ cup (1 stick) unsalted butter, melted
- 1 cup granulated sugar
- ½ cup unsweetened natural cocoa powder
- 2 large eggs, at room temperature
- 1 teaspoon vanilla extract
- ½ teaspoon salt
- ½ cup all-purpose flour, spooned and leveled
- Optional: 1 teaspoon instant espresso powder (to deepen chocolate flavor)
For the Chocolate Coating:
- 8–10 oz semi-sweet or dark chocolate chips (or chopped chocolate bars)
- 1 teaspoon coconut oil or vegetable shortening (optional, for smoother coating)
- Toppings of choice: flaky sea salt, chopped toasted nuts, crushed candy canes, sprinkles, drizzle of contrasting chocolate
Instructions
- Preheat oven to 350°F (175°C). Line an 8×8-inch baking pan with parchment paper and lightly grease.
- Make the brownie batter: In a large bowl, whisk together the melted butter, sugar, and cocoa powder until smooth and well combined. Let cool slightly. Beat in the eggs, one at a time, until the batter is thick and glossy. Stir in vanilla and salt. Gently fold in the flour (and espresso powder if using) just until no streaks remain. Do not overmix.
- Spread the batter evenly into the prepared pan. Bake for 22–28 minutes, until a toothpick inserted in the center comes out with a few moist crumbs. The edges should be set. Do not overbake.
- Cool completely in the pan on a wire rack. For the cleanest cuts, once cool, place the pan in the refrigerator for at least 1 hour (or freezer for 30 minutes) until the brownies are very firm.
- Cut into bars: Lift the brownie slab out by the parchment. Trim the edges, then cut into 16 squares (4×4) or desired bar size. Place the cut bars on a parchment-lined baking sheet and return to the fridge or freezer to keep them cold.
- Melt the chocolate: In a microwave-safe bowl, combine the chocolate chips and coconut oil (if using). Microwave in 30-second bursts, stirring between, until completely melted and smooth. Let cool for 1–2 minutes.
- Dip the bars: Using a fork, dip each cold brownie bar into the melted chocolate, letting the excess drip off. Place on the parchment-lined sheet. While the chocolate is still wet, sprinkle with your chosen toppings.
- Let the chocolate set: Refrigerate the dipped bars for 15–20 minutes, or leave at room temperature for about 1 hour, until the coating is firm. Serve chilled or at room temperature. Store leftovers in the refrigerator.
Notes
- Chilling the brownies thoroughly before cutting and dipping is essential for clean, neat bars. Don’t skip this step.
- For the easiest, glossiest coating, use chocolate melting wafers or candy melts. If using real chocolate, the coconut oil helps with smoothness and sheen.
- Customize with your favorite toppings: flaky salt, nuts, sprinkles, crushed candy canes, or a drizzle of contrasting chocolate.
- Store in an airtight container in the refrigerator for up to 2 weeks, or freeze for up to 3 months. The chocolate coating keeps the brownies incredibly moist and fresh.
These Chocolate Covered Brownie Bars are the ultimate indulgence for any chocolate lover. With their fudgy centers, snappy chocolate coating, and endless decorating possibilities, they’re guaranteed to become your new favorite treat to make and share. Whip up a batch, and discover why these little bars are so incredibly irresistible.