
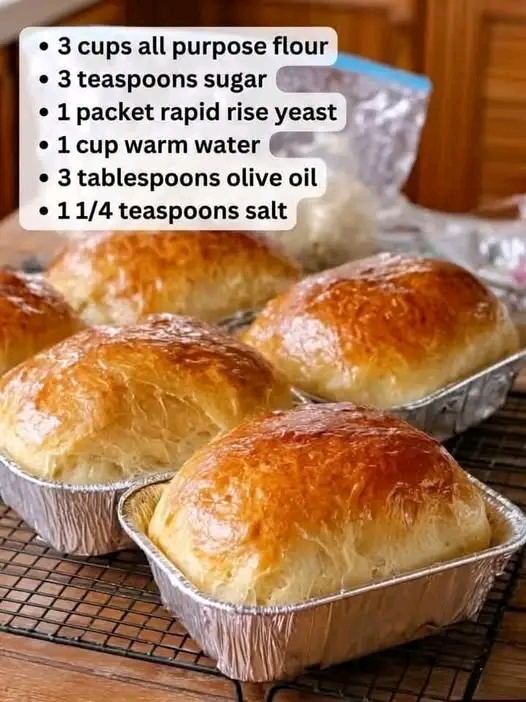
These Bread in a Bag Mini White Loaves are soft, fluffy, lightly chewy, and finished with a beautiful golden crust. The dough is mixed and kneaded right inside a large resealable bag, which makes the process simple, tidy, and beginner-friendly.
Using rapid-rise yeast keeps the method straightforward, while olive oil adds tenderness to the crumb. Dividing the dough into mini loaf pans creates individual breads that bake quickly and are perfect for serving with soup, sandwiches, breakfast, or freezing for later.
Why You Will Love This Recipe
This recipe is easy to prepare because most of the mixing happens inside the bag. There is less mess on the counter, fewer bowls to wash, and no stand mixer required.
The mini loaves also rise and bake faster than a full-size loaf, which makes them practical for small households, meal prep, gifting, or portioning into freezer-friendly servings.
A light egg wash gives the tops a shiny, bakery-style finish, while olive oil can be used instead for a simpler crust.
Ingredients
- 3 cups all-purpose flour
- 3 teaspoons granulated sugar
- 1 packet rapid-rise yeast, about 2 1/4 teaspoons
- 1 cup warm water, about 110°F to 115°F
- 3 tablespoons olive oil
- 1 1/4 teaspoons salt
For the Pans and Topping
- Extra olive oil or nonstick spray for greasing
- 1 egg yolk
- 1 teaspoon water
Ingredient Notes
Flour: All-purpose flour gives these loaves a soft crumb and light structure. Bread flour can also be used for a slightly chewier texture.
Rapid-rise yeast: Rapid-rise or instant yeast can be mixed directly with the flour. There is no need to dissolve it in water first.
Warm water: The water should feel warm but not hot. Water that is too hot can damage the yeast, while cold water will slow the rise.
Olive oil: Olive oil keeps the crumb soft and adds mild richness without making the bread heavy.
How to Make Bread in a Bag Mini Loaves
- Place the flour, sugar, rapid-rise yeast, and salt in a large 1-gallon resealable plastic bag.
- Seal the bag and shake it gently until the dry ingredients are evenly mixed.
- Open the bag and pour in the warm water and olive oil.
- Press out most of the excess air and seal the bag tightly.
- Use your hands to squeeze, press, and knead the dough through the bag for about three to five minutes.
- Continue until the dough comes together into a mostly smooth ball.
- Set the sealed bag in a warm place.
- Let the dough rise for 30 to 45 minutes, or until visibly puffed.
- Lightly grease four mini loaf pans with olive oil or nonstick spray.
- Carefully open the bag to release any built-up gas.
- Turn the dough onto a lightly floured surface.
- Divide it into four equal portions.
- Shape each portion into a small log.
- Place each log into a prepared mini loaf pan.
- Cover loosely with plastic wrap or a clean kitchen towel.
- Let the loaves rise for another 20 to 30 minutes, until puffy and near the tops of the pans.
- Preheat the oven to 375°F.
- Whisk the egg yolk with one teaspoon of water.
- Brush the tops of the risen loaves gently with the egg wash.
- Place the mini loaf pans on a baking sheet.
- Bake for 18 to 22 minutes, until deeply golden.
- Cool in the pans for about 10 minutes.
- Remove the loaves and transfer them to a wire rack to finish cooling.
How to Get the Softest Texture
Avoid adding too much extra flour when shaping the dough. The dough should be soft and slightly tacky rather than dry.
Let both rises finish properly. Dough that has not risen enough will produce a denser loaf, while properly proofed dough will feel light and puffy.
Do not overbake. Mini loaves cook quickly, so begin checking at the 18-minute mark.
If the tops become too dark before the centers are fully baked, tent the loaves loosely with foil for the final few minutes.
Water Temperature Matters
The ideal water temperature is roughly 110°F to 115°F. It should feel like warm bathwater rather than hot tap water.
If you do not have a thermometer, test it with your finger. It should feel comfortably warm without being hot enough to make you pull away.
Too-hot water can kill the yeast and prevent the dough from rising. Cooler water will still work, but the rising time may be longer.
How to Know When the Dough Has Risen Enough
During the first rise, the dough should visibly expand and feel airy through the bag.
During the second rise, the shaped loaves should look puffy and rise close to or just above the rim of the pans.
Rising time depends on room temperature. A warm kitchen speeds up the process, while a cooler room may require additional time.
How to Get a Glossy Golden Crust
An egg wash made from egg yolk and a small amount of water creates the shiniest, deepest golden finish.
Brush it on gently so you do not deflate the risen dough.
For an egg-free finish, brush the tops lightly with olive oil before baking. The crust will still brown nicely but will look less glossy.
For a softer crust after baking, brush the hot loaves with a small amount of melted butter or olive oil.
Easy Variations
For garlic herb bread, add one teaspoon garlic powder and one teaspoon Italian seasoning to the dry ingredients.
For cheesy mini loaves, fold shredded cheddar or Parmesan into the dough before the first rise.
For sesame bread, sprinkle sesame seeds over the egg wash before baking.
For a slightly sweeter loaf, increase the sugar to two tablespoons and add a teaspoon of vanilla or honey.
For savory sandwich loaves, add dried rosemary, thyme, or cracked black pepper.
What to Serve with Mini White Bread
These mini loaves are perfect with butter, jam, honey, peanut butter, or cream cheese for breakfast.
They also work well with tomato soup, chili, beef stew, chicken soup, pasta, or roasted meat.
Slice them lengthwise for small sandwiches, grilled cheese, garlic bread, or toast.
Make-Ahead Tips
The dough can complete the first rise in the refrigerator overnight if you prefer to bake the next day. Let it return closer to room temperature before shaping.
You can also bake the loaves one day ahead and store them tightly wrapped once completely cool.
For gifts or meal prep, wrap each loaf individually after cooling.
Storage and Freezing
Store completely cooled bread in an airtight bag or container at room temperature for up to three days.
For longer storage, wrap each mini loaf tightly and place it in a freezer-safe bag. Freeze for up to two months.
Thaw at room temperature or warm directly from frozen in a toaster oven or low oven.
For the freshest texture, warm thawed bread for a few minutes before serving.
Printable Recipe Card
Bread in a Bag Mini White Loaves
Prep Time: 15 minutes
Rising Time: 50 to 75 minutes
Bake Time: 18 to 22 minutes
Total Time: About 1 hour 30 minutes
Yield: 4 mini loaves
Category: Bread
Cooking Method: Oven
Quick Instructions
- Mix flour, sugar, yeast, and salt in a resealable bag.
- Add warm water and olive oil.
- Knead through the bag for three to five minutes.
- Let rise for 30 to 45 minutes.
- Divide into four portions and shape into mini loaves.
- Let rise again for 20 to 30 minutes.
- Brush with egg wash.
- Bake at 375°F for 18 to 22 minutes.
- Cool before removing from the pans.
Final Thoughts
These Bread in a Bag Mini White Loaves are a simple way to make soft homemade bread without a mixer or complicated technique. Mixing and kneading inside the bag keeps cleanup easy, while rapid-rise yeast and mini pans help the loaves rise and bake quickly.
Use warm water, let the dough rise fully, and check the loaves early in the oven for the softest crumb and a glossy golden crust.