
Let me tell you about the day I almost gave up on dessert.
I love sweets. I mean, really love them. Chocolate cake, brownies, cookies, you name it. But every time I looked in the mirror, I knew something had to change. The sugar was catching up with me. The cravings were out of control. And no matter how much I exercised, the scale would not budge.
Then a friend whispered something that changed everything.
“Try apples and cocoa. No sugar. Every day.”
I laughed. Apples and cocoa? That sounds like a sad snack, not a dessert. But she insisted. She showed me a photo of her before and after. And the recipe was so simple I almost did not believe it.
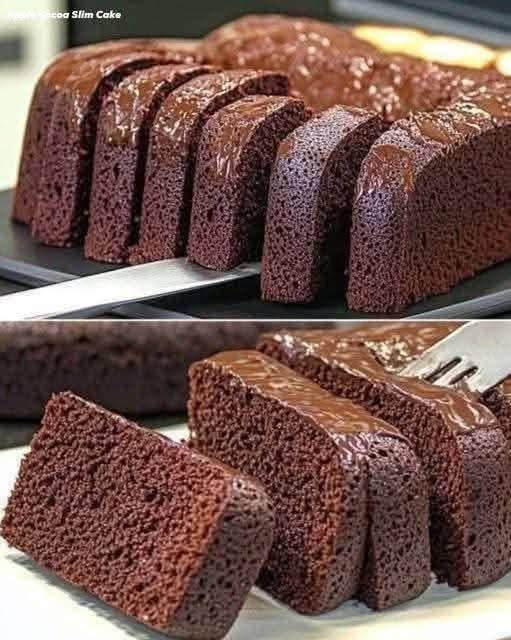
Four medium sweet apples. Four large eggs. Five tablespoons of unsweetened cocoa powder. One teaspoon of baking powder. Olive oil for the pan.
That is it.
No flour. No sugar. No butter. No guilt.
I tried it that same night. And honestly? I was shocked. It was moist, chocolatey, satisfying, and completely delicious. I started eating a slice every morning. Then every afternoon as a snack. And within two weeks, something incredible happened.
I stepped on the scale and saw a number I had not seen in over a year.
I was losing weight before my eyes.
Now I am sharing this recipe with you — not as a magic pill, but as a real, honest, whole‑food dessert that helped me break my sugar addiction and finally start dropping pounds.
In exchange, all I ask is a simple “Yum” in the comments. Because if this recipe helps even one person the way it helped me, that is more than enough.
Why This No‑Sugar Apple Cocoa Cake Works for Weight Loss
You have probably tried “healthy” desserts before. Most of them taste like cardboard or leave you craving sugar ten minutes later. This one is different.
Here is why this low‑calorie chocolate dessert actually supports weight loss.
- No Added Sugar
Sugar is the hidden enemy in most “healthy” snacks. It spikes your insulin, stores fat, and keeps you hungry. This recipe uses only the natural sweetness of ripe apples. No white sugar. No brown sugar. No honey. No maple syrup. No artificial sweeteners.
- High in Fiber
Apples are packed with soluble fiber, especially pectin. Fiber keeps you full for hours, stabilizes blood sugar, and feeds healthy gut bacteria. One serving of this cake gives you a serious fiber boost.
- Protein from Eggs
Four large eggs provide about 24 grams of high‑quality protein. Protein is essential for weight loss because it reduces cravings, boosts metabolism, and helps preserve muscle while you lose fat.
- Rich in Antioxidants
Unsweetened cocoa powder is one of the most antioxidant‑dense foods on the planet. It fights inflammation, supports heart health, and can even help reduce stress eating.
- Naturally Low in Calories
Because there is no flour, no oil (except a tiny amount for greasing), and no sugar, each slice is surprisingly low in calories. You can enjoy it every day without derailing your progress.
- Satisfies Chocolate Cravings
Most weight loss diets fail because they eliminate everything you love. This recipe gives you a deep, rich chocolate flavor that feels like a treat — but it is actually good for you.
The Science: How Apples and Cocoa Work Together for Fat Loss
Let us get a little deeper into why this combination is so powerful.
Apples and Blood Sugar Control
The natural sugars in apples come packaged with fiber and polyphenols. Unlike refined sugar, which rushes into your bloodstream and causes a crash, apple sugar is released slowly. That means no energy spikes and no desperate cravings an hour later.
Cocoa and Appetite Suppression
Studies have shown that dark chocolate and cocoa can reduce appetite and decrease cravings for sweet, salty, and fatty foods. The bitter notes in unsweetened cocoa actually signal satisfaction to your brain with less sugar.
The Satiety Factor
When you combine fiber (apples), protein (eggs), and healthy polyphenols (cocoa), you get a dessert that actually fills you up. Many people report that one slice of this cake keeps them full for 3–4 hours — almost like a meal.
The Complete Recipe: No Sugar, No Flour, No Guilt
Here is the exact recipe I use every single day. It makes one 8‑inch or 9‑inch round cake (or a loaf pan). You can double it for a larger family.
Ingredients
· 4 medium sweet apples (I use Fuji, Gala, or Honeycrisp)
· 4 large eggs (room temperature is best)
· 5 tablespoons unsweetened cocoa powder (not hot cocoa mix)
· 1 teaspoon baking powder
· Olive oil (just for greasing the pan)
Optional Add‑Ins (Still No Sugar)
· 1 teaspoon vanilla extract (adds warmth)
· ¼ teaspoon cinnamon (enhances apple flavor)
· A pinch of salt (brings out chocolate notes)
· 2 tablespoons chopped walnuts or almonds (adds crunch and healthy fats)
Tools You Will Need
· Blender or food processor (a regular blender works fine)
· 8‑inch or 9‑inch cake pan or loaf pan
· Parchment paper (optional but helpful)
· Spatula
Step‑by‑Step Instructions (So Easy, Anyone Can Do It)
Step 1 – Preheat and Prepare
Preheat your oven to 350°F (175°C). Lightly grease your cake pan or loaf pan with olive oil. You can also line the bottom with parchment paper for easy removal.
Step 2 – Wash and Core the Apples
Wash the apples well. You do not need to peel them — the skin adds fiber and nutrients. Core each apple and cut them into chunks. Remove the seeds and any tough stem pieces.
Step 3 – Blend the Wet Ingredients
Place the apple chunks into your blender or food processor. Crack the four eggs directly on top. Blend on medium speed until the mixture is completely smooth and frothy. This takes about 30–60 seconds.
You are looking for a liquid, almost applesauce‑like consistency with no visible apple chunks.
Step 4 – Add the Dry Ingredients
Add the unsweetened cocoa powder and baking powder to the blender. If you are using vanilla, cinnamon, or salt, add them now. Blend again for 15–20 seconds until everything is fully combined. The mixture will turn a beautiful deep chocolate brown.
Scrape down the sides with a spatula if needed and blend once more.
Step 5 – Pour into the Pan
Pour the batter into your prepared pan. It will be thinner than traditional cake batter — that is normal. Tilt the pan to spread it evenly. Tap the pan gently on the counter to release any air bubbles.
Step 6 – Bake
Bake at 350°F (175°C) for 30–35 minutes. The cake is done when a toothpick inserted in the center comes out clean or with just a few moist crumbs. The edges will pull away slightly from the pan, and the top will spring back when lightly touched.
Step 7 – Cool
Let the cake cool in the pan for 10 minutes. Then run a knife around the edge and turn it out onto a wire rack to cool completely. If you used parchment paper, simply lift the cake out.
Step 8 – Slice and Enjoy
Cut into 8 or 10 slices. Enjoy warm or at room temperature. Store leftovers in an airtight container in the refrigerator for up to 5 days.
Want the full truth and the practical next steps?
Page 2 continues with the real explanation, the key details many readers skip, and the simple takeaways that make this guide more useful.