
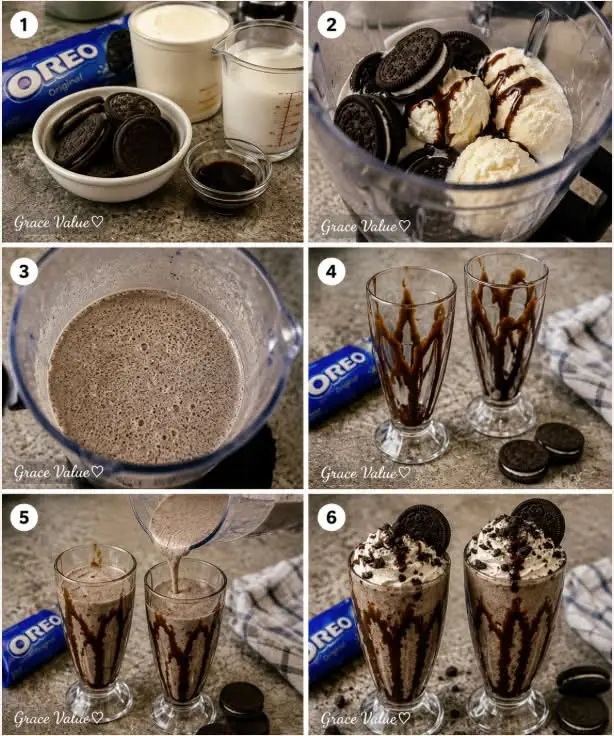
The classic diner-style milkshake made with just four ingredients – rich vanilla ice cream, crunchy Oreo cookies, cold milk, and a drizzle of chocolate syrup – for a dessert that tastes like pure nostalgia.
There are few desserts that evoke the same sense of pure, unadulterated joy as a thick, creamy Oreo milkshake. It’s the kind of treat that transports you back to childhood – a diner counter, a tall frosty glass, a spoonful of cookie chunks suspended in velvety vanilla ice cream, and that unmistakable Oreo flavor that’s equal parts chocolate, cream, and nostalgia. This homemade Oreo milkshake recipe captures all of that magic in a few simple steps, using only four basic ingredients that you probably already have in your kitchen.
What makes a great Oreo milkshake? It’s all about balance – the right ratio of ice cream to milk to achieve that spoonable, sippable consistency; the perfect amount of Oreo cookies to deliver both flavor and texture; and a touch of chocolate syrup for an extra layer of fudgy goodness. In this comprehensive guide, I’ll walk you through every detail, from choosing the best ice cream to blending techniques that avoid a watery mess, plus pro tips, creative variations, nutritional insights, and answers to all your burning questions. Whether you’re making this for a hot summer day, a birthday party, or a late‑night craving, this recipe is your ticket to milkshake perfection.
✨ Why this Oreo milkshake is the best you’ll ever make:
• Only 4 ingredients – simple, accessible, and no fancy equipment required.
• Thick, creamy, and indulgent – the perfect texture every time.
• Customizable – add your favorite mix‑ins, change the ice cream, or make it dairy‑free.
• Ready in 5 minutes – perfect for instant gratification.
• Kid‑friendly and crowd‑pleasing – a guaranteed hit with all ages.
📋 The Recipe – Homemade Oreo Milkshake
Prep: 5 min · Cook: 0 min · Total: 5 min
Servings: 1–2 · Diet: Vegetarian
🥣 Ingredients
- 8 Oreo cookies (plus extra for garnish)
- 2 cups (about 300g) vanilla ice cream – high‑quality, full‑fat for best results
- 1 cup (240ml) cold whole milk – use whole milk for creaminess, or substitute with oat/almond milk
- 1 tablespoon chocolate syrup (optional) – adds a fudgy depth
👩🍳 Step‑by‑Step Instructions
- Chill your glass (optional but recommended): Place a tall glass in the freezer for 5–10 minutes to keep your milkshake cold longer.
- Crush the Oreos: Place 8 Oreo cookies in a blender or food processor and pulse until they are broken into coarse crumbs. For a chunkier texture, pulse less; for a smooth shake, blend until fine.
- Blend: Add the vanilla ice cream, cold milk, and chocolate syrup (if using) to the blender. Blend on low speed until the mixture is smooth and well combined. Scrape down the sides as needed.
- Adjust consistency: If the shake is too thick, add a splash more milk; if too thin, add a scoop of ice cream and blend again.
- Serve: Pour into the chilled glass. Top with whipped cream, extra crushed Oreos, and a drizzle of chocolate syrup. Insert a straw and enjoy immediately.
💡 Pro tip: For an extra‑thick milkshake, use slightly softened ice cream (microwave for 10–15 seconds) and reduce the milk to ¾ cup. Blend until just combined.
~420Calories (per serving)
8gProtein
20gFat
52gCarbs
Ingredient Breakdown – Why Each One Matters
Every component of this milkshake serves a purpose. Understanding them will help you make adjustments and substitutions with confidence.
Oreo Cookies – The Star of the Show
Oreo cookies are iconic for a reason – their crisp chocolate wafers and sweet, creamy filling create a flavor and texture that’s instantly recognizable. When blended into a milkshake, they break down into fine crumbs that infuse the ice cream with their characteristic cocoa flavor, while leaving tiny chunks for a satisfying bite. For the best results, use regular Oreos (not Double Stuf, as they can make the shake overly sweet) and crush them to your desired consistency. If you prefer a smoother shake, blend until no large pieces remain; for a more textured experience, pulse only a few times.
Can you use other chocolate sandwich cookies? Yes – but Oreo’s unique flavor is hard to beat. If you use a generic brand, you may need to adjust the sweetness.
Vanilla Ice Cream – The Creamy Base
High‑quality vanilla ice cream is the foundation of a great milkshake. It provides richness, sweetness, and a smooth, creamy texture. Choose a full‑fat ice cream (with at least 14% butterfat) for the most indulgent result – lower‑fat ice creams contain more air and water, which can make the shake thin and icy. Premium brands like Häagen‑Dazs or Ben & Jerry’s work wonderfully. If you’re feeling adventurous, you can use coffee, chocolate, or strawberry ice cream for a different twist – just keep in mind that the Oreo flavor will be slightly different.
For a dairy‑free version, use a high‑quality non‑dairy vanilla ice cream (coconut, oat, or almond‑based). The texture may be slightly softer, but the flavor will still be delicious.
Whole Milk – The Consistency Controller
Milk is the liquid that brings the shake together. Using whole milk (or even half‑and‑half) yields a thicker, creamier shake, while lower‑fat milks will result in a thinner, less rich drink. The amount of milk you use directly affects the thickness – start with ¾ cup for a spoonable shake, and add more if you prefer a sip‑able consistency. If you’re using a high‑powered blender, you may need slightly less liquid because the ice cream will break down more effectively.
Chocolate Syrup – The Optional Elevator
Though optional, chocolate syrup adds an extra layer of fudgy, chocolatey depth that complements the Oreo cookies beautifully. It also helps enhance the color of the shake, giving it that rich, dark hue. You can use store‑bought syrup (like Hershey’s) or homemade chocolate sauce. If you skip it, the shake will still be delicious, but a small drizzle makes a noticeable difference.
Perfecting the Texture – Thick vs. Thin
The beauty of a homemade milkshake is that you control the consistency. Here’s how to adjust it to your preference:
- For a thick, spoonable shake: Use ¾ cup of milk and slightly softened ice cream (let it sit out for 5–10 minutes). Blend just until combined – over‑blending can thin it out.
- For a drinkable, sip‑able shake: Use 1 cup or more of milk, and blend for a few extra seconds. This is perfect for straws.
- For a malted version: Add 1–2 tablespoons of malted milk powder for that classic diner flavor.
- For a lower‑calorie version: Use low‑fat milk and reduce the number of Oreos (or use Oreo thins).
Pro Tips for the Ultimate Oreo Milkshake
🧊 Chill your glass – A frosty glass keeps your shake cold and enhances the experience. Pop it in the freezer while you prep.
🍪 Save some Oreos for garnish – Crush an extra cookie or two and sprinkle on top for a professional look and extra crunch.
⚡ Blend on low – High speed can over‑blend and melt the ice cream. Use the lowest setting that gets the job done.
🥛 Adjust milk gradually – Start with less milk and add more as needed. It’s easier to thin than to thicken.
Endless Variations – Make This Milkshake Your Signature
Once you’ve mastered the classic, you can experiment with these creative twists:
- Peanut Butter Oreo Shake: Add 2 tablespoons of creamy peanut butter to the blender – the salty, nutty flavor pairs beautifully with chocolate.
- Mint Oreo Shake: Add ¼ teaspoon of peppermint extract and a few drops of green food coloring (optional) for a refreshing, minty version.
- Banana Oreo Shake: Blend in ½ a ripe banana for natural sweetness and a creamier texture.
- Salted Caramel Oreo Shake: Drizzle 2 tablespoons of caramel sauce and a pinch of sea salt into the blend.
- Chocolate Oreo Shake: Use chocolate ice cream instead of vanilla and add an extra tablespoon of chocolate syrup.
- Vegan Oreo Shake: Use dairy‑free vanilla ice cream, oat milk, and a vegan chocolate syrup. Oreos are already vegan! (Check the label – original Oreos are dairy‑free.)
- Alcoholic twist: For adults, add 1–2 ounces of Kahlúa, Baileys, or rum for a boozy milkshake.
- Cookie Butter Shake: Add 2 tablespoons of Biscoff or cookie butter spread – it adds a spiced, caramelized depth.
Each variation uses the same base method – just add the extra ingredients and blend. The possibilities are endless, so don’t be afraid to get creative.
Serving Suggestions – Elevate Your Presentation
While a simple glass is perfectly fine, a few extra touches can turn this milkshake into a showstopper:
- Whipped cream swirl: Top with a generous dollop of homemade or store‑bought whipped cream.
- Chocolate drizzle: Drizzle chocolate syrup around the inside of the glass before pouring for a marbled effect.
- Crushed Oreo rim: Dip the rim of the glass in chocolate syrup then into crushed Oreos for a cookie‑crusted edge.
- Cherry on top: A classic maraschino cherry adds a pop of color and a sweet finish.
- Straws and spoons: Serve with a wide straw and a long spoon – the best way to tackle thick shakes.
For a party, set up a milkshake bar with different toppings and let guests customize their own.
Storage and Make‑Ahead Tips
Milkshakes are best enjoyed immediately, but you can prepare some components ahead of time:
- Crush Oreos in advance: Keep crushed Oreos in an airtight container in the fridge for up to a week.
- Freeze the shake: If you have leftovers (unlikely!), you can freeze them in an ice‑cube tray and blend again when ready.
- No leftovers? This recipe makes a single generous serving or two smaller portions – scale up as needed.
For meal prep, you can portion out the dry ingredients (Oreos) and keep them with a note on how much ice cream and milk to add. However, the ice cream should be added fresh for the best texture.
Want the full truth and the practical next steps?
Page 2 continues with the real explanation, the key details many readers skip, and the simple takeaways that make this guide more useful.