
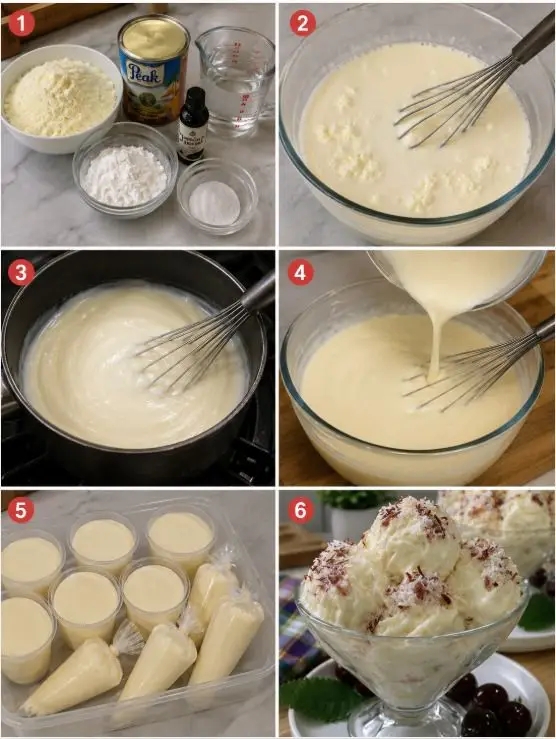
This ultra‑creamy, luxuriously smooth ice cream is made with just six simple ingredients – no ice cream maker required. It’s the perfect base for endless flavour variations and a guaranteed crowd‑pleaser.
There’s something truly magical about homemade ice cream. The rich, velvety texture that melts on your tongue, the pure, clean flavour that comes from fresh ingredients, and the satisfaction of creating a frozen treat from scratch – it’s a culinary experience that store‑bought tubs simply can’t match. This Milky Ice Cream recipe is the epitome of that magic. With just a handful of pantry staples – whole milk, heavy whipping cream, sweetened condensed milk, sugar, and vanilla – you can whip up a dessert that’s incredibly smooth, wonderfully creamy, and bursting with pure vanilla flavour.
What sets this recipe apart is its simplicity and versatility. It’s a no‑churn ice cream, meaning you don’t need an expensive ice cream maker or any special equipment – just a hand mixer or stand mixer and a freezer. The combination of heavy cream, sweetened condensed milk, and a touch of granulated sugar creates a perfectly balanced sweetness and a luxuriously creamy texture that rivals any premium store‑bought brand. Plus, this recipe serves as a blank canvas for endless variations – stir in chocolate chips, swirl in caramel, or fold in fresh berries to create your own signature flavour.
In this comprehensive guide, we’ll walk you through the exact method for achieving the creamiest no‑churn ice cream, share pro tips to avoid icy crystals, explore flavour variations, and answer all your burning questions. Whether you’re a seasoned home cook or a beginner in the kitchen, this recipe is foolproof and guaranteed to impress. Let’s dive in!
✨ Why this milky ice cream is the best you’ll ever make:
• No ice cream maker needed – just a mixer and a freezer.
• Incredibly creamy – thanks to the perfect balance of fats and sugars.
• Simple ingredients – all pantry staples, no artificial additives.
• Endlessly customisable – add your favourite mix‑ins or flavourings.
• Better than store‑bought – fresher, cleaner, and more satisfying.
📋 The Recipe – Milky Ice Cream
Prep: 15 min · Freeze: 6+ hrs · Total: ~6.5 hrs
Servings: 8–10 · Diet: Vegetarian
🥣 Ingredients
- 2 cups whole milk
- 1 cup heavy whipping cream
- ½ cup sweetened condensed milk
- ¼ cup granulated sugar
- 1 teaspoon vanilla extract
👩🍳 Step‑by‑Step Instructions
- Chill the bowl and beaters: Place your mixing bowl and beaters in the freezer for 10–15 minutes. This helps the cream whip faster and stay cold.
- Combine the wet ingredients: In a large bowl, whisk together the whole milk, sweetened condensed milk, granulated sugar, and vanilla extract until the sugar is completely dissolved.
- Whip the cream: In the chilled bowl, whip the heavy cream using an electric hand mixer or stand mixer on medium‑high speed until stiff peaks form – about 3–4 minutes. Be careful not to over‑whip, or you’ll end up with butter.
- Fold together: Gently fold the whipped cream into the milk mixture in three additions, using a rubber spatula. Fold until just combined – do not overmix, or you’ll deflate the cream.
- Pour and freeze: Pour the mixture into a freezer‑safe container (a loaf pan works well). Cover with plastic wrap or a lid. Freeze for at least 6 hours, or preferably overnight, until firm.
- Serve: Let the ice cream sit at room temperature for 5–10 minutes before scooping for the perfect texture.
💡 Pro tip: For an ultra‑smooth texture, stir the ice cream every 30 minutes for the first 2 hours of freezing to break up any ice crystals. This is the secret to a professional‑grade consistency.
~290Calories
5gProtein
19gFat
26gCarbs
Ingredient Breakdown – Why Each Component Matters
Every ingredient in this recipe plays a crucial role in achieving that perfect creamy texture and balanced flavour. Understanding them will help you make substitutions confidently and achieve the best possible results.
Whole Milk – The Hydrating Base
Whole milk provides the liquid base for the ice cream. Its fat content (around 3.25%) contributes to the overall creaminess and helps prevent ice crystals from forming. It also carries the flavours of vanilla and sugar, ensuring every bite is delicious. For a richer ice cream, you can substitute half‑and‑half, but whole milk strikes the perfect balance between richness and lightness.
Heavy Whipping Cream – The Texture Architect
Heavy whipping cream is the key to that luxurious, airy texture. With a fat content of at least 36%, it whips into stiff peaks that trap air, giving the ice cream its light, scoopable consistency. The fat also coats the ice crystals, preventing them from growing large and gritty. This is what transforms a simple frozen milk mixture into a smooth, creamy dessert.
Sweetened Condensed Milk – The Sweetness and Body
Sweetened condensed milk is a powerhouse ingredient. It adds concentrated sweetness and a thick, syrupy body that helps bind the mixture and prevent ice crystal formation. It also adds a subtle caramelised note that enhances the overall flavour. Because it’s already sweet, you can reduce the granulated sugar if you prefer a less sweet ice cream.
Granulated Sugar – The Sweetness Adjuster
While the condensed milk provides sweetness, a little extra granulated sugar helps balance the flavour and improve the texture. Sugar lowers the freezing point, ensuring the ice cream stays soft and scoopable even after hours in the freezer. It also helps incorporate air during whipping, contributing to a lighter mouthfeel.
Vanilla Extract – The Flavour Backbone
Vanilla is the soul of this ice cream. It adds a warm, aromatic depth that enhances the dairy flavours. Use pure vanilla extract for the best results – imitation vanilla can leave a bitter aftertaste. For an even more intense flavour, you can scrape the seeds from a vanilla bean and infuse the milk mixture.
The Science of No‑Churn Ice Cream – How It Works
Traditional ice cream relies on constant churning to incorporate air and break up ice crystals as the mixture freezes. No‑churn ice cream achieves the same effect through a clever combination of ingredients. The high fat content of the heavy cream and the sugars from the condensed milk and granulated sugar lower the freezing point, resulting in a smoother texture. The air incorporated during whipping creates a stable foam that stays suspended in the mixture, giving it that light, scoopable quality. By freezing the mixture slowly (or stirring it periodically), you prevent large ice crystals from forming. The result is a creaminess that rivals any churned ice cream.
Pro Tips for the Creamiest, Dreamiest Ice Cream
❄️ Chill everything – Cold ingredients whip better and incorporate more air. Chill your bowl, beaters, and even the milk mixture before whipping.
🥄 Don’t over‑whip – Whip the cream until stiff peaks form, but stop as soon as they do. Over‑whipping will turn the cream into butter and ruin the texture.
🔄 Fold, don’t stir – Use a gentle folding motion when combining the whipped cream with the milk mixture. This preserves the air you’ve whipped in.
🧊 Stir during freezing – For the smoothest result, stir the ice cream every 30 minutes for the first 2 hours of freezing to break up any ice crystals.
Endless Variations – Customise Your Ice Cream
This milky ice cream base is a blank canvas for your creativity. Here are some delicious ways to make it your own:
- Chocolate Chip: Fold in ½ cup of mini chocolate chips just before freezing.
- Strawberry: Puree 1 cup of fresh strawberries and fold into the mixture before freezing.
- Caramel Swirl: Swirl in ½ cup of caramel sauce after pouring the mixture into the container.
- Mint Chocolate Chip: Add ¼ teaspoon of peppermint extract and fold in chocolate chips.
- Cookie Dough: Stir in chunks of egg‑free cookie dough and extra chocolate chips.
- Coffee: Dissolve 1 tablespoon of instant coffee in 2 tablespoons of warm milk and add to the mixture.
- Nutella: Warm ½ cup of Nutella and swirl it into the ice cream base.
- Lemon: Add the zest of one lemon and 2 tablespoons of lemon juice for a refreshing, tangy twist.
How to Serve Your Milky Ice Cream
This ice cream is delicious on its own, but you can elevate it with these serving ideas:
- Sundae style: Top with chocolate sauce, whipped cream, sprinkles, and a cherry.
- With fruit: Serve alongside fresh berries, sliced peaches, or grilled pineapple.
- In cones: Scoop into waffle cones for a classic treat.
- As a float: Add a scoop to a glass of root beer or cola for an old‑fashioned float.
- With brownies: Serve a scoop over warm brownies for a decadent dessert.
Storage and Shelf Life – Keep It Fresh
Store your ice cream in an airtight container in the freezer for up to 2 weeks for the best texture. After that, it may develop ice crystals. To prevent ice crystals, press a piece of parchment paper directly onto the surface of the ice cream before sealing the container. When you’re ready to serve, let it sit at room temperature for 5–10 minutes to soften slightly for easier scooping. Avoid refreezing melted ice cream, as it can become icy and grainy.
Nutritional Highlights – A Treat That Nourishes
While ice cream is an indulgence, this homemade version offers some nutritional benefits compared to commercial brands:
- No artificial additives – free from stabilizers, emulsifiers, and artificial flavours.
- High‑quality ingredients – use organic dairy and pure vanilla for added nutrients.
- Calcium and protein – from milk and cream, supporting bone health and muscle function.
- Customizable sugar levels – adjust the sweetness to suit your preferences.
Each serving provides a good amount of energy, making it a satisfying treat that can be enjoyed in moderation as part of a balanced diet.
Want the full truth and the practical next steps?
Page 2 continues with the real explanation, the key details many readers skip, and the simple takeaways that make this guide more useful.