
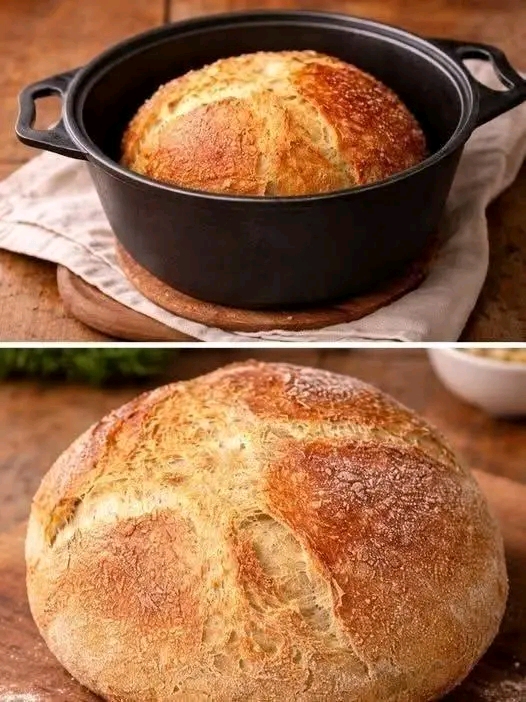
If you’ve ever dreamed of pulling a bakery-quality loaf of bread from your own oven—with a shatteringly crisp crust and a soft, airy crumb—this Crusty No-Knead Dutch Oven Bread is about to make that dream a reality. This is the ultimate easy bread recipe for beginners and seasoned bakers alike. With just four simple ingredients and zero kneading, you can create a beautiful artisan loaf that rivals anything from a specialty bakery. The secret? A long, slow rise and a preheated Dutch oven that traps steam, creating that signature crusty exterior and chewy interior. Perfect for sandwiches, toast, dipping in soups, or simply slathered with butter. Budget friendly, foolproof, and absolutely delicious.
Why You’ll Love This Recipe
· No Kneading Required: Just stir the ingredients together and let time do the work. Perfect for beginners and busy bakers.
· Incredible Crust and Crumb: The Dutch oven method creates a professional-style crust that’s crispy and golden, while the inside stays soft and chewy.
· Only 4 Simple Ingredients: Flour, salt, yeast, and water. That’s it. No fancy additives or special equipment.
· Hands-Off Rise: The 12–18 hour rise is mostly unattended, making this the perfect overnight recipe.
· Budget Friendly: Costs pennies per loaf compared to store-bought artisan bread.
· Versatile: Enjoy fresh, use for sandwiches, toast, croutons, or breadcrumbs.
· Crowd Pleaser: Fresh homemade bread always impresses. Watch it disappear at the dinner table.
· Freezer Friendly: Slice and freeze for later. Toast straight from frozen.
Ingredients You’ll Need
· 3 cups all-purpose flour (or bread flour for a chewier texture)
· 1 ½ teaspoons salt
· ½ teaspoon active dry yeast (or instant yeast)
· 1 ½ cups warm water (about 110°F)
· Extra flour, for dusting
· Cornmeal or parchment paper, for shaping
Optional add-ins: 1 tablespoon honey, 1 tablespoon olive oil, 1 teaspoon dried rosemary or thyme, ¼ cup grated Parmesan cheese, ¼ cup chopped olives, ¼ cup dried cranberries and walnuts.
Note: For a whole wheat version, substitute 1 cup of all-purpose flour with whole wheat flour. You may need to add 1–2 tablespoons more water. Bread flour yields a slightly chewier, more artisan texture.
Step-by-Step Instructions
- Mix the Dough: In a large bowl, whisk together the flour, salt, and yeast until evenly combined. Pour in the warm water and stir with a wooden spoon until a shaggy, sticky dough forms. The dough should be moist but not soupy.
- First Rise (12–18 Hours): Cover the bowl tightly with plastic wrap or a lid and let it rise at room temperature for 12–18 hours, until the surface is bubbly and the dough has more than doubled in size. This long, slow rise develops incredible flavor.
- Shape the Dough: Turn the dough out onto a well-floured surface. Fold it over on itself 3–4 times, then shape it into a round ball by tucking the edges underneath. Place the dough ball on a piece of parchment paper. Cover loosely with a clean kitchen towel and let it rise for 1–2 hours, until slightly puffy.
- Preheat the Dutch Oven: About 30 minutes before baking, place a Dutch oven (with its lid) into the oven and preheat to 450°F (230°C). A hot Dutch oven is essential for creating steam and a crispy crust.
- Bake: Carefully remove the hot Dutch oven from the oven. Lift the dough using the parchment paper and place it into the pot. Score the top of the loaf with a sharp knife or razor in a cross pattern. Cover with the lid and bake for 30 minutes.
- Uncover and Finish: Remove the lid and continue baking for 15–20 minutes, until the crust is deeply golden brown and the loaf sounds hollow when tapped.
- Cool: Carefully lift the bread out using the parchment paper and transfer it to a wire rack. Cool for at least 1 hour before slicing. This allows the interior to set properly.
Tips for the Best Crusty No-Knead Bread
· Use a Kitchen Scale: For the most accurate measurements, weigh your flour (about 360g for 3 cups). Too much flour makes a dense loaf.
· Don’t Skip the Long Rise: The 12–18 hour rise is what develops the flavor and texture. Plan ahead—this is an overnight recipe.
· Preheat the Dutch Oven Thoroughly: A hot pot creates the steam that gives the bread its signature crust. Let it preheat for at least 30 minutes.
· Score with Confidence: A sharp knife or razor blade makes a clean cut that allows the bread to expand properly. Don’t be timid.
· Cool Completely Before Slicing: Cutting into hot bread can make it gummy. Wait at least 1 hour for the best texture.
· Use Parchment Paper: It makes transferring the dough into the hot pot easy and prevents sticking.
Variations & Substitutions
· Whole Wheat Version: Replace 1 cup of all-purpose flour with whole wheat flour. Add 1–2 tablespoons extra water.
· Herb and Garlic Bread: Add 1 teaspoon dried rosemary, 1 teaspoon dried thyme, and 2 cloves minced garlic to the dry ingredients.
· Cheesy Bread: Fold in ½ cup shredded cheddar or Parmesan cheese before shaping.
· Olive and Rosemary Bread: Add ¼ cup chopped Kalamata olives and 1 tablespoon fresh rosemary.
· Cranberry Walnut Bread: Add ¼ cup dried cranberries and ¼ cup chopped walnuts.
· Seeded Bread: Add 2 tablespoons sunflower, pumpkin, or sesame seeds to the dough.
Frequently Asked Questions
Can I use instant yeast instead of active dry yeast?
Yes! Instant yeast works perfectly. You can mix it directly with the dry ingredients without proofing. The rise time may be slightly faster.
Do I really need a Dutch oven?
A Dutch oven is highly recommended for the best crust. However, you can also use a heavy oven-safe pot with a lid, or even a cast-iron skillet covered with foil. The key is trapping steam.
Can I make this bread without a long rise?
The long rise is essential for flavor and texture. If you’re short on time, you can let it rise for 4–6 hours, but the flavor won’t be as developed.
How do I store homemade bread?
Store at room temperature in a paper bag or bread box for up to 2 days. For longer storage, slice and freeze for up to 3 months. Reheat in the oven or toaster.
Why is my bread dense?
Dense bread usually means too much flour or not enough rising time. Measure flour accurately (spoon and level) and allow the full 12–18 hour rise.
Can I add seeds or nuts to the dough?
Absolutely! Add up to ½ cup of seeds, nuts, or dried fruit to the dough before the first rise or during shaping.
Can I bake this on a pizza stone instead of a Dutch oven?
Yes, but you’ll need to create steam in the oven. Place a pan of boiling water on the bottom rack while baking. The crust won’t be quite as crispy.
Recipe Card: Crusty No-Knead Dutch Oven Bread
· Prep Time: 15 minutes
· Rise Time: 12–18 hours + 1–2 hours
· Cook Time: 45–50 minutes
· Total Time: About 14–16 hours (including rise time)
· Servings: 1 loaf (8–10 slices)
· Category: Bread, Baking, Homemade
· Cuisine: American, Artisan
Ingredients:
· 3 cups all-purpose flour (or bread flour)
· 1 ½ teaspoons salt
· ½ teaspoon active dry yeast
· 1 ½ cups warm water (110°F)
· Extra flour for dusting
Instructions:
- Whisk flour, salt, and yeast. Add water and stir until a shaggy dough forms.
- Cover and let rise at room temperature 12–18 hours until bubbly and doubled.
- Turn onto floured surface. Fold 3–4 times and shape into a ball. Place on parchment paper.
- Cover and let rise 1–2 hours until puffy.
- Preheat Dutch oven (with lid) at 450°F for 30 minutes.
- Transfer dough to hot pot. Score top with a cross.
- Cover and bake 30 minutes. Uncover and bake 15–20 minutes until deeply golden.
- Cool on wire rack at least 1 hour before slicing.
Nutrition (per slice, approximate):
· Calories: 150
· Protein: 4g
· Carbohydrates: 30g
· Fat: 1g
· Fiber: 1g
· Sugar: 0g
Nutrition will vary based on specific ingredients and portion size.
Final Thoughts
This Crusty No-Knead Dutch Oven Bread is proof that you don’t need a bakery to enjoy incredible artisan bread at home. With just four ingredients, a long overnight rise, and a hot Dutch oven, you can create a loaf with a crackling crust and a soft, airy interior that will impress everyone at your table. It’s the perfect recipe for beginners and a satisfying staple for experienced bakers. Make it once and you’ll never go back to store-bought bread again.
Have you made this no-knead bread? Share your favorite add-ins and baking tips in the comments below!