
There are certain recipes that come with a reputation. They are not just desserts — they are legends. Passed down through generations, whispered about at potlucks, and always, always the first thing to disappear. Catch a Husband Cake is exactly that kind of recipe.
With a name that playful, you might expect something complicated or fussy. But the truth is much simpler. This cake is creamy, soft, and made from just a handful of everyday ingredients. No fancy techniques. No hard‑to‑find items. Just sweetened condensed milk, whole milk, eggs, flour, and butter.
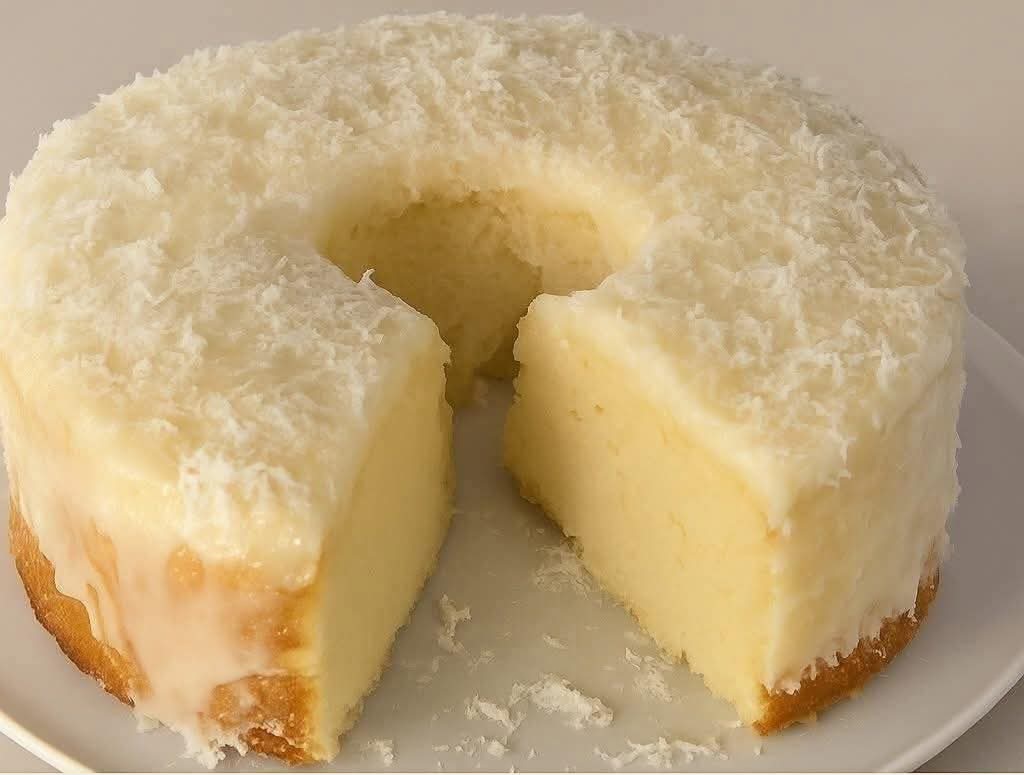
The result? A dense, velvety, custard‑like cake that tastes like a cross between flan, a milk bar, and the most comforting dessert you have ever made. It is not too sweet, not too heavy, and absolutely addictive.
In this guide, you will learn the complete recipe, the history behind the name, pro tips for perfect texture, delicious variations, and why this cake has earned its reputation as a showstopper.
Why Is It Called “Catch a Husband Cake”?
The name is part folklore, part marketing genius. The idea is simple: make this cake, bring it to a gathering, and the combination of creamy texture, golden crust, and irresistible flavor will leave such an impression that someone will want to marry you on the spot.
Of course, that is an exaggeration — but only slightly. This cake has a way of making people close their eyes and sigh with pleasure. It is the kind of dessert that gets remembered. Whether you are baking for a date, a family dinner, or just yourself, the name adds a layer of charm and conversation.
Historically, similar “husband‑catching” recipes appear in many cultures — from the American “Marry Me Chicken” to various European “capture his heart” cakes. They all share one thing: they are simple, delicious, and universally loved.
Why This Cake Works So Well
The magic of Catch a Husband Cake lies in its texture. Unlike fluffy layer cakes or crumbly coffee cakes, this one is dense, moist, and almost pudding‑like in the center. The top forms a beautiful golden crust, while the inside stays soft and creamy.
Here is what makes it special:
· Only 6 ingredients – No long shopping lists.
· One bowl – Minimal cleanup.
· No electric mixer required – A whisk or fork works fine.
· Bakes into its own caramel – The sweetened condensed milk creates a naturally sweet, slightly caramelized bottom.
· Custard‑like interior – Soft, creamy, and satisfying.
· Keeps well – Tastes even better the next day.
It is the kind of cake that works for breakfast with coffee, dessert after dinner, or an afternoon snack with tea.
The Complete Catch a Husband Cake Recipe
This recipe makes one 9‑inch round or square cake (about 8–10 slices). It is naturally gluten‑free if you use a gluten‑free flour blend (see variations).
Ingredients
· 1 can (14 oz / 396g) sweetened condensed milk
· 1 can whole milk (use the empty condensed milk can to measure — about 1½ cups / 355ml)
· 3 large eggs (room temperature)
· 1 cup (120g) all‑purpose flour
· 2 tablespoons (28g) unsalted butter, melted
· Optional: 1 teaspoon vanilla extract or ½ teaspoon ground cinnamon
Equipment
· 9‑inch round or square baking dish (or 8×8 inch square)
· Mixing bowl and whisk
· Measuring cups (or just use the condensed milk can)
· Oven
Step‑by‑Step Instructions
Step 1 – Preheat and Prepare
Preheat your oven to 350°F (175°C). Generously grease your baking dish with butter or cooking spray. If you want easy removal, line the bottom with parchment paper, but greasing alone usually works because the cake releases well.
Step 2 – Combine the Wet Ingredients
In a large mixing bowl, pour in the entire can of sweetened condensed milk. Using the same can (rinsed), fill it with whole milk and add that to the bowl. The ratio is exactly one can of condensed milk to one can of whole milk.
Add the 3 large eggs and the melted butter. If you are using vanilla extract or cinnamon, add it now. Whisk everything together until smooth and well combined. The mixture will be pale yellow and slightly thick from the condensed milk.
Step 3 – Add the Flour
Add the 1 cup of all‑purpose flour to the wet mixture. Whisk gently until just combined. Do not overmix — a few small lumps are fine. Overmixing can make the cake slightly tough, though this recipe is forgiving.
The batter will be thin, more like a custard or pancake batter than a traditional cake batter. That is correct.
Step 4 – Pour into the Baking Dish
Pour the batter into your prepared baking dish. Do not worry if it looks thin — it will set beautifully as it bakes. Tap the dish gently on the counter to release any air bubbles.
Step 5 – Bake
Bake at 350°F (175°C) for 45–55 minutes. The cake is done when the top is golden brown, the edges pull away slightly from the sides, and a toothpick inserted in the center comes out clean or with just a few moist crumbs. The center should be set but still soft — it will continue to firm up as it cools.
If the top browns too quickly, loosely cover with foil for the last 15 minutes of baking.
Step 6 – Cool
Let the cake cool in the pan on a wire rack for at least 20 minutes. For the best texture, cool completely to room temperature. The cake will deflate slightly as it cools — that is normal.
Step 7 – Slice and Serve
Run a knife around the edge of the pan. Invert onto a plate or serve directly from the dish. Slice into squares or wedges. Serve warm, at room temperature, or chilled — each temperature offers a different experience.
Want the full truth and the practical next steps?
Page 2 continues with the real explanation, the key details many readers skip, and the simple takeaways that make this guide more useful.