
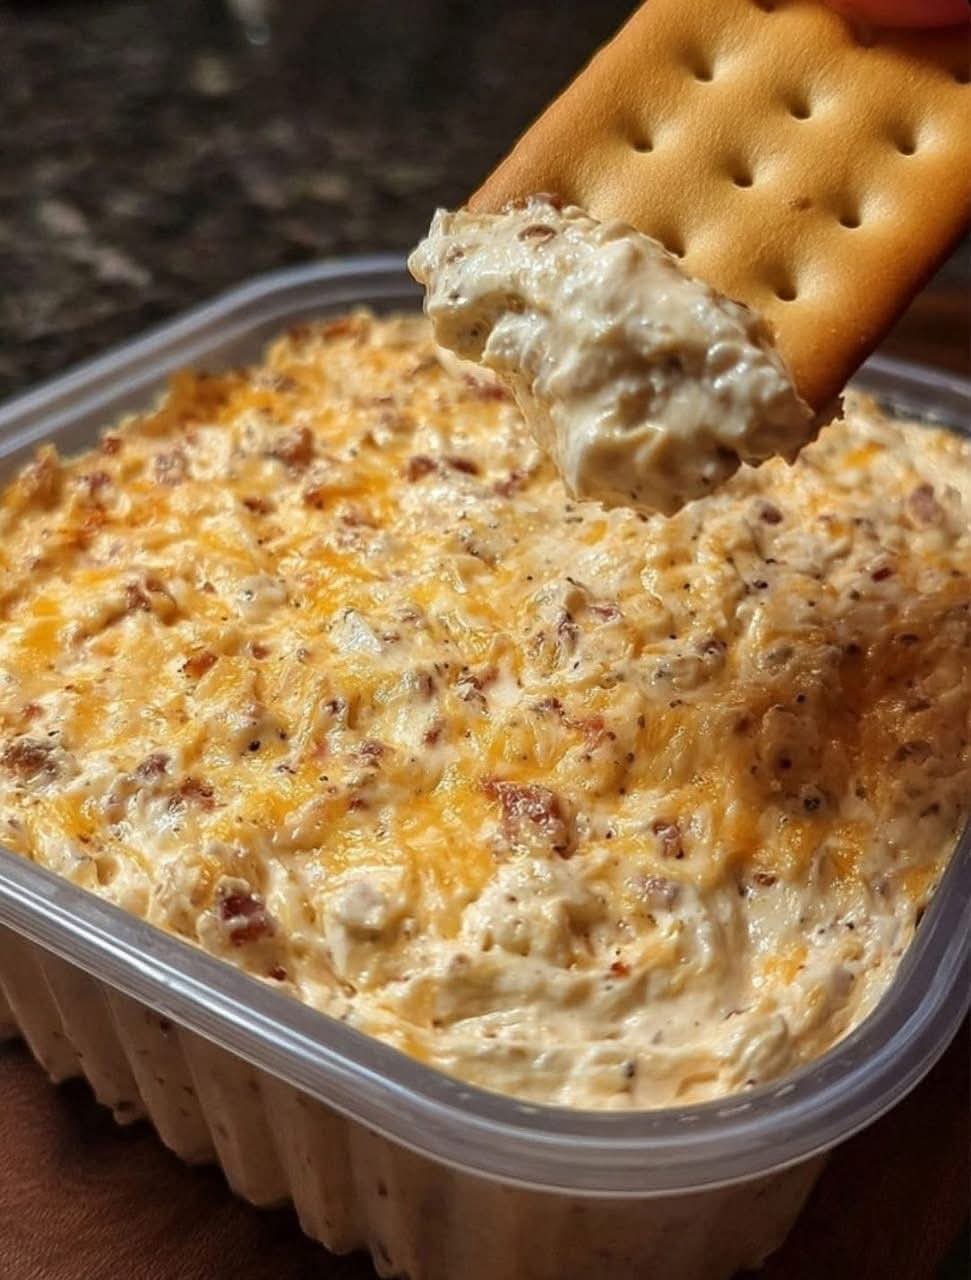
Every great party has that one appetizer that vanishes within minutes – the one guests hover around, asking “Who made this?” and “What’s in it?” This is The No Name Dip. It doesn’t need a fancy title because the flavor speaks for itself. Imagine a warm, bubbly blend of cream cheese, sharp cheddar, savory sausage, and a hint of spice, all baked until golden and irresistible. Scoop it up with crackers, tortilla chips, or fresh veggies, and you’ll understand why this dip has earned legendary status at potlucks, game days, and holiday gatherings. If you are searching for a best creamy party dip that comes together in minutes, this is the one.
Whether you need a last‑minute appetizer for unexpected guests, a low‑effort dish for Super Bowl Sunday, or a comforting snack for movie night, The No Name Dip delivers. This easy no‑bake dip (actually it’s baked, but the prep is no‑bake!) will become your secret weapon.
In this complete guide, you will learn the original No Name Dip recipe, pro tips for the perfect creamy texture, delicious variations (add jalapeños, swap proteins, make it vegetarian), storage advice, and why sometimes the best things in life don’t have a name. Let’s get dipping.
Why The No Name Dip Is a Crowd‑Pleasing Legend
Some recipes are passed down through generations with precise names and origins. The No Name Dip is not one of them. It emerged from a forgotten church cookbook, a frantic weeknight scramble, or maybe just a happy accident with leftover cheese and cream. What matters is that it works – beautifully. The combination of creamy, cheesy, meaty, and slightly spicy flavors creates a crowd‑pleasing appetizer that satisfies every craving.
Here is why you will fall in love with it:
Only 6 simple ingredients – Cream cheese, sour cream, shredded cheddar, cooked sausage, Rotel tomatoes, and seasonings.
10 minutes of prep – Then the oven does the rest.
Incredibly versatile – Serve with chips, crackers, bread, or vegetables.
Make‑ahead friendly – Assemble and bake when needed.
Budget‑friendly – Uses affordable pantry staples.
Always the first dish to empty – Guaranteed.
Once you make this homemade dip from scratch, you will never buy a processed cheese dip again.
The Complete No Name Dip Recipe
This recipe serves 8‑10 as an appetizer. It doubles easily for larger parties.
Ingredients:
8 oz (226g) cream cheese, softened to room temperature
½ cup (120g) sour cream (or plain Greek yogurt for a tangier version)
1 cup (120g) shredded sharp cheddar cheese (or a blend of cheddar and Monterey Jack)
1 cup (about 150g) cooked breakfast sausage or ground beef – crumbled and drained
1 can (10 oz / 285g) Rotel diced tomatoes with green chilies – lightly drained
½ teaspoon garlic powder (optional but recommended)
¼ teaspoon smoked paprika (for a subtle smoky depth)
Salt and black pepper to taste
Optional garnish: chopped fresh parsley or green onions, extra shredded cheese
Equipment:
- Medium mixing bowl
- Spatula or wooden spoon
- 8×8 inch baking dish or small cast‑iron skillet
- Measuring cups and spoons
- Cheese grater (if grating your own cheese – recommended for better melt)
Step‑by‑Step Instructions
Step 1 – Preheat and Prepare
Preheat your oven to 350°F (175°C). Lightly grease an 8×8 baking dish or a small oven‑safe skillet. If you are grating your own cheese, do that now – pre‑shredded cheese often contains anti‑caking agents that can make the dip slightly grainy.
Step 2 – Cook the Sausage (if not pre‑cooked)
In a skillet over medium heat, cook the breakfast sausage (or ground beef) until browned and no longer pink, breaking it into small crumbles. Drain excess fat. Set aside.
Step 3 – Mix the Creamy Base
In a medium bowl, combine the softened cream cheese and sour cream. Mix until smooth and well combined. A hand mixer works, but a sturdy spatula does the job just fine.
Step 4 – Add the Flavor Bombs
Stir in the shredded cheddar cheese, cooked sausage, Rotel tomatoes (with about half the liquid drained – you don’t want it too runny), garlic powder, smoked paprika, salt, and pepper. Mix until everything is evenly distributed.
Step 5 – Transfer and Top
Spoon the mixture into your prepared baking dish. Spread it into an even layer. If you like a golden, bubbly top, sprinkle a little extra shredded cheese over the surface.
Step 6 – Bake to Perfection
Bake uncovered for 20‑25 minutes, until the dip is hot and bubbly around the edges and the top is lightly golden. If you want a deeper brown top, switch to broil for the last 1‑2 minutes – watch carefully.
Step 7 – Rest and Serve
Let the dip rest for 5 minutes before serving. This allows it to set slightly so it’s scoopable but still creamy. Garnish with fresh parsley or green onions if desired. Serve warm with tortilla chips, pita chips, crackers, crostini, or vegetable sticks.
Pro Tips for the Best No Name Dip
Follow these expert tips for a quick cheesy dip recipe that turns out perfect every time:
Soften the cream cheese fully – Cold cream cheese leads to lumps. Leave it on the counter for 30 minutes or microwave for 15 seconds.
Drain the Rotel lightly – Too much liquid makes the dip runny. Drain off about half the can’s liquid. For a thicker dip, drain completely and add a tablespoon of tomato paste.
Grate your own cheese – Pre‑shredded cheese contains starches that prevent smooth melting. A block of cheddar grated at home melts like a dream.
Don’t overbake – The dip is done when bubbly at the edges. Overbaking can cause the cheese to separate and become greasy.
Let it rest before serving – This is crucial. The dip will be lava‑hot straight from the oven. A 5‑minute rest prevents burnt tongues and allows flavors to meld.
Keep it warm for parties – Transfer to a small slow cooker or fondue pot set to “warm” to maintain the perfect scoopable temperature.
Delicious Variations (Keep the Same Base)
Once you master the classic No Name Dip, try these fun twists. These dip variations for parties will keep your appetizer game strong.
1. Spicy Jalapeño No Name Dip
Add 2 tablespoons of pickled jalapeños (chopped) and ½ teaspoon of cayenne pepper. Top with fresh sliced jalapeños before baking.
2. Bacon Lover’s Dip
Replace the sausage with ½ cup of crispy cooked bacon bits. Use smoked cheddar instead of regular. Garnish with extra bacon crumbles.
3. Vegetarian No Name Dip
Omit the sausage. Sauté 1 cup of finely chopped mushrooms, bell peppers, and onions until softened, then mix into the cheese base. Add ½ teaspoon of liquid smoke for depth.
4. Buffalo Chicken No Name Dip
Swap the sausage for 1 cup of shredded cooked chicken. Mix in ¼ cup of buffalo sauce and reduce the salt. Top with crumbled blue cheese before baking – a true game day dip idea that wins every time.
5. Spinach Artichoke No Name Dip
Replace the sausage with 1 cup of thawed chopped spinach (squeezed dry) and ½ cup of chopped artichoke hearts. Use Parmesan instead of cheddar for a classy twist.
6. Taco No Name Dip
Use ground beef seasoned with taco seasoning instead of breakfast sausage. Top with diced tomatoes, black olives, and a drizzle of sour cream after baking. Serve with tortilla chips.
7. Low‑Carb / Keto No Name Dip
Serve with celery sticks, bell pepper strips, cucumber rounds, or pork rinds. Use full‑fat cream cheese and sour cream, and skip any high‑carb add‑ins. This low‑carb cheesy dip is perfect for keto diets.
How to Store, Reheat, and Serve The No Name Dip
Proper storage means you can enjoy this easy cheesy party appetizer for days.
Refrigerator
Store leftovers in an airtight container for up to 4 days. The dip will thicken when cold – that’s normal.
Reheating
Oven method (best): Transfer to an oven‑safe dish, cover with foil, and bake at 325°F for 10‑15 minutes until warmed through. Uncover for the last 2 minutes. Microwave method (quick): Heat in 30‑second bursts, stirring between each, until hot. Add a splash of milk if it seems too thick. Slow cooker method (for parties): Reheat on LOW for 1‑2 hours, stirring occasionally. Add a little milk to loosen if needed.
Want the full truth and the practical next steps?
Page 2 continues with the real explanation, the key details many readers skip, and the simple takeaways that make this guide more useful.