
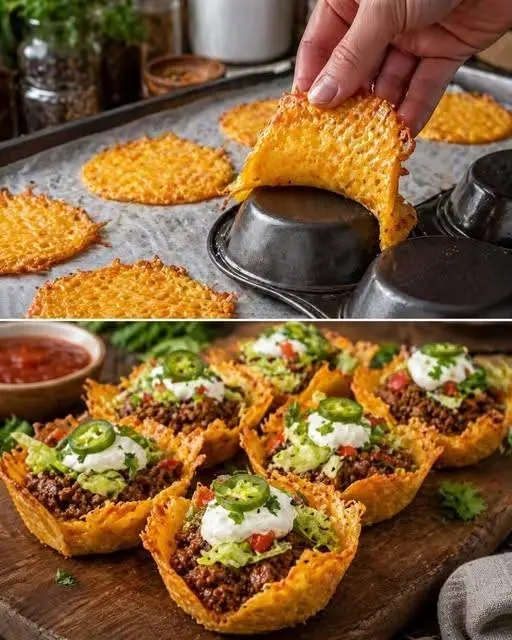
100% flourless, gluten‑free, and ridiculously easy – these pure‑cheese taco shells are the low‑carb dinner you’ve been craving.
Let’s be honest: Taco Tuesday is a sacred tradition. But if you’re following a keto or low‑carb lifestyle, the standard corn or flour tortilla can feel like a betrayal. Enter the cheese shell taco – a genius hack that turns a simple mound of shredded cheese into a crispy, lacy, utterly irresistible vessel for all your favourite fillings. No flour, no grains, no guilt. Just pure, melty cheese that bakes into a crunchy shell that holds its shape and delivers that satisfying snap with every bite.
The first time I made these, I was skeptical. Could cheese really form a sturdy taco shell? Would it be too greasy? Too fragile? But after a single batch, I was converted. The shells bake into golden, airy crisps that are sturdy enough to hold a generous scoop of juicy taco meat, sour cream, guacamole, and all the fixings. And the best part? They come together in under 20 minutes with just one ingredient (plus your favourite fillings). This is the ultimate keto Taco Tuesday recipe – quick, satisfying, and guaranteed to impress even the carb‑lovers at your table.
In this comprehensive guide, I’ll walk you through everything you need to know: from choosing the right cheese to the perfect baking and draping technique, plus pro tips, flavour variations, nutritional breakdown, and answers to your most burning questions. By the end, you’ll be a cheese‑shell expert, ready to elevate your taco game to a whole new level.
🔥 Why these cheese shell tacos are a game‑changer:
• Zero carbs – pure protein and fat, perfect for keto and low‑carb diets.
• Gluten‑free & grain‑free – suitable for celiacs and anyone avoiding grains.
• Incredibly easy – bake, drape, fill – no special equipment needed.
• Customizable – use any cheese blend, any filling, any toppings.
• Kid‑approved – crunchy, cheesy, and fun to eat.
📋 The Recipe – Crispy Cheese Shell Tacos
Prep: 10 min · Cook: 8 min · Total: 18 min
Servings: 8 shells · Diet: Keto, Low‑Carb, Gluten‑Free
🧀 For the Cheese Shells
- 3 cups shredded cheese (low‑moisture varieties work best: sharp cheddar, Monterey Jack, or a Mexican blend. Pre‑shredded is fine, but freshly shredded melts more smoothly).
🥩 For the Juicy Beef Filling
- 1 lb ground beef (80/20 for maximum flavour)
- 1 packet taco seasoning (or homemade blend: 1 tbsp chili powder, ½ tsp cumin, ½ tsp garlic powder, ½ tsp onion powder, salt & pepper)
- ¼ cup water
🥑 For the Toppings (optional, but recommended)
- Sour cream or plain Greek yoghurt
- Guacamole
- Pico de gallo or diced tomatoes
- Sliced fresh jalapeños
- Fresh chopped cilantro
👩🍳 Step‑by‑Step Instructions
- Preheat and prep: Preheat your oven to 375°F (190°C). Line a large baking sheet with parchment paper – do not use foil, as the cheese will stick.
- Make the cheese mounds: Drop 8 slightly flattened mounds of shredded cheese (about ¼ cup each) onto the parchment, spacing them well apart to allow for spreading.
- Bake the crisps: Bake for 6–8 minutes, until the cheese has melted, bubbled, and turned golden brown along the edges. Keep an eye on them – they can go from golden to burnt quickly.
- The “Drape” secret: Remove the tray and let the cheese circles rest for 30 seconds – long enough to become pliable but not hard. Working quickly, lift a warm cheese circle and drape it over the inverted bottom of a muffin tin (or a small glass bowl). Gently press down to form a cup shape. Repeat with all circles.
- Cool to crisp: Let the cheese cups sit on the inverted muffin tin for 5–10 minutes until fully cooled and hardened into crisp shells.
- Make the filling: While the shells cool, brown the ground beef in a skillet over medium‑high heat. Drain excess grease. Add the taco seasoning and water, simmer for 5 minutes until the liquid evaporates and the meat is juicy and coated.
- Assemble: Carefully remove the crispy cheese shells from the muffin tin. Spoon the taco meat into each shell, then top with sour cream, guacamole, tomatoes, jalapeños, and cilantro. Serve immediately.
💡 Pro tip: If your cheese shells harden before you can drape them, pop them back into the hot oven for 15 seconds to soften – they’ll become pliable again.
~220Calories (per shell + filling)
18gProtein
16gFat
1gCarbs (net)
Choosing the Perfect Cheese – The Foundation of Great Shells
Not all cheeses are created equal when it comes to making crispy shells. You need a cheese that melts well, spreads evenly, and crisps up without becoming greasy. Low‑moisture cheeses are your best bet. Sharp cheddar delivers a robust flavour and excellent browning. Monterey Jack offers a milder, creamier melt that’s perfect for a neutral base. A Mexican blend (cheddar, Monterey Jack, and often asadero) gives you a built‑in flavour profile that’s already taco‑friendly.
I recommend shredding your own cheese from a block whenever possible. Pre‑shredded cheese often contains anti‑caking agents (like cellulose or potato starch) that can interfere with melting and prevent the cheese from forming a smooth, lacy sheet. Freshly shredded cheese will melt into a more cohesive, beautiful crisp. If you’re short on time, pre‑shredded works in a pinch – just be aware that your shells might be slightly less delicate.
For those who want a more gourmet twist, try a mix of Gruyère and Parmesan – the nuttiness pairs wonderfully with beef, and the combination crisps up beautifully. Or go for a pepper Jack for a spicy kick. The beauty of this recipe is that you can experiment with any cheese that melts well – just avoid very high‑moisture cheeses like fresh mozzarella, which will not crisp up properly.
The Science of Baking – Temperature, Timing, and Parchment
Getting that perfect golden‑brown, lacy shell requires a bit of attention. 375°F (190°C) is the sweet spot – hot enough to melt and bubble the cheese quickly, but not so hot that it burns before it spreads. At this temperature, the cheese will melt, the fats will render, and the proteins will brown through the Maillard reaction, creating that irresistible savoury crispness.
Timing is critical: 6–8 minutes is the window. At 6 minutes, the edges will be golden and the centre will be bubbly – perfect for a delicate, thin shell. At 8 minutes, the shell will be darker and crunchier. I recommend starting to check at 6 minutes and pulling them when they reach your desired colour. Remember, they will continue to cook slightly as they cool, so err on the side of slightly lighter if you’re unsure.
Parchment paper is non‑negotiable. The cheese releases its natural oils as it melts, and those oils will fuse with foil or bare metal, leaving you with a stuck‑on, broken mess. Parchment provides a non‑stick surface that allows the cheese to release easily, ensuring your shells stay intact and perfectly shaped.
Pro Tips for Flawless Cheese Shells Every Time
🧀 Even mounds – Use a measuring cup or cookie scoop to ensure all cheese mounds are the same size, so they bake evenly.
⏲️ Let them rest – Don’t rush the 30‑second rest after baking; it allows the cheese to firm up enough to be handled without tearing.
🔁 Reheat if needed – If a shell cools too quickly, pop it back into the oven for 10–15 seconds to become pliable again.
🥣 Alternative molds – No muffin tin? Drape over the bottom of a small glass or use the back of a wooden spoon to shape cups.
Juicy Taco Meat – The Perfect Partner
The filling for these cheese shells is classic taco beef – but the key is to get it juicy and well‑seasoned. I recommend 80/20 ground beef; the higher fat content ensures flavour and moisture. After browning, drain the excess grease (you can leave a little for extra flavour), then add your taco seasoning and water. Simmering for 5 minutes allows the spices to infuse and the liquid to reduce, leaving you with meat that’s coated in a rich, savoury glaze – not dry, not watery, just perfect.
If you want to amp up the flavour, add a splash of lime juice or a dollop of tomato paste to the seasoning mix. For heat, stir in some chipotle powder or smoked paprika. You can also use ground turkey, chicken, or even shredded pork – just adjust cooking times accordingly.
The toppings are where you can really make these tacos your own. The classics – sour cream, guacamole, pico de gallo – are always winners. But don’t be afraid to get creative: pickled red onions, sliced radishes, hot sauce, or even a drizzle of crema. The cheese shells are a neutral base that welcomes any flavour combination you can dream up.
Variations – Beyond Beef
These cheese shells are incredibly versatile. Here are five of my favourite variations:
- Chicken Tinga: Use shredded chicken simmered in a smoky tomato‑chipotle sauce for a spicy, tangy twist.
- Fish Tacos: Fill with grilled or battered white fish, and top with cabbage slaw and a lime crema.
- Breakfast Tacos: Scramble eggs with chorizo, add a sprinkle of cheese, and top with salsa verde.
- Veggie & Bean: Swap meat for black beans and sautéed bell peppers, seasoned with cumin and chili powder.
- Buffalo Chicken: Mix shredded chicken with buffalo sauce and blue cheese crumbles – a spicy, tangy delight.
Each variation works beautifully with the crispy cheese base, proving that these shells aren’t just for Taco Tuesday – they’re for any day you want a low‑carb, flavour‑packed meal.
Storage and Meal Prep – Can You Make Them Ahead?
The golden rule of cheese shells is: eat them fresh. They are at their peak of crispiness right after cooling. If you store them in the fridge, they’ll absorb moisture from the air and become soft and chewy – still tasty, but you lose that signature crunch. If you must make them ahead, I recommend storing the shells in an airtight container with a paper towel to absorb moisture, and then reheating them in a 350°F oven for 3–5 minutes to re‑crisp. Even then, they won’t be quite as good as freshly made.
For best results, bake the shells just before serving. You can prepare the meat filling and all the toppings in advance, then bake the shells while you heat the filling. The entire process takes about 15 minutes, so it’s perfect for a quick weeknight dinner or a casual gathering with friends.
If you have leftover cheese shells, you can break them into chips and use them as a crunchy salad topper or dip them into guacamole – a delicious zero‑carb snack.
Why These Tacos Are a Keto Dieter’s Dream
When you’re on a ketogenic diet, every carb counts. Traditional taco shells (corn or flour) can set you back 12–20g of carbs per shell – often more than your daily allowance. By swapping to a cheese shell, you cut that number to near zero. The shells are made entirely of cheese, which is naturally high in protein and fat, and contains negligible carbohydrates. This allows you to enjoy the full taco experience without breaking ketosis.
Beyond keto, these shells are also gluten‑free, making them a safe choice for those with celiac disease or gluten sensitivity. They’re also grain‑free, paleo‑friendly (if you use a paleo‑compliant cheese) and suitable for a whole30 approach (just skip the dairy‑free sour cream and use compliant toppings).
Nutritionally, a single cheese shell provides about 110 calories, 7g of protein, and 9g of fat – all from high‑quality dairy. When you add the seasoned beef (about 150 calories, 14g protein, 10g fat) and toppings, you get a well‑balanced meal that’s satisfying and nourishing. The high fat and protein content also promote satiety, meaning you’ll stay full for longer and be less tempted to snack between meals.
FAQ – Everything You Need to Know
Can I use pre‑shredded cheese? Yes, but freshly shredded will give you a better melt and crisp. If using pre‑shredded, look for one without anti‑caking agents (some brands use potato starch or cellulose).
Why did my cheese shells stick to the pan? You probably used foil instead of parchment, or you didn’t grease the parchment (though parchment is naturally non‑stick). Always use parchment paper.
Can I make these in the microwave? Not recommended – microwaving won’t give you the same even browning and crispiness. The oven is the way to go.
How do I keep the shells from getting soggy? Fill them just before serving. If you add wet toppings (like salsa), eat immediately. The shells will start to soften as they sit, but they remain tasty.
What if I don’t have a muffin tin? Use any round, heatproof object – the bottom of a small bowl, a shot glass, or even an upside‑down egg carton (make sure it’s oven‑safe!). Just drape the cheese over it.
Final Thoughts – The Taco Tuesday Revolution
These crispy cheese shell tacos are proof that you don’t have to sacrifice flavour or fun to eat low‑carb. With just a handful of ingredients and a few minutes of your time, you can create a meal that’s crunchy, savoury, and endlessly adaptable. Whether you’re a seasoned keto pro or just exploring gluten‑free alternatives, this recipe is a must‑try.
I encourage you to experiment – try different cheeses, spice up the meat, pile on your favourite toppings. Make it a family activity: let everyone build their own taco with their preferred fixings. The joy of Taco Tuesday is all about customisation and community, and these cheese shells deliver that experience without the carb overload.
So next Tuesday (or any day of the week), skip the tortillas and give these cheese shells a shot. I promise you’ll be amazed at how something so simple can taste so incredible – and you might just never go back to traditional tacos again.
🧀 Save this recipe · Share with your keto crew · And enjoy the crispiest, cheesiest Taco Tuesday of your life!
📌 Keto · Low‑Carb · Gluten‑Free · Zero‑Carb Shells · Ready in 20 minutes