
Pro Tips for the Perfect Layered Dessert
- Don’t Let the First Layer Fully Harden
The strawberry layer should be semi‑set when you add the pineapple layer. If it’s fully hard, the layers may separate. If it’s too runny, the pineapple mixture will sink. Aim for a firm but slightly sticky texture (about 30–45 minutes in the fridge).
- Drain the Pineapple Well
Excess liquid from the pineapple can make the pineapple layer watery and prevent it from setting properly. Use a fine‑mesh strainer and press lightly with a spoon to remove as much juice as possible.
- Use Cold Heavy Cream for Whipping
For the fluffiest whipped cream, chill the bowl, beaters, and cream before whipping. Stop at stiff peaks – do not overbeat, or it will turn into butter.
- Make It Ahead
This dessert is ideal for making 1–2 days in advance. The layers set perfectly, and the flavor actually improves overnight.
- Serve Chilled
Do not let the dessert sit at room temperature for more than an hour – the whipped cream layers can soften.
Delicious Variations – Make It Your Own
🥥 Coconut Strawberry Pineapple Dessert
Add ½ cup shredded coconut to the crushed biscuit topping. For extra tropical flavor, use coconut cream instead of heavy cream in the pineapple layer.
🍫 White Chocolate Dream
Stir ½ cup melted white chocolate into the pineapple mixture before folding in the whipped cream. Top with white chocolate shavings.
🍓 Fresh Strawberry Layer
Replace strawberry gelatin with 2 cups fresh strawberry purée + 2 tbsp gelatin powder. Sweeten to taste. This creates a more natural, less sweet flavor
🍍 Extra Pineapple
Add ½ cup finely chopped fresh pineapple to the pineapple layer for more texture.
🧀 Cheesecake Twist
Add 4 oz softened cream cheese to the pineapple mixture. Beat until smooth before folding in whipped cream. This creates a denser, cheesecake‑like layer.
🌿 Minty Fresh
Add 1 tbsp fresh mint leaves (finely chopped) to the strawberry layer for a refreshing twist.
🍊 Orange & Strawberry
Replace half the cold water with fresh orange juice in the strawberry layer. The orange brightens the strawberry flavor.
What to Serve with This Layered Dessert
Occasion Pairing
Summer barbecue Fresh fruit salad, iced tea
Birthday party Whipped cream dollops, candles
Potluck Serve in individual cups for easy grabbing
Holiday dinner A scoop of vanilla ice cream on the side
Coffee break Espresso or cappuccino
This dessert is rich enough to stand alone but pairs beautifully with fresh berries or a drizzle of chocolate sauce.
Storage & Make‑Ahead Instructions
Refrigerator
Store covered in the refrigerator for up to 5 days. The layers may soften slightly, but the flavor remains delicious.
Freezer
This dessert freezes well for up to 2 months. Wrap tightly with plastic wrap and then foil. Thaw overnight in the refrigerator before serving. The texture may be slightly less creamy, but still tasty.
Make Ahead
Assemble the dessert completely (without the biscuit topping – add just before serving for maximum crunch). Cover and refrigerate for up to 24 hours. Add topping right before serving.
Meal Prep
Cut into individual squares and store in airtight containers for grab‑and‑go desserts.
Nutrition Facts (Per Serving – 1/9 of recipe)
Nutrient Amount
Calories 385
Protein 5g
Fat 22g
Saturated Fat 13g
Carbohydrates 43g
Fiber 1g
Sugar 36g
Sodium 150mg
Calcium 10% DV
Vitamin C 15% DV
Using full‑fat whipped cream, sweetened condensed milk, and graham crackers.
For a lighter version: Use sugar‑free gelatin, light whipped topping, and reduce sweetened condensed milk to ¼ cup (about 290 calories, 12g fat).
Frequently Asked Questions (FAQs)
Q: Can I use sugar‑free gelatin?
Yes – sugar‑free strawberry gelatin works well. You may need to adjust sweetness in the pineapple layer.
Q: Can I make this in individual cups?
Absolutely – layer the strawberry mixture, then pineapple mixture, then topping in small glasses or jars. Great for parties.
Q: Why is my strawberry layer runny?
The gelatin may not have set enough before adding the next layer, or the whipped cream was not folded in gently. Chill the strawberry layer for at least 30 minutes until semi‑firm.
Q: Can I use fresh pineapple instead of canned?
Yes – use 1 cup finely chopped fresh pineapple. You may need to add 1 tablespoon of sugar to compensate for sweetness.
Q: How do I get clean, neat squares?
Chill the dessert overnight, then use a sharp knife. Wipe the blade clean between cuts. For extra clean edges, dip the knife in hot water and dry before each slice.
Q: Can I add a crust at the bottom instead of the top?
Yes – press crushed biscuits mixed with melted butter into the bottom of the dish before adding the strawberry layer. This creates a traditional “crust” base.
Q: Is this dessert gluten‑free?
Use gluten‑free graham crackers or biscuits for the topping. All other ingredients are naturally gluten‑free.
Q: Can I make this vegan?
Use vegan gelatin (agar‑agar), coconut whipped cream, sweetened condensed coconut milk, and vegan biscuits. The texture may be slightly different.
Troubleshooting – What Went Wrong?
Problem Likely Cause Fix Next Time
Layers didn’t set Gelatin not dissolved properly, or not enough chilling time Ensure gelatin fully dissolves; chill at least 4 hours.
Layers separated Strawberry layer too firm before adding pineapple Add pineapple layer when strawberry is semi‑set (about 30–45 minutes).
Pineapple layer runny Pineapple not drained well, or whipped cream under‑whipped Drain pineapple thoroughly; whip cream to stiff peaks.
Topping soggy Added too early or stored too long Add topping just before serving.
Too sweet Used sweetened condensed milk + sugar‑based gelatin Use sugar‑free gelatin or reduce sweetened condensed milk.
Why This No‑Bake Dessert Is a Crowd‑Pleaser
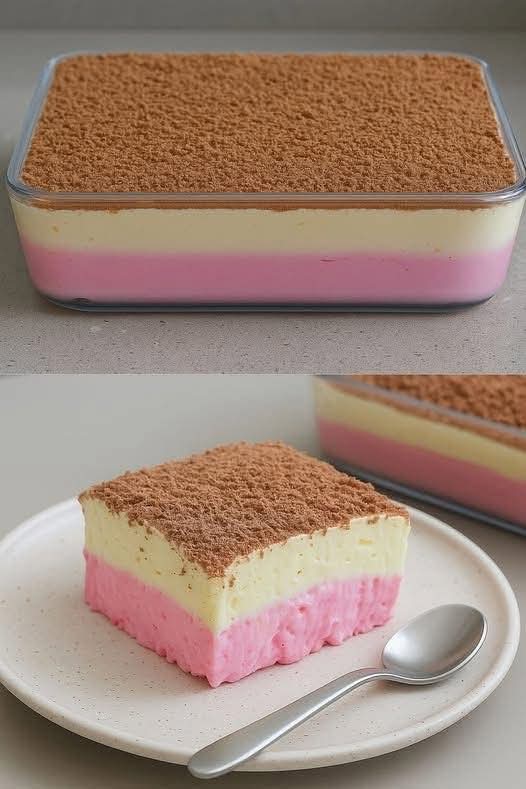
There’s something magical about a dessert that looks complicated but comes together in minutes. The bright pink strawberry layer catches the eye, the golden pineapple layer promises tropical sweetness, and the crunchy biscuit topping adds that perfect textural contrast. Every spoonful gives you creamy, fruity, crunchy, and light all at once.
And because it’s no‑bake, you can make it even on the hottest summer day without heating up your kitchen. It’s the perfect dessert for backyard barbecues, birthday parties, potlucks, or just because you deserve a treat.
Final Thoughts – Your New Go‑To No‑Bake Dessert
This strawberry and pineapple layered dessert is proof that you don’t need an oven or advanced baking skills to create something spectacular. With just a few pantry staples and a little chilling time, you can make a dessert that looks and tastes like it came from a fancy patisserie.
Make it for your next gathering, and watch it disappear. Keep the recipe handy – you’ll be asked for it again and again.
Now it’s your turn! Have you tried this layered dessert? What’s your favorite variation – coconut, white chocolate, or fresh fruit? Drop a comment below – I’d love to hear your twist.
And if you found this guide helpful, share it with a friend who loves easy, impressive desserts. Pin it for later, and subscribe to our newsletter for more no‑bake treats.
Stay creamy, stay fruity, and enjoy every layer. 🍓🍍✨