
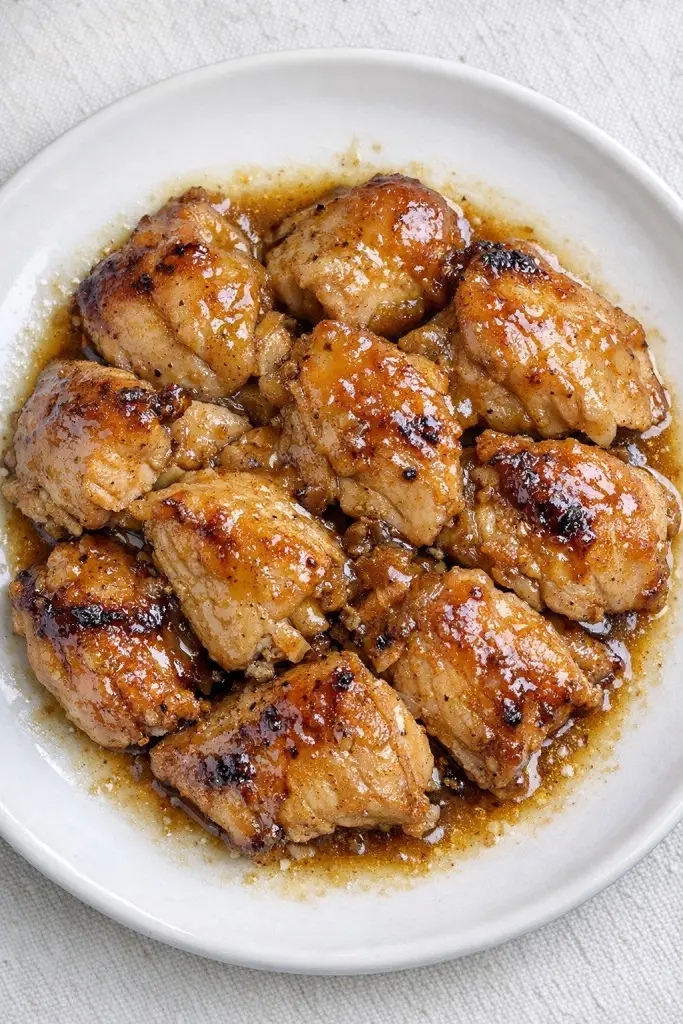
The perfect “throw it together” meal after a scorching hot day – a glossy, caramelized glaze that coats every piece, made with just a handful of pantry staples.
When the summer heat is relentless, the last thing you want to do is spend an hour slaving over a hot stove. You need a dinner that’s fast, flavourful, and forgiving – something that feels like a treat without requiring a trip to the specialty store. Enter these Sticky Honey Garlic Soy Chicken Thighs. With just four simple ingredients (plus the chicken and a sprinkle of black pepper), you can have a restaurant‑worthy meal on the table in under 20 minutes, with a sauce so glossy and rich it’ll have everyone fighting for the last drop.
I first stumbled upon this combination on a sweltering July evening when I had almost nothing in the fridge – just a pack of chicken thighs, a half‑empty bottle of soy sauce, a squeeze of honey, and a few garlic cloves. I threw them together on a whim, and the result was nothing short of magical: the honey caramelised into a dark, sticky glaze, the garlic infused the sauce with its pungent warmth, and the soy provided a savoury backbone that balanced the sweetness perfectly. The chicken thighs, with their higher fat content, stayed impossibly tender and juicy, even with a good sear.
This recipe has since become my go‑to for busy weeknights, impromptu dinners, and even meal prep. It’s naturally gluten‑free (if you use tamari), dairy‑free, and can be made keto‑friendly by swapping the honey for a sugar‑free alternative. But the best part? It’s virtually foolproof – the sauce reduces into a thick, clingy glaze that coats every piece of chicken, creating those beautiful dark, charred spots that make your mouth water just by looking at them.
🔥 Why this recipe is a summer lifesaver:
• 20 minutes total – from pan to plate, perfect for hot days.
• 4 pantry ingredients – soy sauce, honey, garlic, and chicken.
• Minimal cleanup – one skillet, no oil needed (the chicken provides its own fat).
• Unbelievably juicy – chicken thighs stay tender even if you overcook them.
• Versatile – serve over rice, cauliflower rice, or noodles.
📋 The Recipe – Sticky Honey Garlic Soy Chicken Thighs
Prep: 5 min · Cook: 15 min · Total: 20 min
Servings: 4 · Diet: Gluten‑Free (with tamari), Dairy‑Free
🥣 The 4 Magic Ingredients
- 1.5 lbs (about 6–8) boneless, skinless chicken thighs
- ¼ cup soy sauce (use low‑sodium if you prefer)
- ¼ cup honey (for that glossy sweetness)
- 4 cloves garlic, minced (the aromatic backbone)
- Black pepper (to season – that’s your pantry staple)
👩🍳 Step‑by‑Step Instructions
- Pat dry & season: Pat the chicken thighs completely dry with paper towels – this is crucial for a golden sear rather than steaming. Season both sides generously with black pepper (no salt needed – the soy sauce provides plenty).
- Mix the sauce: In a small bowl, whisk together the soy sauce, honey, and minced garlic until smooth.
- Sear the chicken: Heat a large, heavy‑bottomed skillet (cast iron is ideal) over medium‑high heat. Do not add oil – the chicken thighs will render their own fat. Place the thighs in the pan, smooth side down, and cook undisturbed for 5–6 minutes, until deeply browned with dark, charred spots. Flip and cook for 3 minutes on the other side.
- Glaze: Pour the sauce mixture over the chicken. Reduce the heat to medium‑low. Let the sauce bubble and reduce for 3–4 minutes, flipping the chicken constantly to coat it in the thickening, sticky glaze. Watch carefully – the honey can burn quickly if left unattended!
- Rest & serve: As soon as the sauce is dark, thick, and coats the back of a spoon, remove the pan from the heat. Let it rest for 5 minutes so the chicken can relax and soak up the juices. Pile them on a plate, spoon that caramelized pan sauce right over the top, and serve.
💡 Pro tip: For a tangy twist, add 1 tablespoon of balsamic or rice vinegar to the sauce – it elevates the sweetness to a professional level.
~320Calories
26gProtein
16gFat
14gCarbs (mostly from honey)
Why These Four Ingredients Create Magic – The Science Behind the Glaze
Each of the four ingredients in this recipe plays a specific, irreplaceable role. Understanding them will help you master the dish and even adapt it to your taste.
Soy Sauce – The Savory Backbone
Soy sauce provides the umami that balances the sweetness of honey. It’s rich in glutamates, which enhance the natural meaty flavour of the chicken and give the sauce its deep, mahogany colour. When heated, the soy sauce caramelises slightly, adding complexity. Use a low‑sodium variety if you’re watching your salt intake – it allows you to control the seasoning without overwhelming the other flavours.
Honey – The Sticky Sweetness
Honey is the soul of this glaze. Its high fructose content means it browns beautifully and thickens into a sticky, glossy coating that clings to the chicken. Unlike granulated sugar, honey adds a floral, slightly fruity note that pairs perfectly with garlic and soy. For a low‑carb version, you can substitute sugar‑free honey or a monk fruit/erythritol blend, but the texture and gloss won’t be quite the same – a tiny bit of xanthan gum can help thicken.
Garlic – The Aromatic Anchor
Garlic is the flavour bridge between the sweet and savoury elements. When minced and cooked in the sauce, it mellows and becomes almost nutty, infusing the entire dish with its pungent warmth. Use fresh garlic – powdered just won’t give you the same punch. Four cloves is the sweet spot; feel free to add more if you’re a garlic lover.
Black Pepper – The Simple Elevator
Black pepper might seem like an afterthought, but it’s essential. It adds a mild heat that cuts through the richness of the chicken and balances the sweetness. More importantly, it helps sear the chicken – the pepper creates tiny crevices on the surface that promote browning, giving you those dark, crispy spots that are the hallmark of a perfect pan‑seared piece.
The Art of the Sear – Why Patting Dry and No Oil Matter
If you’ve ever ended up with steamed, pale chicken instead of a golden crust, the culprit is almost always moisture. Patting the chicken dry with paper towels removes surface moisture, allowing the heat of the pan to immediately start browning the proteins. Skipping oil might seem counterintuitive, but chicken thighs are naturally fatty – they render enough fat to prevent sticking. This fat also adds incredible flavour, as it cooks into the pan and later combines with the sauce.
To achieve that deep, dark, charred sear, you need heat – a screaming‑hot cast iron or stainless steel pan. Place the chicken smooth side down and do not move it for 5–6 minutes. This lets a crust form; if you try to flip it too early, it will stick and tear. When it’s ready, it will release naturally from the pan.
The Glaze – Timing Is Everything
The glaze is where the magic happens. Once you add the sauce to the pan, the heat must be reduced to medium‑low – otherwise the honey will burn before it has a chance to thicken. The sauce will bubble vigorously at first; that’s the moisture evaporating and the sugars starting to caramelise. Stir and flip the chicken constantly to coat every surface. After 3–4 minutes, the sauce will have reduced to a syrupy, sticky glaze that clings to the chicken and forms those beautiful dark streaks.
When the sauce coats the back of a spoon and leaves a clear trail, it’s ready. Remove the pan from the heat immediately – residual heat will continue to thicken it. Let the chicken rest for 5 minutes; this allows the juices to redistribute, ensuring each bite is moist and flavourful.
Pro Tips for Summer Cooking Success
🥄 Add a tangy twist – A tablespoon of balsamic or rice vinegar elevates the glaze to restaurant quality, cutting through the sweetness with a bright acidity.
🔥 Oven method to keep cool – Sear the chicken in an oven‑safe skillet for 3 minutes per side, pour on the sauce, and finish in a 400°F oven for 12 minutes – no standing over a hot stove.
🍚 Serve over cauliflower rice – For a keto‑friendly meal, the fluffy rice soaks up the sauce without the carb load.
🧂 Watch the salt – Soy sauce is salty, so taste before adding extra salt. The pepper provides enough seasoning.
Endless Variations – Make This Recipe Your Own
This 4‑ingredient base is so versatile that you can easily customise it to suit your mood, dietary needs, or what’s in your fridge. Here are five of my favourite twists:
- Spicy Honey Garlic: Add ½ teaspoon of red pepper flakes or a sliced fresh chilli with the garlic. The heat balances the sweetness beautifully.
- Ginger Soy: Grate 1 tablespoon of fresh ginger into the sauce – it adds a bright, zesty note that’s perfect with chicken.
- Lemon Herb: Add the zest of one lemon and a tablespoon of chopped fresh thyme after cooking – it lightens the dish and adds a summery lift.
- Teriyaki‑Style: Add 2 tablespoons of mirin or sake and a pinch of sesame seeds for a classic teriyaki profile.
- Low‑Carb/Keto: Replace the honey with a sugar‑free syrup (like Lakanto) and thicken with a touch of xanthan gum. The result is still sticky and delicious.
And don’t stop at chicken – this glaze works wonderfully with pork chops, salmon, tofu, or even roasted vegetables. Just adjust cooking times accordingly.
Serving Suggestions – The Perfect Companions
While this chicken is spectacular on its own, it truly shines when paired with a bed of something to soak up that luscious sauce. Steamed white rice is the classic choice – its neutrality allows the glaze to take centre stage. For a lower‑carb option, cauliflower rice is a fantastic alternative; it absorbs the sauce without competing with the flavours. You can also serve it over noodles, quinoa, or even a pile of sautéed greens like bok choy or spinach for a complete meal in a bowl.
For an extra pop of colour and freshness, garnish with chopped spring onions, sesame seeds, or fresh cilantro. A squeeze of lime juice over the top just before serving brightens the entire dish and cuts through the richness. These small touches turn a simple weeknight dinner into something that feels special enough for guests.
Meal Prep and Leftovers – The Gift That Keeps Giving
This recipe is a meal‑prepper’s dream. The chicken thighs stay moist even after reheating, making them ideal for packed lunches or quick dinners throughout the week. Store leftovers in an airtight container in the refrigerator for up to 4 days – the glaze will thicken slightly as it cools, but it melts back into a saucy coating when reheated.
To reheat, gently warm the chicken in a skillet over low heat with a splash of water or extra soy sauce to loosen the glaze. Alternatively, microwave in 30‑second bursts, covered, until heated through. The texture remains tender, and the flavours only deepen as they meld.
You can also freeze the cooked chicken for up to 2 months. Thaw in the fridge overnight and reheat as above. The sauce may separate slightly, but a quick stir will bring it back together.
Why Chicken Thighs Are the Unsung Heroes of Quick Cooking
If you’re used to cooking chicken breasts, making the switch to thighs is a game‑changer. Dark meat has a higher fat content, which not only adds flavour but also makes the meat much more forgiving. Overcook a breast, and you get dry, stringy meat; overcook a thigh, and it just becomes more tender and juicy. This makes thighs the perfect choice for pan‑searing and glazing – they stay succulent even when you’re busy juggling other tasks.
Nutritionally, chicken thighs are rich in iron, zinc, and B vitamins (especially B6 and B12). The skin‑less variety keeps the fat content moderate while still providing that essential moisture. When paired with the honey‑soy glaze, you get a balanced meal with protein, healthy fats, and a moderate amount of carbohydrates (mostly from the honey).
For those monitoring their sugar intake, the 14g of carbs per serving (mostly from honey) can be easily managed within a balanced diet. If you’re on a strict keto plan, the sugar‑free version mentioned earlier reduces carbs to near zero, making this a safe and satisfying choice.
Common Mistakes and How to Avoid Them
Even with a simple recipe, things can go wrong. Here’s how to troubleshoot the most common issues:
- Chicken sticks to the pan: Ensure the pan is hot enough and the chicken is dry. Let it cook undisturbed until it naturally releases – usually after 5‑6 minutes.
- Glaze burns before it thickens: Your heat is too high. Reduce to medium‑low as soon as the sauce goes in, and stir constantly.
- Sauce is too thin: It needs more time to reduce. Let it bubble for an extra minute or two, but watch carefully to avoid burning.
- Too salty: Use low‑sodium soy sauce, and don’t add extra salt. The honey will balance some of the saltiness, but you can also add a splash of water to dilute.
- Not sticky enough: The honey might be too diluted. Make sure you’re using pure honey, and don’t add extra liquid to the sauce.
Frequently Asked Questions
Can I use chicken breasts instead of thighs? Yes, but they will cook faster and can dry out. Reduce the first sear to 4 minutes and the second to 2 minutes, and keep the glaze step to 2‑3 minutes. Check for doneness (165°F internal).
Is there a gluten‑free option? Yes – use tamari or coconut aminos instead of soy sauce. Both are gluten‑free and provide a similar savoury depth.
Can I make this ahead of time? Absolutely – cook the chicken and sauce, cool, and store. Reheat gently on the stove or microwave. The glaze may thicken; add a splash of water to loosen.
What if I don’t have honey? You can substitute with maple syrup or brown sugar (though brown sugar will add more moisture). For a sugar‑free option, use a honey‑flavoured syrup.
How do I get that dark, charred look without burning? It comes from the sear. Make sure the pan is hot and you don’t move the chicken for the first 5 minutes. The dark spots are caramelised bits – they add flavour.
Final Thoughts – The Perfect Summer Dinner
These Sticky Honey Garlic Soy Chicken Thighs are proof that you don’t need a long ingredient list or advanced techniques to create a memorable meal. With just a handful of pantry staples and a hot skillet, you can produce a dish that’s packed with flavour, visually stunning, and endlessly adaptable. Whether you’re serving it on a sweltering July evening, meal‑prepping for the week, or impressing unexpected guests, this recipe delivers every time.
What I love most about this recipe is its simplicity and reliability. It’s the kind of dish that becomes a household staple – the one you turn to when you need something quick, satisfying, and guaranteed to please. The glossy, caramelised glaze, the tender, juicy chicken, and the perfect balance of sweet and savoury make it a winner for kids and adults alike. And with the tips and variations I’ve shared, you can tailor it to your taste and dietary needs, ensuring it never gets boring.
So next time the heat is on and you’re dreading the kitchen, grab a pack of chicken thighs, a bottle of soy sauce, some honey, and a few cloves of garlic – and let the magic happen. In 20 minutes, you’ll have a meal that tastes like you spent hours over the stove, but without breaking a sweat. Enjoy every sticky, savoury bite!
🍗 Save this recipe · Share with a fellow weeknight warrior · And enjoy the most effortless, delicious chicken dinner of the summer!
📌 4 Ingredients · 20 Minutes · One Pan · Gluten‑Free Option · Perfect for Hot Days