
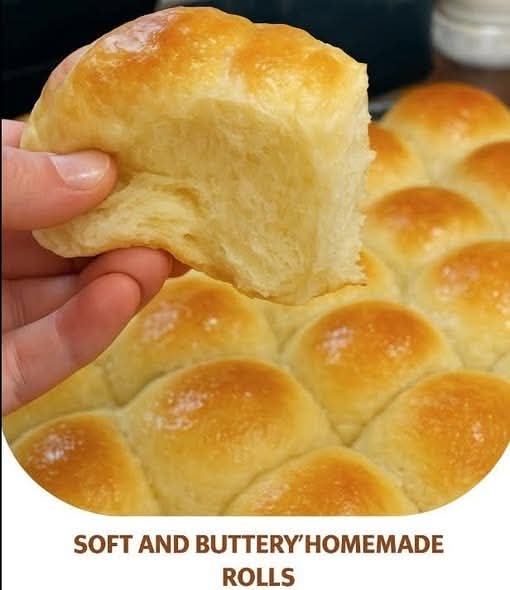
There are breads that are merely side dishes, and then there are Soft and Buttery Homemade Rolls – the kind that become the star of the meal. Imagine pulling apart a warm, golden roll, releasing a wisp of steam. The exterior is slightly glossy from a butter wash; the interior is so feathery and tender it nearly dissolves on your tongue. Each bite carries the pure, nostalgic taste of real butter, a whisper of sweetness, and that incomparable satisfaction that only comes from bread made by your own hands. If you are searching for a best soft homemade dinner rolls recipe that never fails, this is the one you will turn to for holidays, Sunday suppers, and everything in between.
Whether you need a showstopping addition to your Thanksgiving table, a side for weeknight soup, or simply want to fill your kitchen with the smell of baking bread, these homemade rolls deliver. They are beginner‑friendly, require no fancy equipment, and taste infinitely better than anything from a tube. This easy fluffy roll recipe will become a family heirloom.
In this complete guide, you will learn the master recipe for soft, buttery yeast rolls, including pro tips for the perfect texture (how to get that pillowy crumb), step‑by‑step photos in words, troubleshooting dense rolls, delicious variations (garlic, herb, sweet cinnamon), make‑ahead instructions, and the science behind what makes a roll truly “buttery.” Let’s bake.
Why Soft and Buttery Homemade Rolls Are the Ultimate Comfort Bread
Few things in the culinary world rival a freshly baked roll, still warm from the oven, slathered with a pat of butter that melts into every crevice. These rolls are a cross between a classic dinner roll and a brioche – rich enough to satisfy but light enough to serve alongside any main dish. They get their softness from a combination of whole milk, butter, and a technique called “tangzhong” (a simple flour‑water paste that locks in moisture). The result is a homemade bread rolls for beginners that stay soft for days, not hours.
Here is why you will love them:
Only 9 basic ingredients – Flour, milk, butter, sugar, yeast, eggs, salt – all pantry staples.
Incredibly soft and tender – Thanks to the tangzhong method, they resist drying out.
Perfect for holidays and special dinners – Impress guests without stress.
Freezer‑friendly – Make a double batch and save half.
Customizable – Add herbs, cheese, cinnamon sugar, or a garlic butter topping.
Make‑ahead friendly – Shape the night before and bake fresh in the morning.
Once you master this buttery yeast rolls from scratch, you will never buy store‑bought dinner rolls again.
The Complete Soft and Buttery Homemade Rolls Recipe
This recipe makes 12‑15 rolls, perfect for a 9×13 inch baking dish or a round cake pan. It can easily be doubled.
Ingredients (Tangzhong Starter):
3 tablespoons (25g) bread flour or all‑purpose flour
½ cup (120ml) whole milk (or 2% milk)
Ingredients (Dough):
2 ½ cups (300g) bread flour or all‑purpose flour – plus more for dusting
¼ cup (50g) granulated sugar
2 ¼ teaspoons (1 packet) instant yeast (or active dry yeast)
1 teaspoon salt
½ cup (120ml) whole milk, warm (110°F / 45°C)
1 large egg, at room temperature
4 tablespoons (56g) unsalted butter, softened and cut into small pieces, plus more for brushing
Equipment:
- Small saucepan (for tangzhong)
- Stand mixer with dough hook (or large bowl and wooden spoon)
- 9×13 inch baking dish or 10‑inch cast iron skillet
- Pastry brush
- Plastic wrap or a clean kitchen towel
Step‑by‑Step Instructions
Step 1 – Make the Tangzhong (Flour‑Water Paste)
In a small saucepan, whisk together the 3 tablespoons of flour and ½ cup of milk until no lumps remain. Cook over medium‑low heat, stirring constantly with a spatula or whisk, for 2‑3 minutes. The mixture will thicken into a smooth, pudding‑like paste. Remove from heat and let it cool to room temperature. This simple step is the secret to incredibly pillowy brioche‑style rolls that stay soft for days.
Step 2 – Activate the Yeast (if using active dry)
If you are using instant yeast, skip this step. For active dry yeast: In a small bowl, combine ½ cup of warm milk (110°F) with 1 teaspoon of the sugar. Sprinkle the yeast on top and let sit for 5‑10 minutes until foamy. For instant yeast, simply add it to the dry ingredients.
Step 3 – Mix the Dough
In the bowl of a stand mixer (or a large mixing bowl), combine the 2 ½ cups of flour, sugar, salt, and instant yeast (if using). Whisk to blend. Add the cooled tangzhong, the warm milk, and the egg. Mix on low speed with the dough hook until a shaggy dough forms, about 1 minute.
Step 4 – Add the Butter Gradually
With the mixer running on low, add the softened butter pieces one at a time, waiting until each is mostly incorporated before adding the next. Once all the butter is in, increase the speed to medium and knead for 8‑10 minutes. The dough will be very soft, slightly sticky, and smooth. It should pull away from the sides of the bowl but stick slightly to the bottom. If it is too sticky, add 1 tablespoon of flour at a time. If it is too dry, add a teaspoon of milk.
Step 5 – First Rise (Bulk Fermentation)
Shape the dough into a ball and place it in a lightly greased bowl, turning once to coat. Cover with plastic wrap or a damp towel. Let it rise in a warm, draft‑free place until doubled in size, about 1‑1.5 hours. The dough is ready when you poke it with a floured finger and the indentation slowly springs back partway.
Step 6 – Shape the Rolls
Punch down the dough gently to release gas. Turn it out onto a lightly floured surface. Divide the dough into 12‑15 equal pieces (about 55‑60g each). You can use a bench scraper or a knife. To shape each roll, cup your hand over a piece of dough and roll it against the counter in a circular motion until it forms a smooth, taut ball. Place the rolls in a greased 9×13 baking dish or a cast iron skillet, spacing them about ½ inch apart – they will expand and touch during the second rise.
Step 7 – Second Rise
Cover the pan loosely with plastic wrap or a clean towel. Let the rolls rise again until they are puffy and have grown together, about 30‑45 minutes. While they rise, preheat your oven to 350°F (175°C).
Step 8 – Bake to Golden Perfection
Brush the tops of the risen rolls with a beaten egg wash (1 egg + 1 tablespoon water) or simply melted butter for a softer, less shiny crust. Bake for 18‑22 minutes, until the rolls are golden brown on top and a thermometer inserted into the center roll reads 190°F (88°C). Rotate the pan halfway through for even browning.
Step 9 – Brush with Butter and Cool
As soon as the rolls come out of the oven, brush the tops generously with melted butter. This adds shine, flavor, and keeps the crust soft. Let the rolls cool in the pan for 5 minutes, then transfer them to a wire rack to cool slightly (or serve warm).
Pro Tips for the Best Soft and Buttery Rolls
Follow these expert tips for light and fluffy homemade rolls every time:
Do not skip the tangzhong – This simple flour‑milk paste gelatinizes starches, allowing the dough to hold more moisture. The result is a roll that stays soft for 3‑4 days, not just a few hours.
Use bread flour for extra chew – Bread flour has more protein, which creates a slightly chewier, more structured roll. All‑purpose flour works beautifully but yields a more tender, delicate crumb. Both are great.
Butter must be soft but not melted – Cold butter won’t incorporate; melted butter makes the dough greasy. Cube cold butter and let it sit at room temperature for 30 minutes.
Do not over‑flour – These rolls are supposed to have a soft, slightly tacky dough. Resist the urge to add too much flour. A sticky dough makes a tender crumb.
Use a thermometer for the milk – Milk that is too hot will kill yeast; milk that is too cold will slow the rise. Aim for 110°F (45°C) – warm to the touch but not scalding.
Let the rolls touch in the pan – When they rise together, they will pull apart into soft, feathery clusters. This is the classic dinner roll look.
Brush with butter twice – Once right after baking, and again 5 minutes later. This builds a thin, buttery layer that tastes incredible.
Want the full truth and the practical next steps?
Page 2 continues with the real explanation, the key details many readers skip, and the simple takeaways that make this guide more useful.