
If you have never made bread from scratch because you were intimidated by kneading, rising times, or complicated techniques, this no‑knead mini flatbread is about to change everything. With just six simple ingredients – flour, salt, sugar, instant yeast, warm water, and a little oil – you can create soft, puffy, golden flatbreads that are perfect for stuffing, dipping, or eating on their own. There are no eggs, no butter, and no special equipment required. Just a bowl, a spoon, and a baking tray. In under two hours, you will have a batch of warm, homemade flatbreads that taste far better than anything from a store. Let me show you how to make this foolproof recipe that will become a staple in your kitchen.
⏲️ Prep: 10 mins⏰ Rise: 1 hr + 15 mins🔥 Bake: 15-18 mins🍽️ Yields: 10-12 mini flatbreads🥖 No kneading⭐ Budget‑friendly
✨ Why This No‑Knead Flatbread Recipe Works So Well
This recipe is the definition of simplicity. By using instant yeast and a generous hydration level, the dough develops gluten strands naturally during the rest period – without any kneading. The long first rise allows the flour to fully hydrate and the yeast to work its magic, creating a soft, airy texture. The second, shorter rest after shaping gives the flatbreads a final puff before baking, ensuring they stay light and pillowy. The result is a flatbread that is tender, slightly chewy, and absolutely versatile. Use them as mini pita pockets, wrap them around falafel, stuff them with cheese and chicken, or simply brush with garlic butter and serve alongside a bowl of soup. The possibilities are endless.
💡 The secret to no‑knead success: Time does the work for you. The long rest allows the gluten to develop naturally, so you don’t have to do any strenuous kneading. All you need is patience and warm water.
📝 The 6 Simple Ingredients
For this recipe, you need just six pantry staples. 3 cups of all‑purpose flour (about 375g) forms the base. 1 teaspoon of salt enhances the flavor. 1 tablespoon of sugar feeds the yeast and adds a touch of sweetness. 1 tablespoon of instant yeast – this is the kind that can be mixed directly with the dry ingredients; no proofing needed. 1 cup of warm water – the temperature is important; it should be around 110°F (43°C), warm to the touch but not hot, as hot water can kill the yeast. 2 tablespoons of oil – any neutral vegetable oil, olive oil, or even melted butter works.
You will also need a little extra flour for shaping the dough. That is it – no eggs, no butter, no milk. This recipe is as economical as it is delicious.
👩🍳 Step‑by‑Step Instructions
First, mix the dry ingredients. In a large mixing bowl, combine the flour, salt, sugar, and instant yeast. Whisk them together thoroughly so the yeast and salt are evenly distributed – this prevents the yeast from coming into direct contact with too much salt, which can inhibit its activity.
Next, add the wet ingredients. Pour in the warm water and the oil. Use a wooden spoon or a spatula to mix everything together until a soft, shaggy dough forms. There is no need to knead – just stir until the flour is fully incorporated. The dough will be sticky, which is exactly what you want.
Let the dough rest. Cover the bowl with a clean kitchen towel or plastic wrap. Set it aside in a warm place and let it rest for 45 minutes to 1 hour, or until the dough has become noticeably puffy and risen. This first rise is where the gluten develops and the flavor builds.
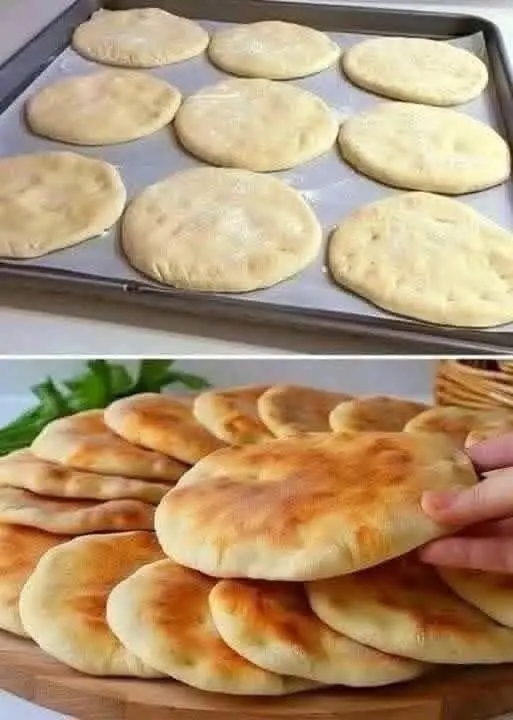
Shape the flatbreads. Sprinkle a little flour on your hands and on your work surface. Turn the dough out onto the floured surface and divide it into small balls – about the size of a golf ball or a little larger. You should get 10 to 12 mini flatbreads. Flatten each ball into a small round disc, about ½ inch thick. Do not roll them too thin – they need a little height to puff up beautifully.
Second rest. Place the shaped flatbreads on a baking tray lined with parchment paper. Cover them loosely with a clean towel and let them rest for another 15 minutes. This second rest allows them to puff up again, ensuring a light, airy texture.
Bake. Preheat your oven to 375°F (190°C). Place the tray in the oven and bake for 15 to 18 minutes, until the flatbreads are lightly golden and puffed. For extra color and a slightly crispy top, you can place them under the broiler for 1 to 2 minutes – watch carefully to avoid burning.
Optional pan method. If you prefer a slightly charred, stovetop version, heat a dry skillet or frying pan over medium heat. Cook each flatbread for 2 to 3 minutes per side until golden spots appear. This method gives them a beautiful, rustic finish.
Serve warm. Brush the baked flatbreads with a little oil or melted butter for extra softness. They are best enjoyed warm, but they also store beautifully.
💡 Pro Tips for the Best No‑Knead Flatbread
Use warm, not hot, water. Water that is too hot will kill the yeast. If it feels uncomfortably hot on your wrist, it is too hot. Aim for lukewarm – about 110°F (43°C).
Do not skip the second rest. That final 15‑minute rest after shaping is what gives these flatbreads their soft, fluffy interior. It allows the dough to relax and puff up one last time.
Brush with oil after baking. For an ultra‑soft, pliable texture, brush the warm flatbreads with a little olive oil or melted butter as soon as they come out of the oven. This also adds a lovely sheen.
Store properly. If you are not eating them immediately, store the cooled flatbreads in an airtight bag or container. They can also be frozen and reheated in a toaster or skillet.
Experiment with flavors. Add a teaspoon of garlic powder, dried herbs, or even a pinch of chili flakes to the dry ingredients for a flavored version.
🥗 Nutritional Snapshot (per flatbread, 1/11 of recipe)
🔥 Calories: 160
💪 Protein: 4g
🥑 Fat: 3g
🍚 Carbs: 29g
🌾 Fiber: 1g
🧂 Sodium: 210mg
Values are estimates using all‑purpose flour and vegetable oil. These flatbreads are a great base for any meal – load them up with protein and vegetables for a balanced plate.
🌟 7 Delicious Ways to Use These Mini Flatbreads
Mini Pita Pockets: Split the flatbreads open and stuff them with falafel, hummus, fresh vegetables, and tahini sauce. They make the perfect handheld meal.
Cheese & Chicken Filling: Fill them with shredded rotisserie chicken, melted cheddar, and a drizzle of barbecue sauce. Pop them back in the oven for a few minutes to melt the cheese.
Egg & Avocado Breakfast Wrap: Use them as a base for scrambled eggs, sliced avocado, and a sprinkle of salt and pepper – a quick, satisfying breakfast.
Garlic Herb Dippers: Brush with garlic butter and sprinkle with fresh parsley. Serve alongside a bowl of tomato soup or pasta.
Flatbread Pizza: Top with tomato sauce, mozzarella, and your favorite toppings. Bake for 5‑7 minutes until the cheese is bubbly. The flatbreads are the perfect size for individual pizzas.
Tuna or Chicken Salad Sandwiches: Fill with your favorite tuna or chicken salad mixture. The soft flatbreads are perfect for a light lunch.
Dipping Bread: Cut them into wedges and serve with olive oil and balsamic vinegar for dipping, or alongside a bowl of hummus or baba ganoush.
❄️ How to Store, Reheat & Freeze
These flatbreads are best enjoyed fresh, but they also store beautifully. Place cooled flatbreads in an airtight container or zip‑top bag and store at room temperature for up to 2 days. For longer storage, they freeze perfectly for up to 2 months. To freeze, separate each flatbread with a piece of parchment paper to prevent sticking, then place in a freezer bag. To reheat, warm them in a toaster, a dry skillet over medium heat, or in the oven at 300°F (150°C) for 5‑8 minutes. The microwave works in a pinch, but it will make them softer rather than crisp. If you are planning to use them as pita pockets, reheat them briefly before cutting and filling.
📦 Meal prep tip: Make a double batch of these flatbreads on the weekend. Store them in the freezer and reheat as needed. They are perfect for quick lunches, impromptu appetizers, or easy dinners.
Want the full truth and the practical next steps?
Page 2 continues with the real explanation, the key details many readers skip, and the simple takeaways that make this guide more useful.