
There are desserts that impress, and then there are desserts that impress and require no oven time. This No‑Bake Strawberry Cheesecake falls squarely into the second category. It is silky smooth, packed with real strawberry flavor, and topped with a glossy, fruity jelly that makes every slice look like it came from a bakery.
Best of all, you do not need to turn on your oven. No water baths. No cracking worries. Just a simple crust, a creamy no‑bake filling, and a fresh strawberry topping that sets beautifully in the refrigerator.
Whether you are a beginner baker, short on time, or just looking for a make‑ahead dessert that wows, this recipe is for you. The combination of buttery digestive biscuit crust, velvety cream cheese filling, and bright strawberry jelly is absolutely irresistible.
In this guide, you will learn the complete recipe, pro tips for the perfect texture, delicious variations, storage advice, and why no‑bake cheesecakes are a summer (and year‑round) favorite.
Why No‑Bake Cheesecake Is a Game‑Changer
Traditional baked cheesecakes are delicious, but they can be intimidating. They require careful temperature control, a water bath, and patience to avoid cracks. No‑bake cheesecakes eliminate all that stress.
Here is why this recipe works so well:
· No oven needed – Perfect for hot days or when your oven is occupied.
· Creamy, light texture – Whipped cream and cream cheese create a mousse‑like consistency.
· Make‑ahead friendly – Needs several hours to set, so you can prepare it the day before.
· Naturally beautiful – The strawberry topping adds a gorgeous red glaze.
· Beginner‑proof – No complicated techniques, no fear of overbaking.
· Customizable – Swap the fruit, change the crust, add chocolate — endless possibilities.
Once you master this no‑bake strawberry cheesecake, you will never go back to the baked version.
The Complete No‑Bake Strawberry Cheesecake Recipe
This recipe makes one 8‑inch (20 cm) round cheesecake, serving 8–10 people. It can easily be doubled for a 9×13‑inch pan.
Ingredients
For the Crust:
· 200g digestive biscuits (about 14–16 biscuits; graham crackers work too)
· 100g unsalted butter, melted
For the Cheesecake Filling:
· 400g cream cheese, softened to room temperature
· 200ml whipping cream (heavy cream, at least 35% fat)
· 100g granulated sugar (or caster sugar)
· 1 teaspoon vanilla extract (optional)
· 1 tablespoon lemon juice (optional, brightens the flavor)
For the Strawberry Topping (Jelly Layer):
· 150g fresh strawberries, hulled and sliced or pureed
· 50g granulated sugar (adjust to taste)
· 10g unflavored gelatin powder (about 1 tablespoon)
· 50ml cold water (to bloom the gelatin)
For Garnish (Optional):
· Fresh strawberry slices
· Whipped cream
· Mint leaves
Equipment
· 8‑inch (20 cm) springform pan or round cake pan with removable bottom
· Mixing bowls
· Electric hand mixer or stand mixer
· Spatula
· Small saucepan
· Parchment paper (optional)
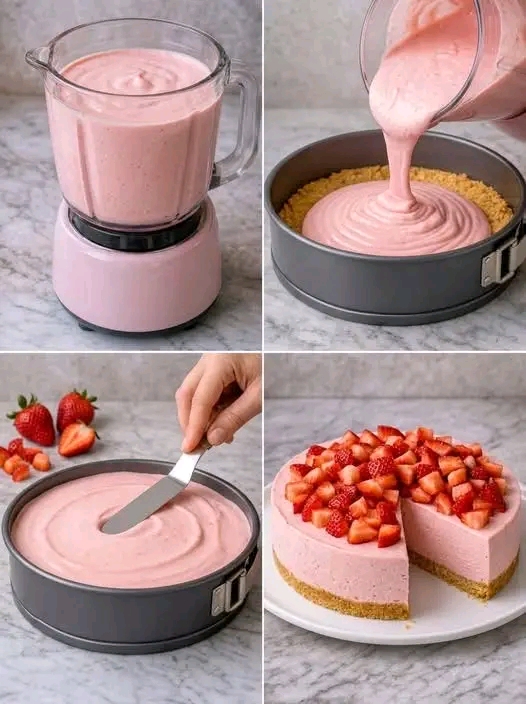
Step‑by‑Step Instructions
Part 1: Make the Crust
Step 1 – Crush the Biscuits
Place the digestive biscuits in a sealed plastic bag and crush them with a rolling pin until you have fine crumbs. You can also use a food processor for a more even texture. You want about 1½ cups of crumbs.
Step 2 – Combine with Butter
In a medium bowl, mix the biscuit crumbs with the melted butter until the mixture resembles wet sand. All crumbs should be evenly moistened.
Step 3 – Press into the Pan
Transfer the crumb mixture to your springform pan. Press down firmly and evenly using the bottom of a measuring cup or a flat glass. Press up the sides about 1 inch if you want a higher edge. Refrigerate the crust while you prepare the filling (at least 15 minutes).
Part 2: Make the Cheesecake Filling
Step 1 – Soften the Cream Cheese
Ensure your cream cheese is at room temperature. Cold cream cheese will be lumpy. Leave it out for 1–2 hours before starting.
Step 2 – Beat the Cream Cheese
In a large mixing bowl, beat the softened cream cheese with an electric mixer on medium speed until smooth and creamy, about 2 minutes. Scrape down the sides.
Step 3 – Add Sugar and Vanilla
Add the sugar, vanilla extract, and lemon juice (if using). Beat until well combined and smooth.
Step 4 – Whip the Cream Separately
In another bowl, whip the cold whipping cream until stiff peaks form. Do not overbeat — it should be thick and billowy.
Step 5 – Fold Together
Gently fold the whipped cream into the cream cheese mixture using a spatula. Fold in thirds, turning the bowl, until no white streaks remain. Do not stir — folding keeps the filling light and airy.
Step 6 – Fill the Crust
Spoon the filling into the prepared crust. Spread evenly with a spatula. Tap the pan gently on the counter to release air bubbles. Refrigerate while you make the topping.
Part 3: Make the Strawberry Jelly Topping
Step 1 – Prepare the Strawberries
Hull the fresh strawberries. For a smooth jelly, puree them in a blender or food processor. For a chunkier topping, slice them thinly.
Step 2 – Cook the Strawberry Base
In a small saucepan, combine the strawberry puree (or sliced strawberries) with the 50g of sugar. Cook over medium heat, stirring occasionally, until the sugar dissolves and the strawberries soften (about 3–5 minutes). If using slices, mash them slightly with a spoon.
Step 3 – Bloom the Gelatin
In a small bowl, sprinkle the 10g of gelatin powder over the 50ml of cold water. Let it sit for 5–10 minutes until it becomes spongy.
Step 4 – Melt the Gelatin
Microwave the bloomed gelatin for 10–15 seconds until it becomes liquid, or place the bowl over a saucepan of simmering water (double boiler method). Do not boil.
Step 5 – Combine with Strawberry Mixture
Remove the strawberry mixture from heat. Whisk in the melted gelatin until completely dissolved.
Step 6 – Cool Slightly
Let the strawberry mixture cool for about 10–15 minutes. It should be warm but not hot — hot liquid will melt the cheesecake filling.
Step 7 – Pour Over the Cheesecake
Gently pour the strawberry mixture over the chilled cheesecake filling. Tilt the pan to spread evenly. If you used sliced strawberries, arrange them decoratively.
Part 4 – Chill and Serve
Step 1 – Refrigerate
Place the cheesecake in the refrigerator for at least 6 hours, preferably overnight. The cheesecake needs time to set fully. Do not rush.
Step 2 – Remove from Pan
Run a thin knife around the edge of the pan to loosen. Release the springform ring. Transfer the cheesecake to a serving plate.
Step 3 – Garnish and Slice
Garnish with fresh strawberry slices, whipped cream, or mint leaves. Use a sharp knife, wiping the blade between cuts, for clean slices. Serve chilled.
Pro Tips for the Perfect No‑Bake Cheesecake
Use Full‑Fat Cream Cheese
Low‑fat or non‑fat cream cheese contains more water and will result in a softer, less stable cheesecake. Full‑fat (at least 30% milk fat) gives the best texture.
Room Temperature Ingredients Are Essential
Cold cream cheese will not blend smoothly, leaving lumps. Set it out 1–2 hours ahead. Cold cream whips better, so keep that chilled until the last minute.
Do Not Overwhip the Cream
Stop when stiff peaks form — when you lift the beaters, the cream stands straight up. Overwhipped cream becomes grainy and will separate.
Fold, Do Not Stir
Stirring deflates the whipped cream, making the filling dense. Use a gentle folding motion: cut down through the center, scrape along the bottom, and fold over.
Let the Topping Cool Before Pouring
If the strawberry jelly is too hot, it will melt the cream cheese filling. Let it cool to lukewarm (about 100°F / 38°C).
Chill Overnight for Best Results
Six hours is the minimum. Overnight chilling (8–12 hours) ensures a clean slice and fully developed flavors.
Use a Springform Pan
A springform pan makes removal effortless. If you do not have one, line a regular cake pan with parchment paper overhanging the sides to lift the cheesecake out.
Want the full truth and the practical next steps?
Page 2 continues with the real explanation, the key details many readers skip, and the simple takeaways that make this guide more useful.