
There are cheesecakes that require water baths, careful temperature control, and hours of anxiety. And then there is this Easy No‑Bake Vanilla Cheesecake — a dessert that delivers all the rich, creamy, velvety goodness of a traditional cheesecake without ever turning on the oven. It is foolproof, beginner‑friendly, and absolutely irresistible.
With a buttery graham cracker crust and a silky vanilla cream cheese filling that sets perfectly in the refrigerator, this cheesecake is the answer to every last‑minute gathering, hot summer day, or moment when you crave something elegant without the stress. Top it with fresh berries, a drizzle of white chocolate, or simply a cloud of whipped cream, and you have a dessert that looks like it came from a high‑end bakery.
In this guide, you will learn the complete foolproof recipe, pro tips for the creamiest texture, delicious variations, storage advice, and why this no‑bake cheesecake will become your go‑to for holidays, birthdays, and every day in between.
Why This No‑Bake Vanilla Cheesecake Is Foolproof
Baked cheesecakes can be intimidating. They crack, they sink, they require a water bath, and they take hours to cool. This no‑bake version eliminates all those worries. The filling sets in the refrigerator, resulting in a light, mousse‑like texture that is stable, sliceable, and incredibly creamy.
Here is why you will love it:
· No oven required – Perfect for hot days or when the oven is occupied.
· Only 7 simple ingredients – All pantry staples.
· Creamy, light texture – Whipped cream and cream cheese create a mousse‑like filling.
· No cracking – No water bath, no stress.
· Make‑ahead friendly – Needs at least 4 hours to chill, so you can prepare it the day before.
· Beginner‑friendly – No baking skills required.
· Endlessly customizable – Add fruit, chocolate, caramel, or nuts.
This is the cheesecake you will bring to potlucks, holiday dinners, and birthday parties — and it will disappear first.
The Complete Easy No‑Bake Vanilla Cheesecake Recipe
This recipe makes one 9‑inch cheesecake, serving 10–12 people.
For the Crust
· 2 cups graham cracker crumbs (or digestive biscuits, about 16 full sheets)
· ½ cup (113g) unsalted butter, melted
For the Cheesecake Filling
· 2 cups (16 oz / 452g) cream cheese, softened to room temperature
· 1 cup (240 ml) heavy whipping cream (cold)
· ¾ cup (90g) powdered sugar (sifted)
· 1 tablespoon lemon juice (optional, enhances flavor and cuts richness)
· 1 teaspoon vanilla extract
For the Topping (Optional)
· Whipped cream (homemade or store‑bought)
· White chocolate drizzle (melted white chocolate)
· Fresh berries (strawberries, raspberries, blueberries)
· Fruit sauce (raspberry, strawberry, or blueberry)
Equipment
· 9‑inch springform pan (or a regular cake pan lined with parchment)
· Electric hand mixer or stand mixer
· Mixing bowls
· Spatula
Step‑by‑Step Instructions (5 Minutes Active Prep)
Part 1 – Make the Crust (2–3 minutes)
Step 1 – Combine
In a medium bowl, mix the graham cracker crumbs with the melted butter until the mixture resembles wet sand.
Step 2 – Press
Transfer the mixture to a 9‑inch springform pan. Press it firmly and evenly into the bottom using the bottom of a measuring cup or a flat glass. Press up the sides about 1 inch if desired.
Step 3 – Chill
Place the crust in the refrigerator while you prepare the filling. Chilling helps it set and prevents crumbling.
Part 2 – Make the Filling (5 minutes)
Step 1 – Beat the Cream Cheese
In a large mixing bowl, beat the softened cream cheese with an electric mixer on medium speed until smooth and creamy, about 2 minutes. Scrape down the sides.
Step 2 – Add Sugar, Vanilla, and Lemon
Add the powdered sugar, vanilla extract, and lemon juice (if using). Beat until well combined and smooth.
Step 3 – Whip the Heavy Cream
In a separate bowl, whip the cold heavy cream until soft peaks form (about 2–3 minutes). Do not overbeat; stop when the cream holds its shape but is still soft.
Step 4 – Fold Together
Gently fold the whipped cream into the cream cheese mixture using a spatula. Fold in thirds, turning the bowl, until no white streaks remain. Do not stir — folding keeps the filling light and airy.
Part 3 – Assemble
Step 1 – Spread the Filling
Spoon the filling over the chilled crust. Spread it evenly with a spatula. For that clean, professional look, smooth the top in one direction.
Step 2 – Tap Out Air Bubbles
Gently tap the pan on the counter a few times to release any air bubbles.
Part 4 – Chill
Step 1 – Refrigerate
Cover the cheesecake with plastic wrap or foil. Refrigerate for at least 4 hours, preferably overnight. This is what gives it that firm but ultra‑creamy texture.
Step 2 – Clean Slices
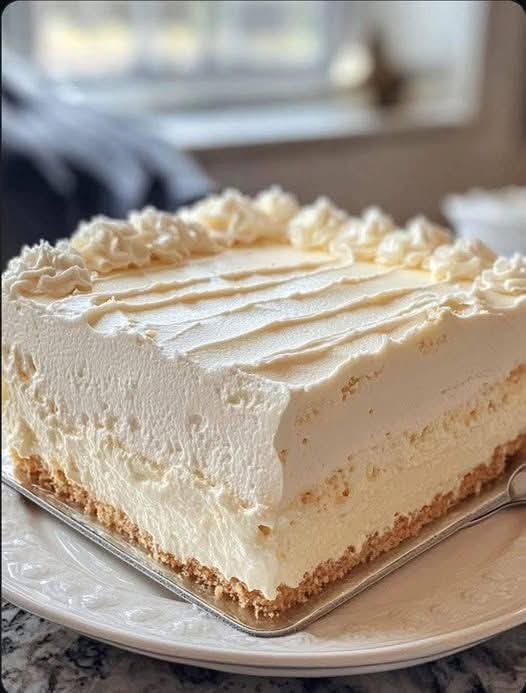
For the cleanest slices (like the photo), chill overnight. Use a sharp knife, dipping it in hot water and wiping it dry between cuts.
Part 5 – Finish and Serve
Step 1 – Remove from Pan
Run a thin knife around the edge of the springform pan. Release the latch and remove the outer ring.
Step 2 – Add Toppings
Top with whipped cream, a drizzle of melted white chocolate, fresh berries, or fruit sauce. Dust with powdered sugar if desired.
Step 3 – Slice and Serve
Serve chilled. Store leftovers in the refrigerator.
Pro Tips for That Perfect “Bakery Look”
Use Room Temperature Cream Cheese
Cold cream cheese will be lumpy. Leave it on the counter for 1–2 hours before starting. If you forget, microwave it in 15‑second bursts until softened but not melted.
Sift the Powdered Sugar
Sifting removes lumps and ensures a smooth filling.
Do Not Overmix After Folding
Overmixing deflates the whipped cream, making the filling dense. Fold gently until just combined.
Chill Overnight for Clean Slices
Four hours is the minimum. Overnight chilling ensures a clean, sharp slice without dragging the filling.
Use a Sharp Knife
Dip the knife in hot water and wipe it dry between each slice. This melts through the cheesecake cleanly.
For a Perfectly Level Top
After spreading the filling, tap the pan on the counter to settle it, then use an offset spatula to smooth.
Delicious Variations (Same Foolproof Method)
Once you master the classic vanilla cheesecake, try these easy twists.
- Lemon Cheesecake
Increase lemon juice to 2 tablespoons. Add 1 tablespoon of lemon zest to the filling. Top with lemon curd and fresh berries.
- Chocolate Cheesecake
Add ½ cup of melted sugar‑free dark chocolate to the cream cheese mixture before folding in the whipped cream. Use an Oreo cookie crust instead of graham crackers.
- Strawberry Cheesecake
Fold in ½ cup of finely chopped fresh strawberries (pat dry). Top with strawberry sauce and fresh slices.
- Raspberry White Chocolate Cheesecake
Drizzle melted white chocolate over the filling before chilling. Swirl gently. Top with fresh raspberries.
- Key Lime Cheesecake
Replace lemon juice with key lime juice. Add 1 tablespoon of lime zest. Use a graham cracker crust with a touch of cinnamon.
- Peanut Butter Cheesecake
Add ½ cup of creamy peanut butter to the cream cheese mixture. Use a chocolate cookie crust. Top with chocolate drizzle and chopped peanuts.
- Gluten‑Free No‑Bake Cheesecake
Use gluten‑free graham crackers or gluten‑free digestive biscuits. Ensure your cream cheese and other ingredients are gluten‑free (most are).
- Vegan No‑Bake Cheesecake
Use vegan cream cheese (like Kite Hill or Violife), coconut cream instead of heavy cream, and vegan butter. The texture will be slightly softer but still delicious.
Want the full truth and the practical next steps?
Page 2 continues with the real explanation, the key details many readers skip, and the simple takeaways that make this guide more useful.