
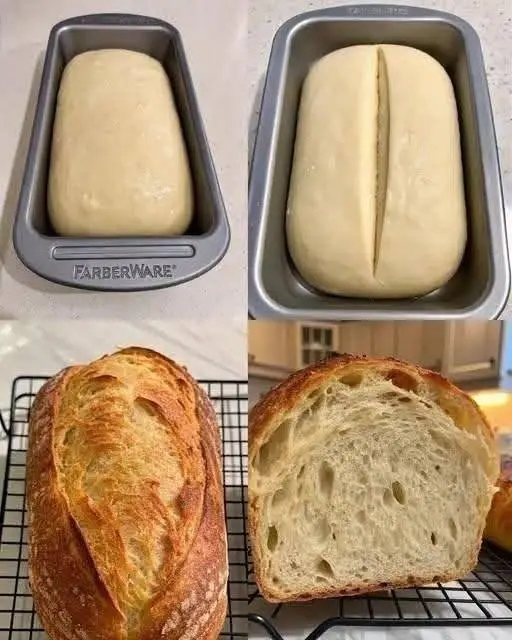
There are breads that are merely a vehicle for butter, and then there are breads that are a work of art – the kind that make you pause, admire the golden, blistered crust, and savor the tender, airy crumb with every bite. Artisan-Style Sandwich Bread is emphatically the latter. Imagine a loaf with a deep, dramatic score that creates a beautiful “ear” on top, a crust that’s dark, crispy, and deeply caramelized, and an interior that’s light, open, and filled with those gorgeous, irregular holes that are the hallmark of high-hydration, slow‑fermented bread. It’s the kind of bread that elevates a simple sandwich to something extraordinary – a true baker’s masterpiece.
If you’ve ever dreamed of making bread that looks and tastes like it came from a professional bakery, this recipe is about to show you how. With a few simple ingredients, a little patience, and a technique that’s easier than you think, you can create a loaf that’s better than anything you’d find at a store. The secret lies in the cold fermentation, the steam, and the deep score – and the result is pure bread magic.
What Is Artisan-Style Sandwich Bread?
At its heart, this bread is a high‑hydration, slow‑fermented loaf that combines the structure of a sandwich bread with the open crumb and crispy crust of an artisan loaf. The high hydration (about 75%) creates a dough that’s soft and slightly sticky, which results in an open, airy crumb with those beautiful, irregular holes. The cold fermentation develops complex flavors and makes the dough easier to score. The deep score creates the signature “ear” that bakes into a crispy, caramelized ridge on top.
This recipe falls into the category of “artisan baking” and “sourdough-style breads” – the kind of bread that’s perfect for sandwiches, toast, or simply enjoying with a slather of butter. It’s a loaf that’s both beautiful and functional, with a crust that’s crisp and a crumb that’s tender and flavorful.
What makes this version especially brilliant is the balance of techniques. The cold proofing develops flavor and makes the dough easier to handle. The steam during baking creates a crisp, crackly crust. And the deep score allows the bread to expand beautifully in the oven, creating that dramatic, rustic look.
Why You’ll Love This Recipe
There are countless reasons to fall in love with this Artisan-Style Sandwich Bread. Here are just a few that will have you making it on repeat:
Beautiful, professional look – the deep score and golden crust are stunning.
Open, airy crumb – light, tender, and filled with gorgeous holes.
Deep, complex flavor – the cold fermentation develops rich, nuanced notes.
Crispy, caramelized crust – the steam and high heat create a perfect crust.
Simple ingredients – just flour, water, salt, and starter (or yeast).
Rewarding and fun – the process is as enjoyable as the result.
Versatile – perfect for sandwiches, toast, or simply with butter.
Make‑ahead friendly – the cold proof allows for flexible timing.
Impressive yet achievable – with a little practice, anyone can do it.
Always a crowd‑pleaser – everyone loves fresh, homemade bread.
This is the recipe that will make you feel like a professional baker. It’s proof that with a little patience and the right techniques, you can create something truly spectacular.
Ingredients for Artisan-Style Sandwich Bread
This recipe uses simple, high‑quality ingredients that come together beautifully. Here’s what you’ll need:
For the Sourdough Version
360g (3 cups) bread flour (high protein flour is essential for the structure)
120g (½ cup) active sourdough starter (100% hydration, bubbly and active)
240g (1 cup) lukewarm water
8g (1.5 tsp) fine sea salt
Optional: 1 tbsp honey or sugar for slight sweetness
Commercial Yeast Alternative (Faster Method)
- 360g bread flour
- 240g warm water
- 2 tsp instant yeast
- 1 tbsp sugar
- 8g salt
Ingredient Notes and Substitutions
Bread Flour: High protein bread flour (12–14% protein) is essential for developing the gluten structure needed to support the open crumb. All‑purpose flour can be used, but the crumb will be slightly denser.
Sourdough Starter: Use an active, bubbly starter that has been fed within the last 4–6 hours. If your starter is sluggish, the fermentation will take longer.
Water: Lukewarm water (about 80°F / 27°C) helps activate the fermentation without killing the yeast. For cold fermentation, the water doesn’t need to be warm.
Salt: Fine sea salt is preferred. It dissolves more evenly than coarse salt.
Honey or Sugar: Optional, but adds a slight sweetness and helps with browning.
Step‑by‑Step Instructions
Follow these detailed steps to create a flawless Artisan-Style Sandwich Bread every single time. The process takes two days, but the active work is minimal.
Day 1: Mix & Cold Ferment
1. Mix the Dough: In a large bowl, combine the water and sourdough starter until dissolved. Add the bread flour and salt. Mix with your hands until no dry flour remains. The dough will be shaggy and sticky – that’s exactly what you want. Cover and let rest for 30 minutes.
2. Stretch and Fold: Perform 3 sets of stretch and folds every 30 minutes. To do this, wet your hand, grab one side of the dough, stretch it up, and fold it over the top. Rotate the bowl and repeat. This builds strength without overworking the dough.
3. Bulk Ferment: Cover the bowl and let the dough rise at room temperature for 6–8 hours, until it has almost doubled in size and looks puffy and airy.
4. Shape: Turn the dough onto a lightly floured surface. Gently stretch it into a rectangle, then roll it tightly into a log. Pinch the seams shut. Place the log seam‑side down into a greased 9×5‑inch metal loaf pan.
5. Cold Proof: Cover the pan with plastic wrap and place it in the refrigerator for 12–24 hours. This cold fermentation develops flavor and makes the dough easier to score and hold its shape.
Day 2: Bake
6. Preheat and Prepare Steam: Place a baking sheet or cast iron skillet on the bottom rack of your oven. Preheat to 450°F (230°C). Boil some water.
7. Score the Bread: Take the cold bread straight from the fridge. Using a very sharp knife, lame, or razor blade, make a single, deep cut – about ½ to ¾ inch deep – straight down the center lengthwise. This deep, straight cut creates the signature “ear” on top.
8. Bake with Steam: Place the loaf pan in the oven. Immediately pour 1 cup of boiling water into the hot skillet on the bottom rack (watch out for steam!) and quickly close the door. Bake for 25 minutes.
9. Remove Steam and Finish: Remove the steam pan from the oven. Lower the temperature to 400°F (200°C). Bake for another 20–25 minutes, until the crust is deeply golden‑brown and the internal temperature reads 205°F–210°F.
10. Cool: Remove the bread from the pan immediately and place it on a wire rack. Let it cool completely for at least 2 hours before slicing. Cutting it hot will turn that beautiful airy crumb into a gummy, squished mess.
Expert Tips for the Perfect Artisan Bread
This recipe is detailed, but a few expert tricks will elevate it to perfection. Here’s what I’ve learned from making this bread countless times:
The deep score is essential – most bread recipes tell you to make a shallow cut, but this recipe needs a deep cut to get that wide, rustic opening that reveals the pale interior while the crust turns dark.
Use a metal pan – a dull, dark‑grey metal pan (like the Farberware style) absorbs heat much better than glass, giving the bread those dark, crispy side walls.
Steam is non‑negotiable – without steam, the crust will set too early, and the bread will be flat with no oven spring.
Cold dough is easier to score – don’t let the dough come to room temperature before scoring. Cold dough holds its shape better and makes a cleaner cut.
Use a razor blade or lame – a sharp blade is essential for a clean score that doesn’t drag the dough.
Let it cool completely – this is the hardest part, but it’s essential. Cutting into hot bread will ruin the open crumb.
Weigh your ingredients – for the best results, use a kitchen scale. Baking is a science, and precise measurements make all the difference.
Adjust fermentation time – if your kitchen is cold, fermentation will take longer. If it’s warm, it will be faster. Look for visual cues (doubled in size, puffy) rather than relying solely on time.
Delicious Variations
One of the best things about this recipe is how easily it adapts to different tastes and cravings. Here are some of my favorite ways to switch it up:
Whole Wheat Artisan Bread
Replace half the bread flour with whole wheat flour. You may need to add a little more water, as whole wheat flour absorbs more liquid.
Herb and Garlic Bread
Add 1 tablespoon of fresh chopped herbs (rosemary, thyme, or oregano) and 2 cloves of minced garlic to the dough during the stretch and fold stage.
Seeded Artisan Bread
Add ½ cup of mixed seeds (sunflower, pumpkin, sesame, and poppy) to the dough during the stretch and fold stage. Sprinkle extra seeds on top before scoring.
Olive and Rosemary Bread
Fold in ½ cup of chopped Kalamata olives and 1 tablespoon of fresh rosemary during the stretch and fold stage. The briny olives and fragrant rosemary are a classic combination.
Cheddar and Jalapeño Bread
Add 1 cup of shredded sharp cheddar and ½ cup of diced pickled jalapeños to the dough. This is a spicy, cheesy twist that’s perfect for sandwiches.
Commercial Yeast Version
If you don’t have a starter, use the commercial yeast alternative. Mix, knead for 10 minutes, and let rise until doubled (about 1.5 hours). Shape, place in the greased pan, and let rise again until it crests 1 inch above the rim. Score, brush with water or egg wash, and bake at 375°F for 35–40 minutes.
Serving Suggestions
This versatile bread can be served in a variety of ways, making it perfect for any occasion:
With butter – the classic way to enjoy fresh, warm bread.
As a sandwich – the open crumb and sturdy crust make it perfect for any filling.
As toast – the crisp crust becomes even more delicious when toasted.
With soup or stew – perfect for dipping.
For brunch – serve with eggs, avocado, or smoked salmon.
For holidays – a beautiful addition to any holiday table.
With cheese and charcuterie – the perfect bread for a cheese board.
Storage and Reheating Guidelines
This bread stores beautifully, making it a fantastic make‑ahead option.
Room Temperature: Store in a paper bag or wrapped in a kitchen towel for up to 3 days. Avoid plastic bags, which can make the crust soft.
Freezing: This bread freezes beautifully. Wrap it tightly in plastic wrap and foil, and freeze for up to 2 months. Thaw at room temperature before serving.
Reheating: To revive a day‑old loaf, spritz the crust with water and heat in a 350°F oven for 5–10 minutes. This restores the crispy crust.
Pro tip: Slice the bread before freezing so you can toast individual slices straight from the freezer.
Want the full truth and the practical next steps?
Page 2 continues with the real explanation, the key details many readers skip, and the simple takeaways that make this guide more useful.