
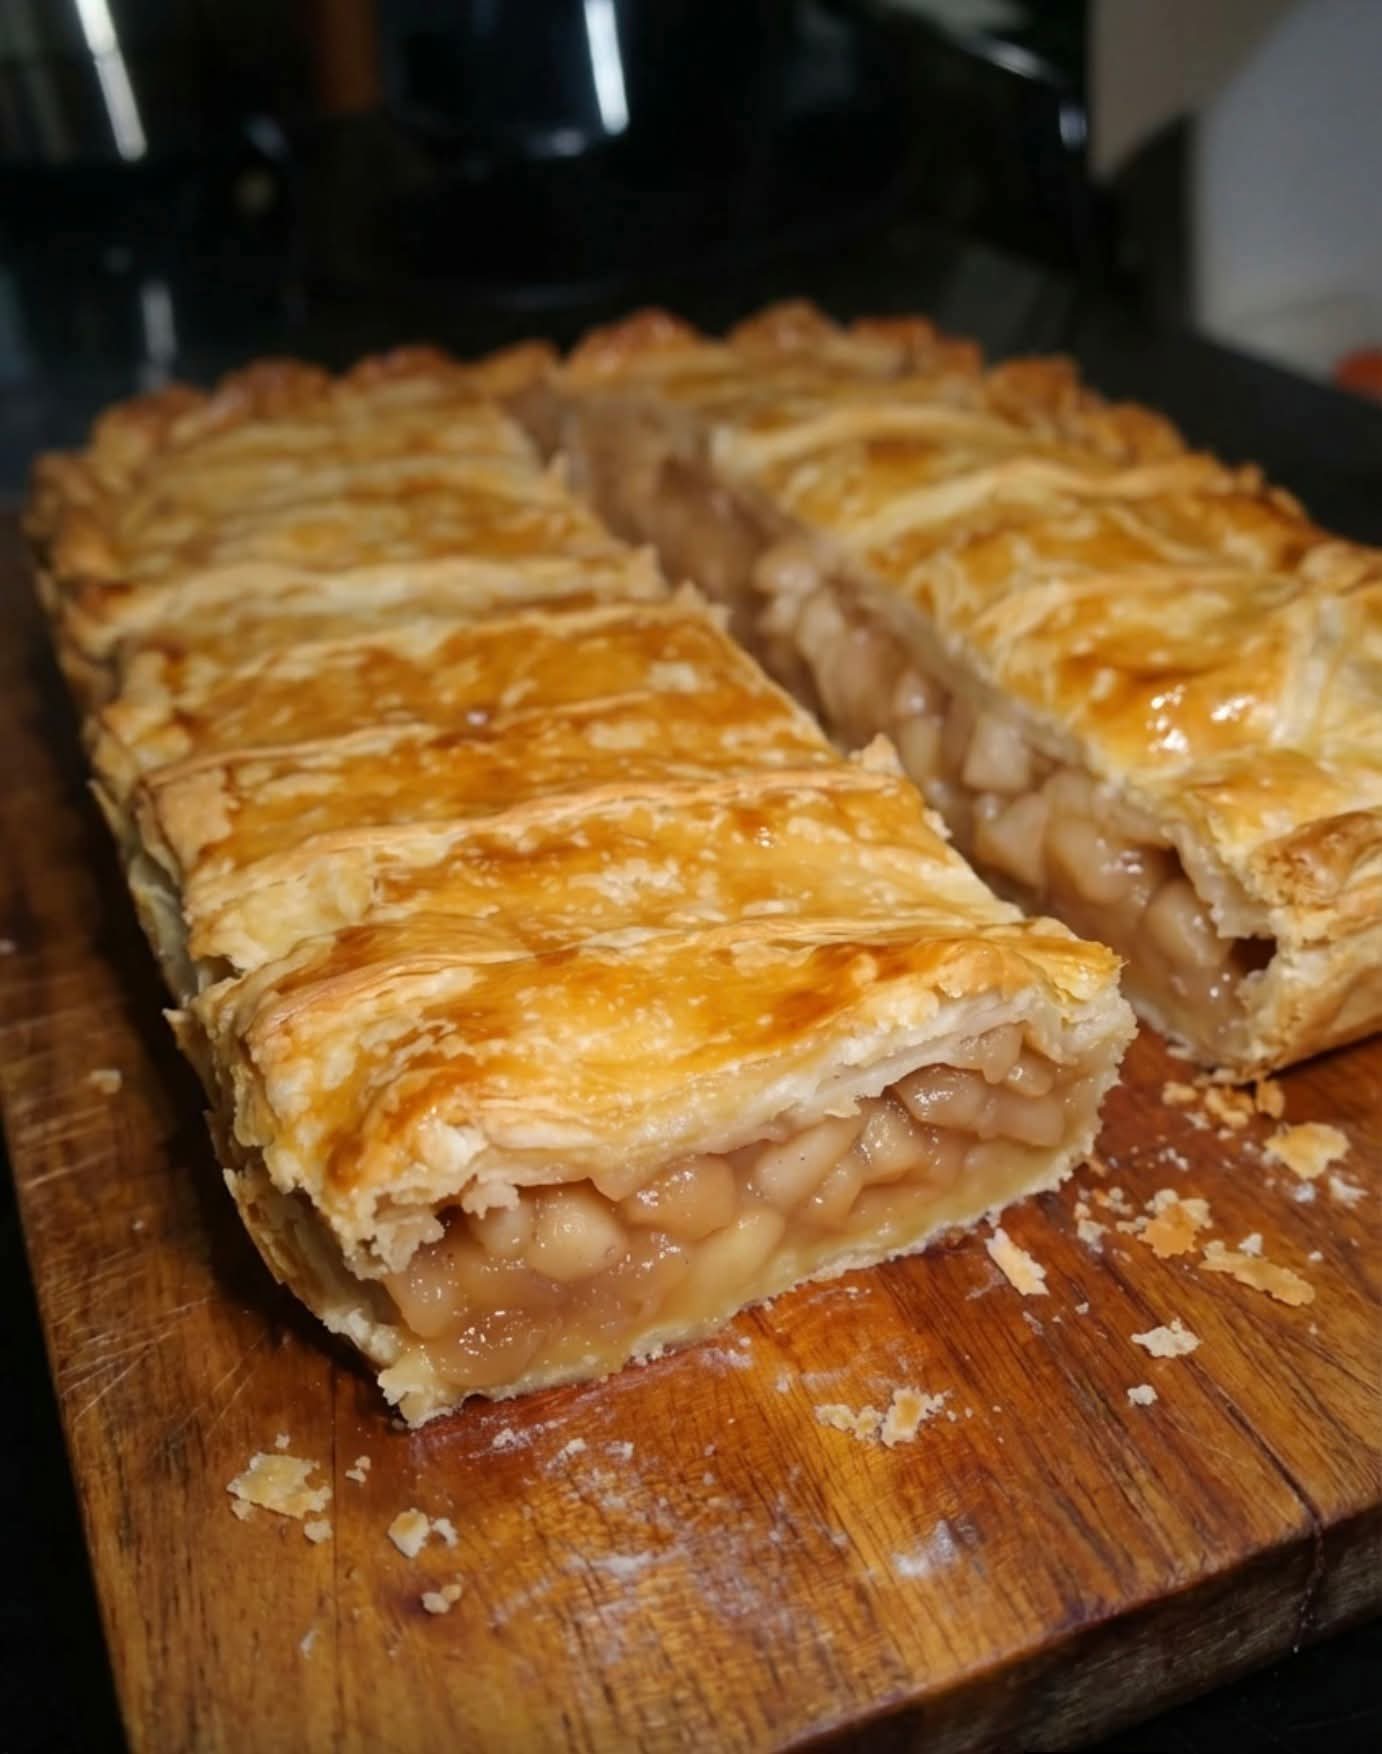
There are apple desserts that take all afternoon. And then there is this Apple Puff Pastry Slab — a strudel‑style treat that delivers all the warm, cinnamon‑apple goodness of a classic strudel in a fraction of the time. No stretching dough. No worrying about tears. Just two sheets of buttery, flaky puff pastry sandwiching a tender, spiced apple filling.
The result? A golden, crisp, irresistible dessert that looks like it came from a European bakery. Slice it into squares or rectangles, dust with powdered sugar, and watch it disappear at brunch, potlucks, or family dinners.
In this guide, you will learn the complete recipe, why puff pastry is the perfect shortcut, how to make a glossy, thick apple filling that won’t make the pastry soggy, pro tips for perfect results, delicious variations, storage advice, and why this slab pie is about to become your new go‑to.
Why This Apple Puff Pastry Slab Is a Game‑Changer
Traditional strudel requires stretching paper‑thin dough by hand – a skill that takes practice. This recipe uses store‑bought puff pastry, which is already laminated with dozens of buttery layers. When baked, it puffs into a shatteringly crisp, golden crust that cradles a sweet, spiced apple filling.
Here is why you will love it:
· Only 2 pastry sheets – No homemade dough required.
· One pan – Baked on a single baking sheet.
· No rolling – Just thaw, fill, and seal.
· Spectacular texture – Flaky outside, tender apple inside.
· Make‑ahead friendly – Prep the filling a day in advance.
· Crowd‑pleaser – Tastes like something from a pastry shop.
This is the dessert you bring to holiday gatherings, fall brunches, and any time you want to impress without the stress.
The Complete Apple Puff Pastry Slab Recipe
This recipe makes one large slab (about 9×13 inches), serving 8–10 people.
For the Apple Filling
· 4–5 medium apples (peeled, cored, and diced small) – about 4 cups
· ½ cup (100g) granulated sugar (adjust to taste)
· 1–2 tablespoons lemon juice (prevents browning and adds brightness)
· 1 teaspoon ground cinnamon
· ¼ teaspoon ground nutmeg (optional)
· 2 tablespoons cornstarch (thickener)
· ¼ cup (60ml) water
· 1 teaspoon vanilla extract
For the Pastry
· 2 sheets puff pastry (thawed according to package directions)
· 1 large egg (for egg wash)
· 1 tablespoon milk (optional, for egg wash)
For Garnish (Optional)
· Powdered sugar (for dusting)
· Simple icing: ½ cup powdered sugar + 1 tablespoon milk
· Chopped walnuts or pecans
Step‑by‑Step Instructions
Part 1 – Make the Apple Filling
Step 1 – Prep the Apples
Peel, core, and dice the apples into small, uniform pieces (about ¼‑inch cubes). Smaller pieces cook faster and distribute evenly.
Step 2 – Cook the Apples
In a large saucepan, combine the diced apples, sugar, lemon juice, cinnamon, nutmeg, and water. Cook over medium heat, stirring occasionally, until the apples soften – about 5–8 minutes. They should be tender but still hold their shape.
Step 3 – Thicken with Cornstarch
In a small bowl, mix the cornstarch with 2 tablespoons of cold water to make a slurry. Stir the slurry into the bubbling apple mixture. Continue cooking for 1–2 minutes until the filling becomes thick and glossy.
Step 4 – Add Vanilla and Cool
Remove the pan from heat. Stir in the vanilla extract. Transfer the filling to a bowl and let it cool completely to room temperature. Warm filling will melt the puff pastry and make it soggy. You can speed cooling by spreading the filling on a baking sheet.
Part 2 – Assemble the Slab
Step 1 – Preheat and Prepare
Preheat your oven to 400°F (200°C). Line a large baking sheet with parchment paper.
Step 2 – Roll Out the First Pastry Sheet
On a lightly floured surface, gently roll out one sheet of thawed puff pastry to smooth out the creases. Do not roll too thin – just enough to make it an even rectangle. Transfer the pastry to the prepared baking sheet.
Step 3 – Add the Filling
Spread the cooled apple filling evenly over the pastry, leaving a 1‑inch border around all edges. Do not overfill – about 1½ to 2 cups of filling is perfect.
Step 4 – Top with Second Pastry Sheet
Roll out the second puff pastry sheet to the same size. Gently place it over the filling. Press the edges together to seal. Use a fork to crimp the edges, or fold and pinch with your fingers.
Step 5 – Score the Top
Using a sharp knife, make shallow slashes on the top pastry – about 4–5 diagonal cuts. This allows steam to escape and gives the slab a classic strudel look.
Step 6 – Egg Wash
In a small bowl, beat the egg with 1 tablespoon of milk (if using). Brush the egg wash generously over the top pastry. This gives a golden, shiny finish.
Part 3 – Bake
Step 1 – Bake
Bake at 400°F (200°C) for 20–25 minutes, until the pastry is puffed, deep golden brown, and the filling is bubbly at the edges. Rotate the baking sheet halfway through for even browning.
Step 2 – Cool
Let the slab cool on the baking sheet for 10–15 minutes before slicing. This allows the filling to set and prevents it from oozing out.
Part 4 – Serve
Step 1 – Slice
Use a serrated knife to cut the slab into squares or rectangles. For clean cuts, wipe the knife between slices.
Step 2 – Garnish
Dust with powdered sugar or drizzle with a simple icing (powdered sugar + milk). Serve warm or at room temperature.
Pro Tips for the Best Apple Puff Pastry Slab
Use Firm, Tart Apples
Granny Smith, Honeycrisp, Braeburn, or Pink Lady hold their shape during cooking. Avoid mealy or overly soft varieties like Red Delicious.
Cool the Filling Completely
This is the most important step. Warm filling releases steam inside the pastry, turning the bottom layer soggy. Make the filling ahead and refrigerate if needed.
Do Not Overfill
Too much filling will burst out of the sides. Aim for a thin, even layer.
Keep the Pastry Cold
Puff pastry works best when chilled. If it becomes warm and sticky while you are assembling, pop it in the refrigerator for 10 minutes before baking.
Use Parchment Paper
The sugar in the filling can caramelize and stick to the pan. Parchment paper ensures easy removal.
For Extra Flakiness
Chill the assembled slab for 15 minutes in the refrigerator before baking. This firms up the butter in the pastry, leading to even more layers.
Want the full truth and the practical next steps?
Page 2 continues with the real explanation, the key details many readers skip, and the simple takeaways that make this guide more useful.