
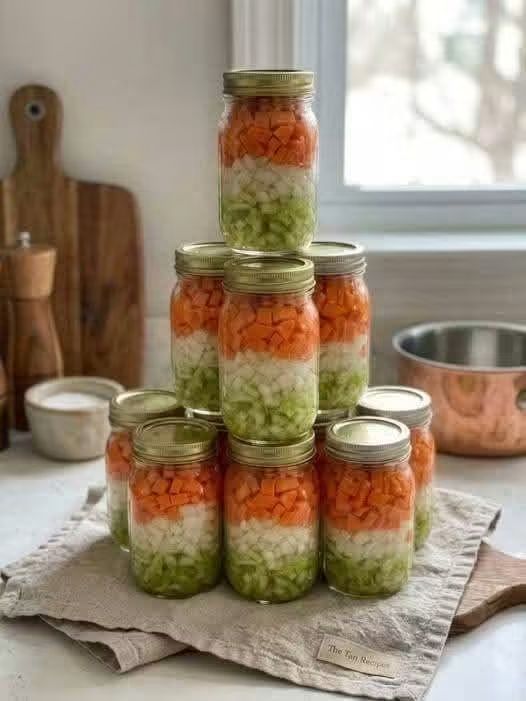
If you’re looking for the ultimate kitchen shortcut that saves time, money, and stress on busy weeknights, look no further than this Raw Pack Pressure Canned Vegetable Base. Just look at those beautiful mason jars in the photo—perfectly layered with vibrant orange carrots, creamy potatoes, and crisp green celery, all preserved in water and ready to use at a moment’s notice.
As the original poster perfectly put it: “This is a recipe I use the most in my kitchen. It is the PERFECT size for adding to so many things I cook for my husband and myself!! I make more almost every month!!”
Whether you’re a seasoned homesteader, a meal-prep enthusiast, or someone who simply wants a shelf-stable backup for emergency preparedness, this “mirepoix in a jar” is about to become your most valuable pantry staple.
Why You’ll Love These Vegetable Base Jars
· Ultimate Convenience: No more washing, peeling, and dicing vegetables when you’re tired after work. Just open a jar and dump!
· Perfect Portion Size: Pints are the ideal size for a meal for two, or for adding to a large family-sized pot of soup.
· Zero Food Waste: Vegetables nearing the end of their freshness can be chopped and preserved instead of thrown away.
· Budget-Friendly: Buy carrots, potatoes, and celery in bulk when they are on sale and preserve them for months.
· Shelf-Stable: No electricity needed. These jars can sit in your pantry for years.
· Versatile: The perfect flavor base for soups, stews, pot pies, casseroles, and slow cooker meals.
Ingredients You’ll Need
(Note: Quantities depend on how many jars you want to fill. A general rule is about 1 to 1.5 lbs of mixed vegetables per pint jar).
· Potatoes (washed, peeled, and diced into ½-inch cubes)
· Carrots (washed, peeled, and diced into ½-inch pieces)
· Celery (washed and diced into ½-inch pieces)
· Boiling Water (or hot vegetable broth for extra flavor)
· Canning Salt (optional, ½ teaspoon per pint jar)
· Clean pint mason jars, lids, and rings
Note: Do not add any pasta, rice, flour, or dairy to these jars. Those ingredients break down and become unsafe or mushy during pressure canning. Always add those fresh when cooking.
Step-by-Step Instructions (The Raw Pack Method)
- Prep Your Workspace: Wash your mason jars, lids, and rings in hot, soapy water. Keep the jars hot in a pot of simmering water until ready to fill.
- Prepare the Vegetables: Peel and dice the potatoes and carrots. Wash and dice the celery. Keep the pieces uniform in size (about ½-inch) to ensure even cooking.
- Raw Pack the Jars: Layer the diced potatoes, carrots, and celery tightly into the hot jars. Pack them firmly, but do not crush them. Leave 1 inch of headspace at the top of the jar. (If using, add ½ teaspoon of canning salt to each jar).
- Add Water: Pour boiling water (or hot broth) over the vegetables, covering them completely and maintaining that 1-inch headspace.
- Remove Air Bubbles: Use a plastic bubble popper or a wooden skewer to gently slide down the sides of the jar to release trapped air bubbles. Add more water if the level drops.
- Wipe and Seal: Wipe the rims of the jars with a clean, damp cloth. Center the lids on the jars and screw on the rings until fingertip-tight.
- Pressure Can: Place the jars in your pressure canner according to the manufacturer’s instructions.
- Process: Bring the canner to a steady boil, vent for 10 minutes, then pressurize. Process pint jars for 40 minutes at the correct pressure for your altitude (see chart below).
- Cool: Turn off the heat and let the canner depressurize naturally. Do not rush this process. Once the pressure is at zero, carefully remove the lid and let the jars sit for 5 minutes before removing them.
- Check Seals: Place the jars on a towel-lined counter and let them cool completely for 12–24 hours. Check the seals by pressing the center of the lid—it should not pop up. Remove the rings, wash the jars, and store in a cool, dark pantry.
⚠️ Crucial Altitude Adjustments for Pressure Canning
Pressure canning is the only safe way to preserve low-acid vegetables like potatoes, carrots, and celery. Water bath canning will NOT kill the bacteria that causes botulism. You must adjust your pressure based on your altitude:
· 0 – 1,000 ft: 10 lbs pressure
· 1,001 – 2,000 ft: 11 lbs pressure
· 2,001 – 4,000 ft: 12 lbs pressure
· 4,001 – 6,000 ft: 13 lbs pressure
· 6,001 – 8,000 ft: 14 lbs pressure
(Always consult your local extension office or the USDA Complete Guide to Home Canning for the most up-to-date safety guidelines.)
How to Use Your Canned Vegetable Base
This is where the magic happens! Because these vegetables are already cooked and ready, they make weeknight dinners a breeze:
· Instant Chicken Noodle Soup: Dump a jar (including liquid) into a pot with chicken broth, shredded rotisserie chicken, and egg noodles. Simmer until noodles are tender.
· Beef Stew: Add a jar to a slow cooker with stew meat, beef broth, tomato paste, and seasonings. Cook on low all day.
· Pot Pie Filling: Use the drained vegetables in a creamy chicken pot pie filling.
· Shepherd’s Pie: Mix a drained jar into cooked ground beef and gravy, then top with mashed potatoes and bake.
· Crockpot Roasts: Pour a jar over a beef roast or pork shoulder before slow cooking for added flavor and veggies.
Frequently Asked Questions
Can I water bath can these jars instead?
No. Vegetables like potatoes, carrots, and celery are low-acid foods. They MUST be pressure canned to be safe. Water bath canning does not reach a high enough temperature to kill botulism spores.
How long do these jars last?
Properly sealed and stored in a cool, dark place, these jars will last for 2–5 years. However, for the best quality and texture, aim to use them within 12–18 months.
Can I add onions or garlic?
Yes, you can add diced onions or garlic. However, onions can sometimes overpower the flavor over time, so use them sparingly.
Why do the potatoes look cloudy or soft?
Potatoes are dense and can sometimes soften or darken slightly during pressure canning. This is completely normal. They will still taste delicious in soups and stews.
Can I add meat to these jars?
Yes! You can raw-pack cubed beef or chicken with the vegetables. However, you must process the jars for the time required for the longest-cooking ingredient (which is usually meat—typically 75 minutes for pints, 90 minutes for quarts). Always follow a tested USDA recipe for meat mixtures.
Recipe Card: Raw Pack Canned Vegetable Base
· Prep Time: 30 minutes
· Cook Time: 40 minutes (processing time for pints)
· Total Time: About 2 hours (including canner heat-up and cool-down)
· Yield: Depends on how many jars you fill (approx. 1.5 lbs veggies per pint)
· Category: Pantry, Food Preservation, Meal Prep
· Cuisine: American
Final Thoughts
This Raw Pack Pressure Canned Vegetable Base is the ultimate kitchen hack. It’s a sustainable, money-saving, and incredibly convenient way to ensure you always have the foundation of a healthy, home-cooked meal ready in your pantry. Whether you’re cooking for two or feeding a crowd, having these jars on hand takes the stress out of weeknight cooking. Make a batch this weekend—you’ll be so glad you did!
Have you tried raw pack canning? Share your favorite vegetables to preserve and your favorite ways to use them in the comments below!