
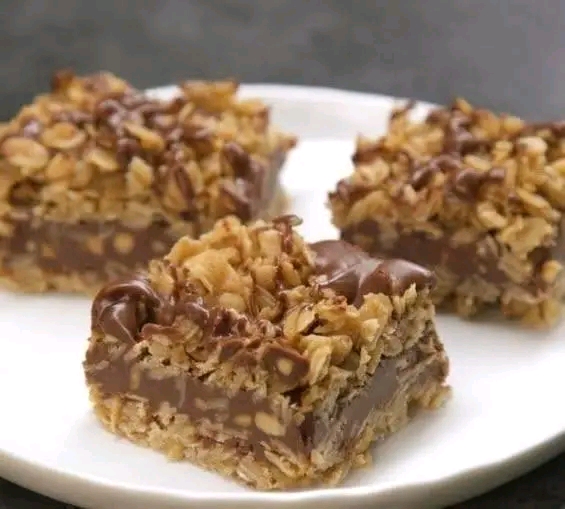
If you’re craving a dessert that’s rich, chocolatey, chewy, and requires absolutely no oven time, these No-Bake Chocolate Oat Bars are about to become your new favorite treat. A buttery, brown sugar oat crust serves as both the base and the crumbly topping, sandwiching a thick layer of melted chocolate and peanut butter. They’re like a homemade candy bar crossed with a granola bar—sweet, satisfying, and completely irresistible. Perfect for hot summer days, holiday baking, potlucks, or anytime you need a quick dessert with minimal effort. This easy no-bake recipe uses simple pantry staples and comes together in just 15 minutes. Budget friendly, kid approved, and completely foolproof.
Why You’ll Love This Recipe
· No-Bake and Easy: No oven, no baking, no fuss. Just mix, layer, chill, and enjoy.
· Only 6 Simple Ingredients: Butter, brown sugar, vanilla, oats, chocolate chips, and peanut butter. Pantry staples only.
· Chocolate Peanut Butter Perfection: The combination of melted chocolate and creamy peanut butter is a classic flavor pairing that never disappoints.
· Chewy and Satisfying: The oat layers provide a hearty, chewy texture that makes these bars feel substantial and satisfying.
· Ready in Minutes: Just 15 minutes of prep time, then let the refrigerator do the work.
· Perfect for Gifting: Package these bars in a pretty tin or box for a thoughtful homemade food gift.
· Budget Friendly: Uses simple, affordable ingredients found at any grocery store.
· Kid Approved: Kids love helping make these bars, and they love eating them even more.
Ingredients You’ll Need
· 1 cup unsalted butter, melted
· 1/2 cup packed brown sugar
· 2 teaspoons vanilla extract
· 3 cups quick-cooking oats
· 1 cup semi-sweet chocolate chips
· 1/2 cup creamy peanut butter
Optional add-ins: 1/4 cup chopped peanuts, 1/4 cup shredded coconut, 1/2 teaspoon salt (if using unsalted peanut butter), 1/4 cup butterscotch chips mixed with chocolate, 1/2 teaspoon cinnamon
Note: For a gluten-free version, use certified gluten-free quick oats. For a dairy-free option, use plant-based butter and dairy-free chocolate chips. Do not use old-fashioned rolled oats—quick-cooking oats are essential for the right texture. Natural peanut butter may separate; use a stabilized brand for best results.
Step-by-Step Instructions
- Prepare the Pan: Line an 8×8-inch baking dish with parchment paper, leaving some overhang on the sides for easy lifting. This makes removing and cutting the bars much easier.
- Make the Oat Mixture: In a large bowl, mix together the melted butter, brown sugar, and vanilla extract until well combined. The brown sugar should mostly dissolve into the butter.
- Add the Oats: Stir in the quick-cooking oats until every oat is fully coated with the butter mixture. The mixture should hold together when pressed.
- Press Half the Oats: Press exactly half of the oat mixture firmly and evenly into the bottom of the prepared baking dish. Use the back of a spoon or a flat-bottomed glass to pack it down tightly. This creates the crust.
- Melt Chocolate and Peanut Butter: In a microwave-safe bowl, melt the chocolate chips and peanut butter together in 30-second intervals, stirring between each interval, until smooth and fully combined. Be careful not to overheat—chocolate can burn.
- Spread Chocolate Layer: Pour the melted chocolate mixture over the pressed oat crust and spread evenly with a spatula, covering the entire surface.
- Add Remaining Oats: Crumble the remaining half of the oat mixture over the top of the chocolate layer, gently pressing it down with your fingers. Don’t press too hard—you want a crumbly topping.
- Chill to Set: Cover and refrigerate for at least 1 hour, or until completely firm and set. For faster setting, place in the freezer for 30 minutes.
- Slice and Serve: Lift the bars out using the parchment paper overhang. Place on a cutting board and cut into squares with a sharp knife. Serve cold for the best texture.
Tips for the Best No-Bake Chocolate Oat Bars
· Use Quick-Cooking Oats: Quick oats absorb the butter mixture better than old-fashioned rolled oats and create a more cohesive texture. Don’t substitute.
· Press Firmly: Pack the bottom oat layer firmly so the bars hold together when sliced. Use the back of a spoon or a glass to really press it down.
· Don’t Overheat the Chocolate: Melt the chocolate and peanut butter in short intervals, stirring frequently. Overheated chocolate becomes grainy and seized.
· Chill Completely: Don’t rush the chilling step. The bars need to be fully set before slicing, or they’ll fall apart.
· Cut with a Sharp Knife: For clean cuts, use a sharp knife and wipe it between slices. Chilled bars cut more cleanly than room temperature ones.
· Store in the Refrigerator: These bars soften at room temperature. Keep them refrigerated until ready to serve.
Variations & Substitutions
· Butterscotch Oat Bars: Replace half the chocolate chips with butterscotch chips for a sweet, caramel-like flavor.
· Dark Chocolate Version: Use dark chocolate chips instead of semi-sweet for a richer, less sweet dessert.
· Almond Butter Version: Replace peanut butter with almond butter for a different nutty flavor.
· Coconut Chocolate Oat Bars: Add 1/4 cup shredded coconut to the oat mixture and sprinkle extra on top.
· M&M Oat Bars: Press mini M&Ms into the chocolate layer before adding the top oat layer.
· Vegan Version: Use plant-based butter, dairy-free chocolate chips, and a creamy plant-based peanut butter.
Frequently Asked Questions
Can I use old-fashioned oats instead of quick oats?
Quick-cooking oats are recommended because they absorb the butter mixture better and create a more cohesive texture. Old-fashioned rolled oats will work but result in a chewier, less compact bar.
How do I store these bars?
Store in an airtight container in the refrigerator for up to 1 week, or freeze for up to 3 months. These bars are best enjoyed chilled—they soften at room temperature.
Can I freeze no-bake chocolate oat bars?
Yes! These bars freeze beautifully. Layer them in a freezer-safe container with parchment paper between layers. Freeze for up to 3 months. Thaw in the refrigerator for 30 minutes before serving.
Why are my bars crumbly?
This can happen if the oat mixture wasn’t pressed firmly enough or if the bars weren’t chilled long enough. Press the bottom layer tightly and chill until completely firm before slicing.
Can I use natural peanut butter?
Natural peanut butter can separate and make the chocolate layer oily. For best results, use a stabilized peanut butter like Jif or Skippy. If using natural, stir very well and consider adding a pinch of salt.
What can I serve with these bars?
These bars are delicious on their own, but they’re also great with a scoop of vanilla ice cream, a drizzle of caramel sauce, or alongside a cup of coffee or cold milk.
Can I make these without peanut butter?
Yes! Replace the peanut butter with almond butter, cashew butter, or even Nutella for a hazelnut chocolate version. You can also use 1/2 cup additional chocolate chips instead.
Recipe Card: No-Bake Chocolate Oat Bars
· Prep Time: 15 minutes
· Chill Time: 1 hour
· Total Time: 1 hour 15 minutes
· Yield: 12 bars
· Category: Dessert, No-Bake, Bars
· Cuisine: American
Ingredients:
· 1 cup unsalted butter, melted
· 1/2 cup packed brown sugar
· 2 teaspoons vanilla extract
· 3 cups quick-cooking oats
· 1 cup semi-sweet chocolate chips
· 1/2 cup creamy peanut butter
Instructions:
- Line 8×8 inch pan with parchment paper.
- Mix melted butter, brown sugar, and vanilla.
- Stir in oats until fully coated.
- Press half of oat mixture into pan.
- Melt chocolate chips and peanut butter in microwave.
- Spread chocolate over oat crust.
- Crumble remaining oat mixture over top. Press gently.
- Refrigerate at least 1 hour until firm.
- Lift out, cut into squares, and serve cold.
Nutrition (per bar, approximate):
· Calories: 340
· Protein: 5g
· Carbohydrates: 32g
· Fat: 22g
· Fiber: 3g
· Sugar: 18g
Nutrition will vary based on specific ingredients and portion size.
Final Thoughts
These No-Bake Chocolate Oat Bars are the ultimate easy dessert for anyone who loves the combination of chocolate, peanut butter, and chewy oats. They come together in minutes, require no oven time, and taste like a cross between a candy bar and a granola bar. Whether you’re making them for a party, a holiday cookie tray, or just to satisfy a sweet tooth, this recipe delivers every time. Keep the ingredients on hand and you’ll always be ready to whip up a batch of these irresistible treats.
Have you made these chocolate oat bars? Share your favorite variations and add-ins in the comments below!