
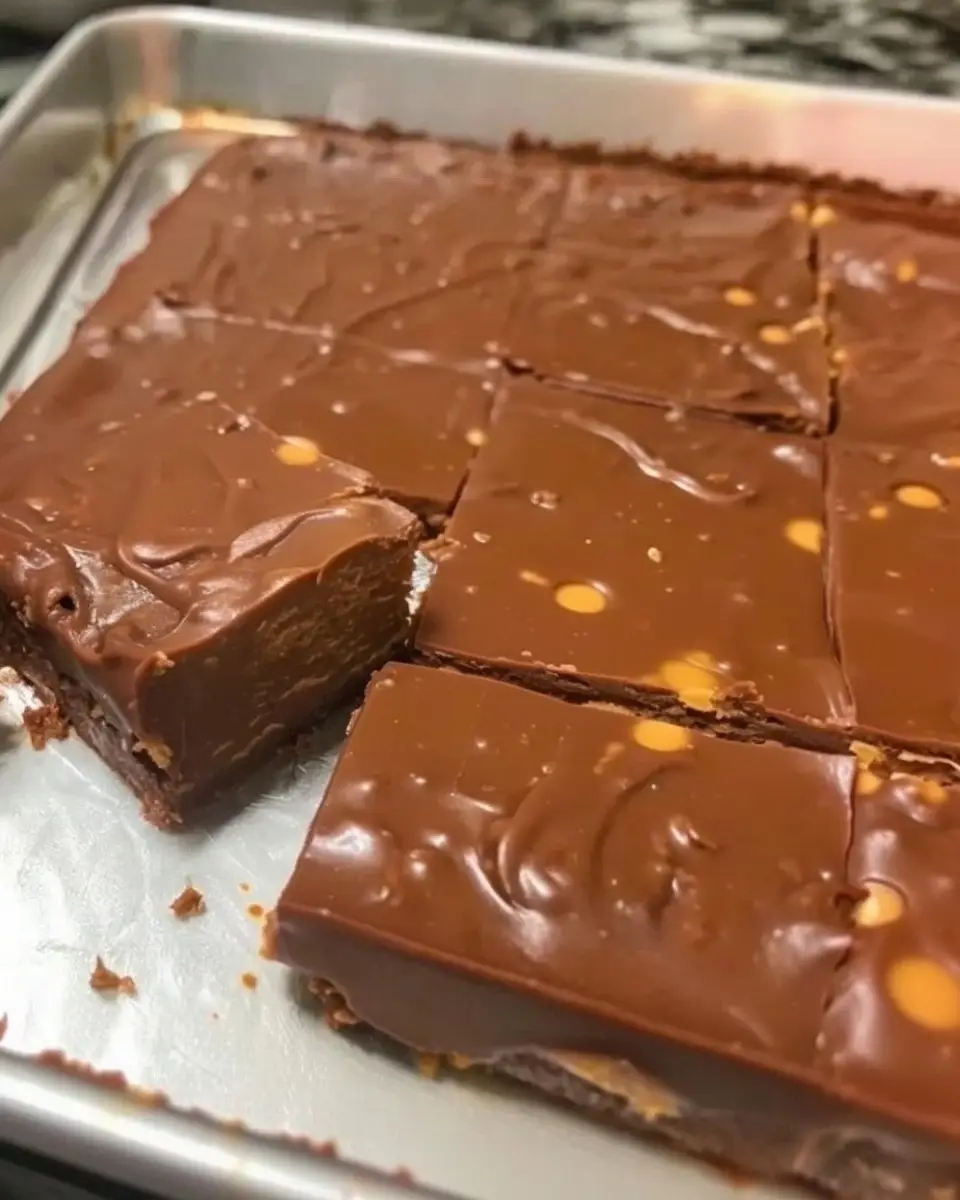
There are desserts that are merely sweet, and then there are desserts that are a revelation – the kind that make you close your eyes, savor every rich, creamy, chocolatey, peanut‑buttery bite, and wonder how something so indulgent can come together in just 10 minutes. No‑Bake Chocolate Peanut Butter Fudge Bars are emphatically the latter. Imagine a perfectly glossy, mirror‑like chocolate top, studded with golden peanut butter swirls, layered over a dense, fudgy peanut butter base. It’s the kind of treat that’s dangerously easy to make, dangerously delicious to eat, and guaranteed to disappear in minutes. It’s the ultimate no‑bake dessert – perfect for when you need a quick sweet fix, a crowd‑pleasing party treat, or a low‑carb indulgence that fits your macros.
If you’re looking for an easy no‑bake dessert that’s quick, decadent, and endlessly customizable, this recipe is about to become your new favorite. With just a handful of simple ingredients and no oven required, you can create a dessert that looks like it came from a fancy bakery – but with a fraction of the effort. Whether you’re following a low‑carb lifestyle, craving a keto fudge recipe, or simply want a family‑favorite no‑bake treat, these bars deliver every single time.
What Are No‑Bake Chocolate Peanut Butter Fudge Bars?
At their heart, these bars are a simple, no‑bake layered dessert that combines the rich, nutty flavor of peanut butter with the deep, decadent taste of dark chocolate. The base is a firm, fudgy peanut butter mixture, topped with a glossy, mirror‑like chocolate layer that’s swirled with peanut butter spots. The combination of textures – dense and creamy on the bottom, smooth and shiny on top – is pure indulgence, and the best part is that they come together in minutes with no baking required.
This recipe falls into the category of “healthy sweet treats” and “low‑carb desserts” – the kind of dish that’s perfect for anyone following a keto, low‑sugar, or clean‑eating lifestyle. The beauty of this recipe is its versatility – you can easily swap ingredients to fit your macros, making it a go‑to dessert for any occasion.
What makes this version especially brilliant is the glossy chocolate topping. The secret to that mirror‑like sheen is coconut oil, which keeps the chocolate smooth, shiny, and perfectly reflective instead of dull and cloudy. The peanut butter swirls add a beautiful visual contrast and an extra burst of nutty flavor – making these bars as stunning as they are delicious.
Why You’ll Love This Recipe
There are countless reasons to fall in love with these No‑Bake Chocolate Peanut Butter Fudge Bars. Here are just a few that will have you making them on repeat:
- No baking required – perfect for hot days or when you don’t want to turn on the oven.
- Quick and easy – comes together in just 10 minutes of prep.
- Simple, pantry‑friendly ingredients – nothing fancy, everything you probably already have.
- Rich, decadent, and satisfying – the perfect sweet treat.
- Low‑carb and keto‑friendly – easily adaptable to fit your macros.
- Gluten‑free and dairy‑free options – fits a variety of dietary needs.
- Make‑ahead friendly – stores beautifully in the refrigerator.
- Freezer‑friendly – perfect for stocking your freezer.
- Customizable – swap the chocolate, add nuts, or change the sweetener.
- Always a crowd‑pleaser – everyone loves chocolate and peanut butter.
This is the recipe that will make you feel like a dessert pro. It’s proof that you don’t need complicated techniques to create something truly spectacular.
Ingredients for No‑Bake Chocolate Peanut Butter Fudge Bars
This recipe uses simple, flavorful ingredients that come together beautifully. Here’s what you’ll need:
For the Peanut Butter Base
- 1 cup creamy peanut butter (use natural, no‑added‑sugar peanut butter for a cleaner version)
- ¼ cup melted coconut oil (or unsalted butter)
- ¼ cup powdered sweetener (erythritol/monk fruit, or powdered sugar)
- 1 teaspoon vanilla extract
For the Glossy Chocolate Topping
- 1½ cups semi‑sweet or dark chocolate chips
- 2 tablespoons coconut oil (the secret to a mirror‑like glossy sheen)
For the Peanut Butter Spots
- ⅓ cup peanut butter chips (or ¼ cup extra peanut butter melted and drizzled)
Ingredient Notes and Substitutions
Peanut Butter: Natural, no‑added‑sugar peanut butter is ideal for a cleaner version. If you’re not concerned about sugar, regular creamy peanut butter works beautifully. Avoid natural peanut butter that’s too runny – it won’t set properly.
Coconut Oil: This is the secret to the glossy chocolate topping. It keeps the chocolate smooth, shiny, and perfectly reflective. You can substitute with unsalted butter, but the shine won’t be as pronounced.
Sweetener: Powdered erythritol or monk fruit sweetener works best for a low‑carb version. If you’re not concerned about carbs, you can use powdered sugar.
Chocolate Chips: Semi‑sweet or dark chocolate chips are classic. For a keto version, use Lily’s sugar‑free chocolate chips. You can also use milk chocolate for a sweeter finish.
Step‑by‑Step Instructions
Follow these simple steps to create a perfect batch of No‑Bake Chocolate Peanut Butter Fudge Bars every single time.
1. Prepare the Pan
Line a 9×9‑inch square baking pan with parchment paper, leaving overhang on two sides for easy removal. If you want thinner bars, you can use a larger pan or a sheet pan.
2. Make the Peanut Butter Base
In a medium bowl, mix the peanut butter, melted coconut oil, powdered sweetener, and vanilla extract until it forms a thick, uniform dough. Press this mixture firmly and evenly into the bottom of the lined pan. Use the flat bottom of a measuring cup to press it down tightly.
3. Melt the Chocolate Topping
In a microwave‑safe bowl, combine the chocolate chips and 2 tablespoons of coconut oil. Microwave in 20‑second bursts, stirring between each, until completely smooth and liquid. Be careful not to overheat.
4. Assemble the Bars
Pour the glossy melted chocolate over the peanut butter base. Tilt the pan to let it spread evenly to the edges.
5. Add the Peanut Butter Spots
Sprinkle the peanut butter chips evenly over the wet chocolate, or drop small spoonfuls of melted peanut butter onto the surface. Use a toothpick or knife to lightly swirl them into the glossy chocolate layer, creating those perfect golden pools.
6. Set and Chill
Place the pan in the refrigerator for 1 to 2 hours until the chocolate is completely firm and solid.
7. Cut and Serve
Pull the fudge out using the parchment paper overhang. Let it sit at room temperature for 5 minutes – this stops the top from cracking. Use a large, sharp knife to cut it into squares, wiping the blade clean between each cut.
Expert Tips for the Perfect Fudge Bars
This recipe is simple, but a few expert tricks will elevate it to perfection. Here’s what I’ve learned from making these bars countless times:
- Don’t skip the coconut oil – it’s the secret to that mirror‑like glossy sheen. Without it, the chocolate will be dull and cloudy.
- Press the base firmly – a compacted base prevents crumbling when you cut the bars.
- Let it rest before cutting – letting the fudge sit at room temperature for 5 minutes prevents the chocolate from cracking.
- Use a sharp knife – a sharp knife makes clean cuts without crumbling the bars. Wipe the blade clean between each cut.
- Store in the refrigerator – because these bars are fat‑based, they will soften at room temperature. Keep them in an airtight container in the fridge.
- Make it your own – try adding chopped nuts, shredded coconut, or a sprinkle of sea salt on top.
- Double the recipe – these bars freeze beautifully, so make a double batch and save some for later.
- Use high‑quality chocolate – the better the chocolate, the better the bars. Choose a chocolate you enjoy eating on its own.
Delicious Variations
One of the best things about this recipe is how easily it adapts to different tastes and cravings. Here are some of my favorite ways to switch it up:
Keto Chocolate Peanut Butter Bars
Use Lily’s sugar‑free chocolate chips, sugar‑free peanut butter chips, and powdered erythritol. This version cuts the carbs by over 80% while keeping it incredibly delicious.
Almond Butter Fudge Bars
Swap the peanut butter for almond butter and top with sliced almonds. The almond butter adds a slightly different nutty flavor.
White Chocolate Peanut Butter Bars
Use white chocolate chips instead of semi‑sweet for a sweeter, creamier version. The white chocolate pairs beautifully with the peanut butter base.
Salted Caramel Peanut Butter Bars
Add a layer of sugar‑free caramel sauce between the base and the chocolate topping. Sprinkle with flaky sea salt for a sweet‑salty contrast.
Crunchy Peanut Butter Bars
Use crunchy peanut butter instead of creamy for extra texture. The added crunch is a delightful surprise.
Vegan Chocolate Peanut Butter Bars
Use vegan chocolate chips and coconut oil. The recipe is already dairy‑free and egg‑free.
Mint Chocolate Peanut Butter Bars
Add ½ teaspoon of peppermint extract to the chocolate topping. The mint adds a refreshing twist.
Serving Suggestions
These versatile bars can be served in a variety of ways, making them perfect for any occasion:
- With a glass of cold milk – the classic pairing that never fails.
- With a cup of coffee – the perfect afternoon treat.
- For holidays – a beautiful addition to any dessert platter.
- For bake sales – these bars are always the first to sell out.
- As a homemade gift – package them in a festive tin for a thoughtful present.
- For movie night – the perfect snack for a cozy night in.
- For meal prep – portion out individual servings for easy grab‑and‑go treats.
Storage and Reheating Guidelines
These bars store beautifully, making them a fantastic make‑ahead option.
Refrigeration: Store in an airtight container in the refrigerator for up to 2 weeks. They will stay firm and delicious.
Freezing: These bars freeze beautifully. Place them in a freezer‑safe container, separating layers with parchment paper, and freeze for up to 2 months. Thaw in the refrigerator before serving.
Pro tip: If the bars are too hard straight from the fridge, let them sit at room temperature for 5–10 minutes before serving.
Nutritional Information
Approximate values per bar (based on 16 bars, using sugar‑free ingredients):
- Calories: 165
- Protein: 4g
- Carbohydrates: 5g
- Fiber: 3g
- Net Carbs: 2g
- Fat: 14g
- Saturated Fat: 7g
Using regular chocolate chips and powdered sugar will increase the calories and carb content.
Want the full truth and the practical next steps?
Page 2 continues with the real explanation, the key details many readers skip, and the simple takeaways that make this guide more useful.