
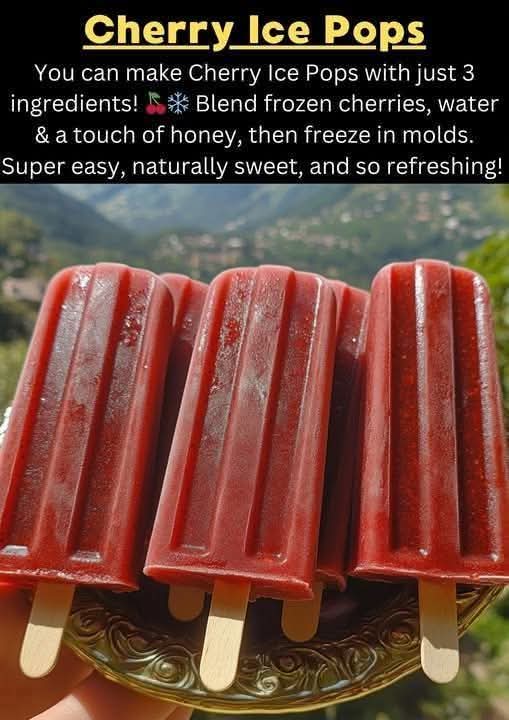
There are frozen treats that are merely a way to cool down, and then there are frozen treats that are a celebration of summer – the kind that make you close your eyes, savor every icy, fruity bite, and feel like a kid again. Homemade Cherry Ice Pops are emphatically the latter. Imagine the bright, sweet‑tart flavor of ripe cherries, perfectly balanced with a touch of honey or maple syrup, frozen into a refreshing, icy pop that’s naturally delicious and incredibly satisfying. With just three simple ingredients – cherries, sweetener, and water – you can create a treat that’s better than anything you’ll find at the store.
If you’re looking for a healthy, easy, and fun snack that’s perfect for hot days, this recipe is about to become your new favorite. These cherry ice pops are naturally sweetened, packed with real fruit, and completely free of artificial colors, flavors, and preservatives. They’re a brilliant way to use up fresh cherries, a healthy treat for kids, and a refreshing indulgence for adults. Plus, they’re incredibly easy to make – no fancy equipment required!
What Are Homemade Cherry Ice Pops?
At their heart, these ice pops are a simple, naturally sweetened frozen treat made from just three ingredients: cherries, a natural sweetener, and water. The cherries are blended with honey or maple syrup and water until smooth, then poured into ice pop molds and frozen until solid. The result is a bright, fruity, icy pop that’s bursting with real cherry flavor – nothing artificial, no added colors, just pure fruit goodness.
This recipe falls into the category of “healthy frozen treats” and “kid‑friendly snacks” – dishes that are both delicious and nourishing. These pops are perfect for hot summer days, after‑school snacks, or a guilt‑free dessert. They’re a fantastic way to get kids to enjoy real fruit, and they’re just as popular with adults looking for a refreshing, low‑calorie treat.
What makes this version especially brilliant is the simplicity. With just three ingredients and a few minutes of prep, you can create a batch of ice pops that are far more flavorful and wholesome than anything you’d find in the freezer aisle. You can also customize them with different sweeteners, add‑ins, or fruit combinations to suit your taste.
Why You’ll Love This Recipe
There are countless reasons to fall in love with these Homemade Cherry Ice Pops. Here are just a few that will have you making them on repeat:
Just 3 ingredients – no complicated shopping lists, no artificial additives.
Naturally sweetened – honey or maple syrup add sweetness without refined sugar.
Packed with real fruit – every pop is bursting with cherry flavor.
Quick and easy – ready in just 10 minutes, then freeze.
Healthy and wholesome – no artificial colors, flavors, or preservatives.
Perfect for hot days – the ultimate refreshing summer treat.
Kid‑friendly – kids love making and eating these pops.
Budget‑friendly – affordable ingredients that go a long way.
Customizable – use different fruits, sweeteners, or add‑ins.
Make‑ahead friendly – keep a batch in the freezer for instant snacks.
This is the recipe that will make you feel like a frozen treat pro. It’s proof that you don’t need complicated techniques or artificial ingredients to create something truly delicious.
Ingredients for Homemade Cherry Ice Pops
This recipe uses simple, wholesome ingredients that come together beautifully. Here’s what you’ll need:
Core Ingredients
- 2 cups fresh or frozen cherries (pitted)
- 2–3 tablespoons honey or maple syrup (to taste)
- ½ cup water
Optional Add‑Ins
1 tablespoon fresh lemon or lime juice – adds a bright, tangy note
½ teaspoon vanilla extract – adds warmth and depth
Fresh mint leaves – for a refreshing twist
¼ cup Greek yogurt – for a creamier, more indulgent pop
Chia seeds – for added texture and nutrition
Chopped fresh cherries – for a chunky texture
Ingredient Notes and Substitutions
Cherries: Fresh cherries are ideal when in season – they have the best flavor and texture. Frozen cherries work beautifully as well – no need to thaw them before blending. If using frozen, you may need to add a little extra water. You can also use other fruits – strawberries, blueberries, peaches, or raspberries all work wonderfully.
Honey or Maple Syrup: Both natural sweeteners add a lovely flavor. Honey has a floral sweetness, while maple syrup adds a subtle, woodsy note. You can adjust the amount to your taste – use less for a more tart pop, or more for extra sweetness. For a sugar‑free option, use a sugar‑free sweetener like monk fruit or stevia.
Water: The water helps the mixture blend smoothly and creates the icy texture. You can substitute with coconut water or fruit juice for added flavor.
Step‑by‑Step Instructions
Follow these simple steps to create a perfect batch of Homemade Cherry Ice Pops every single time. The process is quick, easy, and virtually foolproof.
1. Prepare the Cherries
If using fresh cherries, wash them and remove the pits. If using frozen cherries, measure them out and let them thaw slightly for easier blending.
2. Blend the Ingredients
In a blender or food processor, combine the cherries, honey or maple syrup, and water. Blend on high until the mixture is completely smooth and the cherries are fully pureed. If the mixture is too thick, add a little more water, 1 tablespoon at a time, until it reaches a pourable consistency.
3. Taste and Adjust
Taste the mixture and adjust the sweetness if needed. Add more honey or maple syrup if you prefer a sweeter pop, or a squeeze of lemon or lime juice for extra tang.
4. Pour into Molds
Carefully pour the cherry mixture into ice pop molds, leaving a little space at the top (about ¼ inch) for the mixture to expand as it freezes.
5. Insert Sticks
Insert the ice pop sticks into the molds. If using a mold that requires sticks, place them in the center of each pop.
6. Freeze
Place the molds in the freezer and freeze for at least 4–6 hours, or until completely solid. For best results, freeze overnight.
7. Remove and Serve
To remove the pops from the molds, run the outside of the molds under warm water for a few seconds, then gently pull the pops out. Serve immediately or store in the freezer.
Expert Tips for the Perfect Ice Pops
This recipe is simple, but a few expert tricks will elevate it to perfection. Here’s what I’ve learned from making these pops countless times:
Use ripe, flavorful cherries – the quality of the fruit directly affects the flavor of the pops. Choose sweet, ripe cherries for the best results.
Adjust sweetness to taste – frozen fruit can taste less sweet than fresh fruit. Taste the mixture before freezing and adjust the sweetener as needed.
Add a little acidity – a squeeze of lemon or lime juice brightens the flavor and enhances the cherry taste.
Don’t overfill the molds – leave a little space at the top for the mixture to expand as it freezes.
Use a funnel – for mess‑free pouring, use a small funnel to transfer the mixture into the molds.
Remove pops easily – run the outside of the molds under warm water for a few seconds to loosen the pops.
Customize to your taste – add vanilla, mint, or yogurt for different flavor variations.
Make ahead – these pops keep in the freezer for up to 2 months.
Delicious Variations
One of the best things about this recipe is how easily it adapts to different tastes and cravings. Here are some of my favorite ways to switch it up:
Cherry Lemonade Pops
Add 2 tablespoons of fresh lemon juice and 1 teaspoon of lemon zest to the mixture. The bright, citrusy flavor is perfect for summer.
Creamy Cherry Yogurt Pops
Substitute ¼ cup of the water with ¼ cup of Greek yogurt. The yogurt adds a creamy, tangy richness that’s absolutely delicious.
Cherry Mint Pops
Add ¼ cup of fresh mint leaves to the blender. The mint adds a refreshing, cooling note that pairs beautifully with the cherries.
Mixed Berry Pops
Use a mix of cherries, blueberries, and raspberries. The combination of berries creates a beautiful color and complex flavor.
Cherry Coconut Pops
Substitute the water with coconut water and add ¼ cup of unsweetened shredded coconut to the mixture. The coconut adds a tropical twist.
Spiced Cherry Pops
Add ½ teaspoon of cinnamon or ¼ teaspoon of nutmeg to the mixture. The warm spices add a cozy, comforting flavor.
Chunky Cherry Pops
After blending the mixture, fold in ½ cup of chopped fresh cherries before pouring into the molds. The chunks add a wonderful texture.
Serving Suggestions
These versatile ice pops can be enjoyed in a variety of ways, making them perfect for any occasion:
As a refreshing snack – perfect for cooling down on a hot day.
For kids’ parties – a healthy, fun treat that kids love.
After a workout – a refreshing, low‑calorie way to rehydrate.
As a light dessert – a guilt‑free way to end a meal.
For picnics – easy to pack and serve outdoors.
As a poolside treat – the perfect snack for a day at the pool.
With fresh fruit – serve alongside fresh cherries for a beautiful presentation.
Storage and Reheating Guidelines
These ice pops store beautifully, making them a fantastic make‑ahead option.
Freezing: Store the pops in the freezer in a zip‑top bag or airtight container for up to 2 months. If stacking, separate with parchment paper to prevent sticking.
Serving: For the best texture, let the pops sit at room temperature for 1–2 minutes before serving to allow them to soften slightly.
Pro tip: If your pops are stuck in the molds, run them under warm water for 10–15 seconds – they’ll slide right out.
Want the full truth and the practical next steps?
Page 2 continues with the real explanation, the key details many readers skip, and the simple takeaways that make this guide more useful.