
There’s a quiet, golden moment in the kitchen when you pull a tray of warm, puffed buns from the oven—their tops glistening with melted cheddar and parmesan, their edges crisp and lacy—and you realize you’ve just baked something that tastes utterly indulgent yet fits perfectly into a low-carb lifestyle. These Keto Cheese Buns are that revelation. Soft in the middle, gloriously golden on top, and packed with savory cheese flavor, they satisfy every craving for bread without the carb load. Whether you’re missing a dinner roll beside your soup, a vehicle for a burger, or simply a warm snack on a cool afternoon, these quick and easy buns step up in the most delicious way.
They require no yeast, no kneading, and no waiting for dough to rise. In about half an hour from start to finish, you can have a batch of eight to ten fluffy, cheesy rounds ready to devour. The base is a clever blend of cottage cheese, cheddar, eggs, and almond flour—a combination that sounds too simple to work but creates a texture remarkably close to a tender, savory biscuit. They’re very low in carbohydrates, gluten-free, and high in protein, making them a smart choice for keto meal prep, after-school snacks, or a satisfying accompaniment to eggs, salads, and grilled meats. And because they’re endlessly customizable with herbs, spices, bacon, or jalapeños, you’ll never grow bored.
In this guide, we’ll explore how each ingredient contributes to the perfect keto bun, walk through the foolproof method step by step, and share all the variations, storage tricks, and serving ideas to make these a staple in your kitchen. Whether you’re a seasoned low-carb cook or just dipping your toes into grain-free baking, these cheese buns are about to become your new favorite thing.
Jump to:
- Why You’ll Love These Keto Cheese Buns
- Ingredient Spotlight: The Low-Carb Power Players
- Step-by-Step: Baking the Perfect Bun
- Pro Tips for the Best Texture
- Flavor Variations & Add-Ins
- How to Serve Keto Cheese Buns
- Make-Ahead, Storage & Reheating
- Frequently Asked Questions
- Full Recipe Card
Why You’ll Love These Keto Cheese Buns
Truly low-carb and keto-friendly. With almond flour, cheese, and eggs as the core, each bun clocks in at roughly 2–3 grams of net carbs, depending on the exact brands and add-ins. They’re a safe, satisfying swap for dinner rolls, burger buns, and sandwich bread—no insulin spike, no grain bloat, just pure comfort.
Ridiculously easy and quick. No yeast, no proofing, no stand mixer required. You stir everything in a bowl, scoop onto a tray, and bake. From pantry to plate in under 30 minutes, they’re faster than running to the store for a loaf of keto bread.
Soft, cheesy, and golden. The texture strikes the perfect balance: a tender, slightly moist crumb inside and a crisp, cheesy crust on top. They hold together beautifully, making them ideal for sandwiches, sliders, or simply slathering with butter while they’re warm.
Made from everyday ingredients. Cottage cheese, cheddar, eggs, almond flour, baking powder—that’s it. Nothing exotic or hard to find. You probably have everything you need right now.
Ingredient Spotlight: The Low-Carb Power Players
Understanding why these ingredients work together helps you nail the recipe every time and tweak it to your taste.
1. Cottage Cheese: The Moisture and Structure
Cottage cheese is the secret behind the buns’ tender, soft interior. It adds moisture, a mild tang, and a boost of protein without the need for cream cheese or heavy cream. Full-fat cottage cheese (4%) gives the softest, richest texture; low-fat versions work but may yield a slightly less moist bun. If your cottage cheese is very watery, drain it briefly in a fine-mesh sieve before measuring. For an even smoother batter, you can blend the cottage cheese briefly with an immersion blender, but it’s not required—the curds melt into the buns as they bake.
2. Shredded Cheddar: Flavor and Fat
Sharp cheddar brings bold, cheesy flavor and plenty of fat to keep the buns satisfying and keto-compliant. Pre-shredded cheddar works, but shredding your own from a block ensures the cheese melts more evenly and contains no starchy anti-caking agents. Mild cheddar, Monterey Jack, mozzarella (for a milder flavor and stretch), or a Mexican cheese blend all work beautifully. The cheese contributes to the golden, crisp exterior, so don’t skimp on the amount.
3. Eggs: The Binder
Two large eggs hold everything together, providing structure and lift. They help the buns puff slightly in the oven and give them a bread-like springiness. Use room temperature eggs if possible—they incorporate more easily into the batter.
4. Almond Flour: The Grain-Free Base
Almond flour replaces all-purpose flour, keeping these buns gluten-free and extremely low in carbs. Use super-fine blanched almond flour, not almond meal. Almond meal (made from whole almonds with skins) is coarser and heavier, resulting in denser, grittier buns. The fine texture of blanched almond flour mimics wheat flour beautifully. If your batter feels too wet, an extra tablespoon of almond flour firms it up nicely.
5. Baking Powder, Seasonings, and Parmesan
Baking powder gives a little lift, making the buns slightly puffy rather than flat. Garlic powder, salt, and black pepper provide a classic savory backbone. The optional grated parmesan on top creates an incredible golden crust and an extra pop of umami—highly recommended.
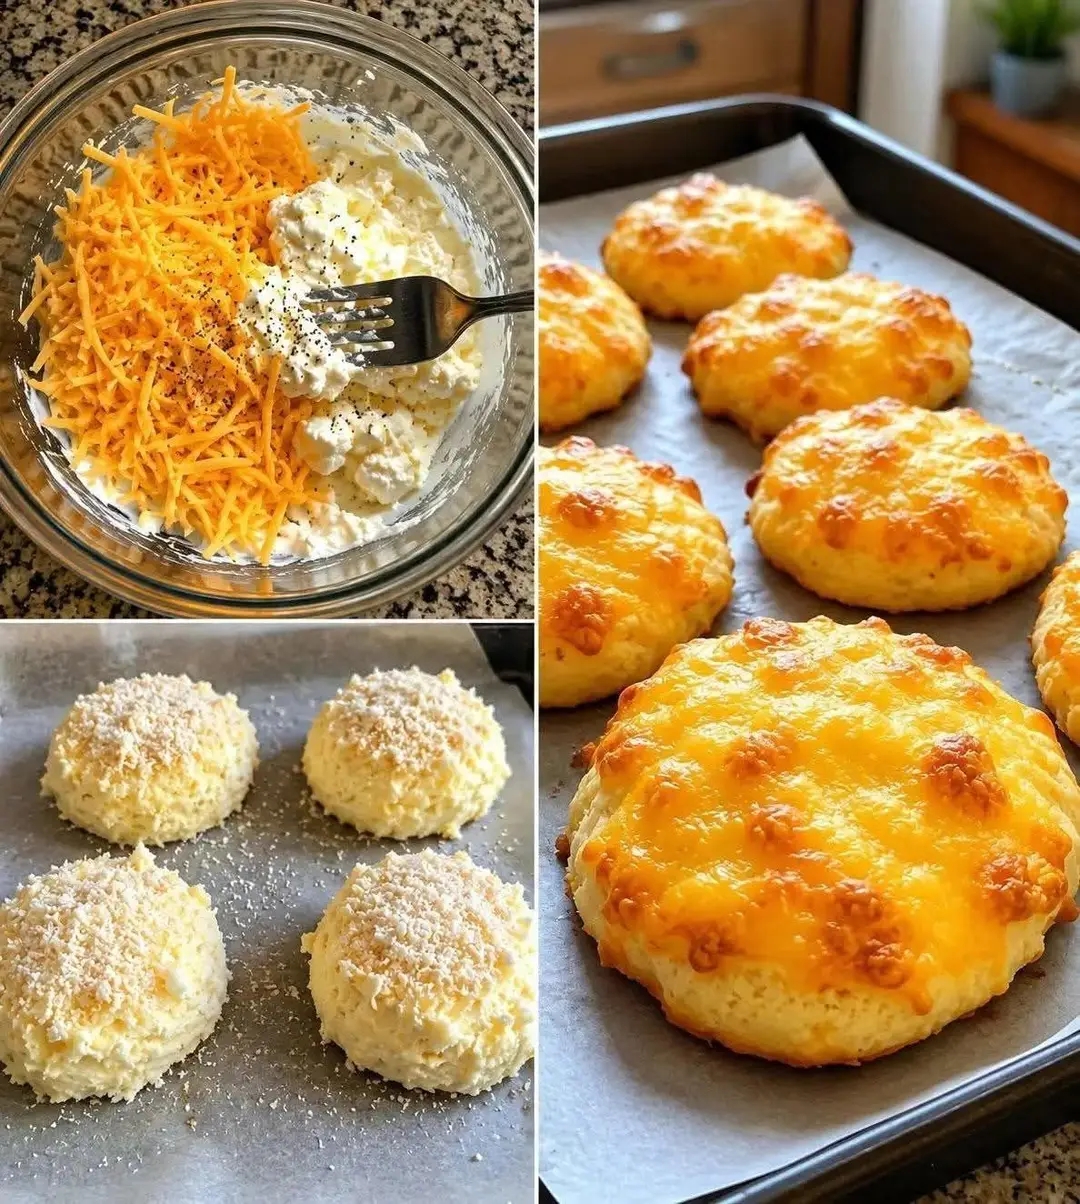
Step-by-Step: Baking the Perfect Keto Cheese Bun
These come together in one bowl and just a few minutes. Here’s exactly how to do it.
Step 1: Preheat and Line
Preheat your oven to 375°F (190°C). Line a large baking tray with parchment paper. The parchment prevents sticking and makes cleanup a breeze. You can also use a silicone baking mat.
Step 2: Combine the Wet Ingredients
In a medium mixing bowl, add 1 cup of full-fat cottage cheese, 1 cup of shredded cheddar cheese, and 2 large eggs. Stir until the eggs are well incorporated and the cheese is evenly distributed. The mixture will look loose and chunky—that’s perfect.
Step 3: Add the Dry Ingredients
Add ½ cup of super-fine almond flour, 1 teaspoon of baking powder, ½ teaspoon of garlic powder, ½ teaspoon of salt, and ¼ teaspoon of black pepper. Stir everything together until you achieve a thick, sticky, uniform batter. There should be no dry pockets. The batter will be scoopable but not runny—similar to a thick cookie dough.
Step 4: Shape the Buns
Using a large cookie scoop or a spoon, drop mounds of batter onto the prepared baking tray. Aim for about 8 to 10 buns, spacing them a couple of inches apart. They don’t spread much, so you can fit them relatively close. Gently shape the mounds into rough rounds with the back of the spoon or your fingertips.
Step 5: Top and Bake
Sprinkle each bun with a generous pinch of grated parmesan cheese (or more shredded cheddar) for that irresistible golden crust. Slide the tray into the preheated oven and bake for 18 to 22 minutes, until the buns are puffed, firm to the touch, and deeply golden on top. The cheese on the surface should be bubbly and crisp around the edges.
Step 6: Cool and Serve
Remove the tray from the oven and let the buns rest for 5 minutes before transferring them to a wire rack. They will firm up further as they cool, making them easier to handle. Serve warm or at room temperature.
Pro Tips for the Best Texture Every Time
- Drain watery cottage cheese. If your cottage cheese has a lot of liquid pooling on top, strain it in a fine-mesh sieve for a few minutes. Excess moisture can make the batter too thin and the buns flat.
- Use super-fine almond flour. This cannot be overstated. Coarse almond meal will make the buns dense and gritty. Blanched, fine almond flour creates a much more bread-like crumb.
- Don’t overmix. Stir just until the batter comes together. Overworking can make the buns a bit tough.
- Chill the batter for firmer buns. If you prefer a denser, more biscuit-like texture, pop the mixed batter in the fridge for 10–15 minutes before scooping. This also makes shaping neater.
- Use a cookie scoop for uniform sizes. Evenly sized buns bake evenly. A 3-tablespoon scoop yields perfectly uniform rounds that finish at the same time.
- Let them rest before moving. Those 5 minutes of cooling are crucial for the buns to set. Move them too soon, and they might crumble. Be patient.
Flavor Variations & Add-Ins
The base recipe is a perfect blank canvas. Try these mix-ins to keep things exciting.
Jalapeño Cheddar Keto Buns
Fold in 2 tablespoons of finely chopped pickled or fresh jalapeños. For extra heat, add a pinch of cayenne pepper or a few dashes of hot sauce to the batter. These are incredible next to chili or grilled chicken.
Bacon, Cheddar & Chive
Add ¼ cup of cooked, crumbled bacon and 2 tablespoons of finely chopped fresh chives or green onions. The smoky, savory flavors make these taste like a loaded baked potato in bun form.
Italian Herb & Parmesan
Swap the garlic powder for 1 teaspoon of dried Italian seasoning. Use half cheddar and half mozzarella for a stretchier texture, and double down on the parmesan topping. Serve with marinara for dipping.
Everything Bagel Buns
Sprinkle the unbaked buns with everything bagel seasoning instead of parmesan. The sesame, garlic, onion, and salt create an addictive crust that pairs beautifully with cream cheese or smoked salmon.
Pizza-Style Buns
Add ¼ cup of sugar-free pepperoni minis and a teaspoon of dried oregano. Use a blend of mozzarella and parmesan. Dip in warm, low-carb pizza sauce for a handheld pizza fix.
How to Serve Keto Cheese Buns
As a bread substitute: Serve them warm alongside a bowl of creamy keto tomato soup, a hearty beef stew, or a fresh Caesar salad. They’re the perfect replacement for a dinner roll or a slice of crusty bread.
For burgers and sandwiches: Slice them in half horizontally to use as slider buns or a full-size burger bun. They hold up to a juicy patty, lettuce, tomato, and all the fixings without falling apart.
With breakfast: Pair them with scrambled eggs, crispy bacon, and avocado for a complete keto breakfast. You can even make a breakfast sandwich with a fried egg and sausage patty.
As a snack: Enjoy them warm from the oven with a smear of butter, a dollop of cream cheese, or a sprinkle of flaky salt. They’re also fantastic dipped in ranch or a spicy aioli.
Make-Ahead, Storage & Reheating
Make-Ahead: You can mix the batter and store it in the refrigerator for up to 2 days before baking. Scoop and bake directly from the fridge, adding 1–2 minutes to the baking time. The baked buns can also be made a day ahead and reheated.
Storing Leftovers: Place cooled buns in an airtight container and refrigerate for up to 5 days. A paper towel in the container helps absorb excess moisture and keeps them from becoming soggy.
Reheating: For the best texture, reheat in a 350°F oven or toaster oven for 5–7 minutes, or in an air fryer for 3–4 minutes until warmed through and crisp around the edges. The microwave works in a pinch but will soften them rather than re-crisp the exterior.
Freezing: These buns freeze beautifully. Place completely cooled buns on a baking sheet and freeze until solid, then transfer to a freezer-safe bag or container. They’ll keep for up to 3 months. Reheat from frozen in a 350°F oven for 8–10 minutes.
Want the full truth and the practical next steps?
Page 2 continues with the real explanation, the key details many readers skip, and the simple takeaways that make this guide more useful.