
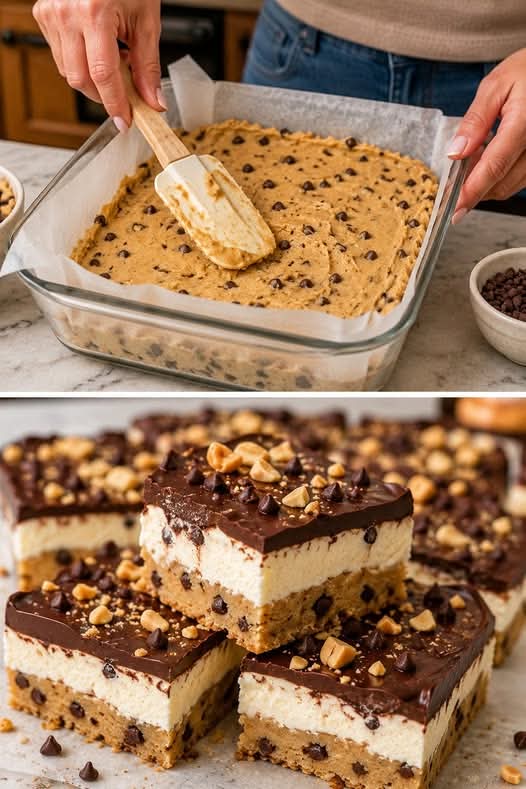
I kept opening the freezer for “just one more piece.” These High Protein Peanut Butter Cookie Dough Ice Cream Bars are creamy, chocolatey, and honestly taste like ice cream shop dessert at home. That crackly chocolate top is unreal. If you are someone who loves the combination of peanut butter, chocolate, and cookie dough but wants a dessert that fuels your body instead of derailing your goals, these bars are about to become your new obsession. They are no‑churn, no‑bake, packed with protein, and made with simple, wholesome ingredients. Each bite has a creamy peanut butter ice cream base, chunks of edible cookie dough, and a thick, crackly chocolate shell on top. The best part? You can eat them straight from the freezer without an ounce of guilt.
Whether you need a post‑workout treat, a healthy dessert for a hot summer day, or a make‑ahead snack for the week, these protein ice cream bars deliver. They are naturally sweetened, gluten‑free, and can be made dairy‑free. This high protein peanut butter dessert will have you reaching into the freezer again and again.
In this complete guide, you will learn how to make the perfect high protein peanut butter cookie dough ice cream bars, including pro tips for the creamiest texture, delicious variations (add chocolate chips, use almond butter, or make them vegan), storage and serving suggestions, and why that crackly chocolate top is the secret to their addictive nature. Let’s get freezing.
Why These Protein Peanut Butter Cookie Dough Bars Are a Freezer Staple
These bars are creamy and rich without heavy cream, packed with protein (thanks to Greek yogurt and protein powder), naturally sweetened, no‑churn and no‑bake, made with real cookie dough (edible, egg‑free), and have that irresistible crackly chocolate top. The combination of a creamy peanut butter ice cream base, chunks of soft, sweet cookie dough, and a snappy chocolate coating is pure magic. The high protein content keeps you full and satisfied, making these bars perfect for post‑workout recovery or a late‑night sweet craving. This is a healthy protein ice cream bar that tastes like an indulgence.
Here is why you will love it:
Only 20 minutes of active prep – Then freeze and enjoy.
High in protein (15‑20g per bar) – Supports muscle recovery and satiety.
No ice cream maker needed – Just a blender and a freezer.
Edible cookie dough without eggs or raw flour – Safe to eat raw.
Customizable – Use almond butter, add chocolate chips, or make it vegan.
Perfect for meal prep – Stays fresh in the freezer for weeks.
Kid‑friendly and adult‑loved – A guaranteed hit.
Once you try these homemade protein ice cream bars, you will never buy store‑bought versions again.
The Complete High Protein Peanut Butter Cookie Dough Ice Cream Bars Recipe
This recipe makes 8‑10 bars (depending on your mold size). It can easily be doubled.
Ingredients – For the Peanut Butter Ice Cream Base:
1 cup (240g) plain Greek yogurt (full‑fat or 2% for creaminess)
½ cup (120g) creamy peanut butter (natural, no added sugar)
1 scoop (30g) vanilla or peanut butter protein powder (whey or plant‑based)
¼ cup (60ml) milk (any milk – dairy, almond, oat)
2 tablespoons honey or maple syrup (adjust to taste)
1 teaspoon vanilla extract
Ingredients – For the Edible Cookie Dough Chunks:
¼ cup (30g) oat flour (or almond flour)
2 tablespoons creamy peanut butter
1 tablespoon honey or maple syrup
1 tablespoon milk (as needed)
2 tablespoons mini chocolate chips (sugar‑free optional)
Pinch of salt
Ingredients – For the Crackly Chocolate Topping:
½ cup (90g) dark chocolate chips (or semi‑sweet)
1 teaspoon coconut oil (for shine and easy spreading)
Equipment:
- Blender or food processor
- Small mixing bowl
- Rubber spatula
- 8×4 inch loaf pan or silicone ice cream bar mold
- Parchment paper
- Freezer
Step‑by‑Step Instructions
Step 1 – Make the Edible Cookie Dough
In a small bowl, combine the oat flour, peanut butter, honey, and a pinch of salt. Stir until a crumbly dough forms. Add milk 1 teaspoon at a time until the dough comes together into a soft, pliable ball. Fold in the mini chocolate chips. Roll the dough into small pea‑sized chunks (or slightly larger for bigger cookie dough bites). Place the cookie dough chunks on a parchment‑lined plate and freeze while you prepare the ice cream base.
Step 2 – Make the Peanut Butter Ice Cream Base
In a blender or food processor, combine the Greek yogurt, peanut butter, protein powder, milk, honey (or maple syrup), and vanilla extract. Blend until completely smooth and creamy. Taste and adjust sweetness if needed. The mixture should be thick and pourable.
Step 3 – Combine and Freeze
Line an 8×4 inch loaf pan with parchment paper (or use a silicone ice cream bar mold). Pour half of the peanut butter ice cream mixture into the pan. Sprinkle the frozen cookie dough chunks evenly over the top. Pour the remaining ice cream mixture over the cookie dough, smoothing the top with a spatula. Tap the pan gently on the counter to remove air bubbles. Cover with plastic wrap and freeze for at least 4 hours, preferably overnight, until firm.
Step 4 – Make the Crackly Chocolate Topping
Once the ice cream base is completely frozen, make the chocolate topping. In a microwave‑safe bowl, combine the dark chocolate chips and coconut oil. Microwave in 20‑second bursts, stirring after each, until melted and smooth. Let the chocolate cool slightly (about 5 minutes) – it should still be pourable but not hot.
Step 5 – Dip or Spread the Chocolate
Remove the frozen ice cream block from the pan using the parchment overhangs. Place on a cutting board. Cut into 8‑10 bars. Place the bars on a parchment‑lined baking sheet. Drizzle or spread the melted chocolate over the top of each bar, or dip the entire bar into the chocolate for a fully coated shell. For a crackly top, pour the chocolate over the bars and spread quickly – the cold temperature will set the chocolate almost instantly. Sprinkle with a pinch of flaky sea salt or extra mini chocolate chips if desired.
Step 6 – Freeze Again and Serve
Return the chocolate‑topped bars to the freezer for 15‑20 minutes to set the chocolate completely. Store in an airtight container or freezer bag. Enjoy straight from the freezer – let them sit at room temperature for 2‑3 minutes for a slightly softer texture.
Pro Tips for the Creamiest High Protein Ice Cream Bars
Follow these expert tips for perfect protein ice cream bars every time:
Use full‑fat Greek yogurt – Low‑fat or non‑fat yogurt contains more water and can lead to ice crystals. Full‑fat gives a creamy, scoopable texture.
Do not over‑blend – Over‑blending the ice cream base can incorporate too much air, which can lead to a foamy texture. Blend just until smooth.
Freeze the cookie dough chunks first – This prevents them from sinking to the bottom of the ice cream base and keeps them evenly distributed.
Let the chocolate cool slightly before topping – If the chocolate is too hot, it will melt the ice cream. If it is too cool, it will be too thick to spread. Warm but pourable is perfect.
Use a sharp knife for clean cuts – Run the knife under hot water, wipe dry, then slice. Repeat between cuts for neat edges.
Store properly – Keep bars in an airtight container or freezer bag to prevent freezer burn. Separate layers with parchment paper.
Make them dairy‑free – Use dairy‑free Greek yogurt (coconut or soy based), plant‑based protein powder, and dairy‑free chocolate chips.
Want the full truth and the practical next steps?
Page 2 continues with the real explanation, the key details many readers skip, and the simple takeaways that make this guide more useful.