
There are chocolate cakes, and then there is Chocolate Mousse Cake – the dessert that makes people gasp when you bring it to the table. Imagine a thin, fudgy chocolate cake base (or a brownie‑like crust), topped with a cloud of silky, airy chocolate mousse that melts on your tongue, all finished with a glossy, mirror‑like ganache. No, your mouse didn’t type this – it’s mousse, the French word for “foam,” and this cake is pure foam‑meets‑fudge perfection. If you are searching for an easy chocolate mousse cake recipe that will earn you pastry chef status, this is the one.
Whether you need a birthday cake that impresses, a Valentine’s Day centerpiece, or simply a weekend baking project that feels luxurious, this chocolate mousse cake delivers. It requires no gelatin (just eggs and cream), no complicated techniques, and can be made ahead. This decadent chocolate layer dessert will become your go‑to for special occasions.
In this complete guide, you will learn the master recipe for chocolate mousse cake – including the brownie‑like base, the light mousse filling, and the shiny ganache glaze. You will also discover pro tips for the perfect mousse texture, delicious variations (add raspberries, coffee, or nuts), make‑ahead instructions, storage advice, and why this cake is a mousse‑t (sorry, we had to). Let’s get baking.
Why Chocolate Mousse Cake Is the King of Chocolate Desserts
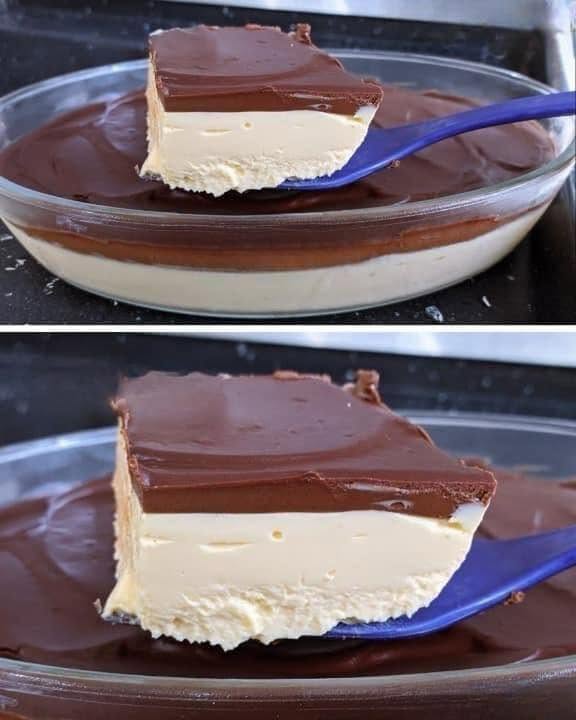
Chocolate mousse cake combines three of the best chocolate experiences in one: a dense, slightly chewy bottom layer (often a brownie or flourless chocolate cake), a creamy, airy middle layer (the mousse), and a smooth, shiny top layer (ganache). The contrast of textures – fudgy, fluffy, and silky – is what makes it unforgettable. Unlike many mousse cakes that use gelatin, this version relies on whipped cream and egg whites for stability, resulting in a lighter, more delicate crumb. This no‑gelatin chocolate mousse cake is pure and simple.
Here is why you will love it:
Three layers of chocolate heaven – Base, mousse, ganache.
No gelatin needed – Real whipped eggs and cream.
Make‑ahead friendly – Actually tastes better the next day.
Impressive but achievable – Looks like a bakery cake.
Customizable – Add orange zest, espresso, or liqueur.
Gluten‑free option – Use a gluten‑free brownie base.
Perfect for birthdays, anniversaries, and holidays – Always a hit.
Once you make this homemade chocolate torte, you will never buy a mousse cake from a bakery again.
The Complete Chocolate Mousse Cake Recipe
This recipe makes one 8‑inch or 9‑inch round cake, serving 10‑12 people. It requires a springform pan for easy removal.
Ingredients – For the Brownie Base:
½ cup (113g, 1 stick) unsalted butter
1 cup (200g) granulated sugar
2 large eggs
1 teaspoon vanilla extract
½ cup (60g) all‑purpose flour (or gluten‑free blend)
⅓ cup (30g) unsweetened cocoa powder
¼ teaspoon salt
Ingredients – For the Chocolate Mousse Layer:
8 oz (226g) semi‑sweet or dark chocolate, finely chopped
2 tablespoons unsalted butter
3 large eggs, separated
¼ cup (50g) granulated sugar, divided
1 cup (240ml) heavy whipping cream, cold
1 teaspoon vanilla extract
Pinch of salt
Ingredients – For the Chocolate Ganache Glaze:
4 oz (113g) semi‑sweet or dark chocolate, finely chopped
½ cup (120ml) heavy cream
1 tablespoon unsalted butter (optional, for shine)
Equipment:
- 8‑inch or 9‑inch springform pan
- Parchment paper
- Electric mixer (hand or stand)
- Mixing bowls (heatproof)
- Rubber spatula
- Saucepan for double boiler or microwave
- Offset spatula
Step‑by‑Step Instructions
Part 1 – Make the Brownie Base
Step 1: Preheat oven to 350°F (175°C). Grease the bottom and sides of your springform pan. Line the bottom with a round of parchment paper. Wrap the outside of the pan with a sheet of aluminum foil (to prevent leaks if the mousse layer is added later in the pan – but here we bake the base first, so foil is optional).
Step 2: In a medium microwave‑safe bowl, melt the butter. Stir in the sugar, then add eggs one at a time, mixing well after each. Add vanilla.
Step 3: In a separate bowl, whisk together flour, cocoa powder, and salt. Gradually add the dry ingredients to the wet mixture, stirring just until combined. Do not overmix.
Step 4: Pour the batter into the prepared springform pan and spread evenly. Bake for 15‑18 minutes, until a toothpick inserted in the center comes out with a few moist crumbs. The base will be thin (about ½‑inch thick) and fudgy. Let cool completely in the pan on a wire rack. Do not remove the base from the pan – it will serve as the bottom of the mousse cake.
Part 2 – Make the Chocolate Mousse
Step 5: Melt the 8 oz of chocolate and 2 tablespoons of butter together in a heatproof bowl set over a saucepan of simmering water (double boiler) or in the microwave in 20‑second bursts. Stir until smooth. Let cool to lukewarm (if too hot, it will cook the eggs).
Step 6: In a large bowl, beat the 3 egg yolks with 2 tablespoons of the sugar until pale and thick, about 2 minutes. Slowly pour the melted chocolate mixture into the yolks, stirring constantly. Set aside.
Step 7: In a clean, grease‑free bowl, beat the 3 egg whites with a pinch of salt until soft peaks form. Gradually add the remaining 2 tablespoons of sugar and beat until stiff, glossy peaks form.
Step 8: In another bowl, whip the cold heavy cream with the vanilla until stiff peaks form (be careful not to overbeat into butter).
Step 9: Gently fold one‑third of the whipped cream into the chocolate‑yolk mixture to lighten it. Then fold in the remaining whipped cream. Finally, gently fold in the egg whites in two additions, using a rubber spatula and a light hand. The mousse should be fluffy and uniform in color. Do not over‑fold or it will deflate.
Part 3 – Assemble the Mousse Layer
Step 10: Pour the mousse over the cooled brownie base in the springform pan. Spread evenly with an offset spatula. Smooth the top. Refrigerate for at least 4 hours, or overnight, until the mousse is firm. This is a no‑bake mousse cake after the base – the mousse sets in the fridge.
Part 4 – Make the Ganache Glaze
Step 11: When the mousse is fully set, make the ganache. Place the 4 oz of chopped chocolate in a heatproof bowl. Heat the ½ cup of heavy cream until just simmering (microwave or stovetop). Pour the hot cream over the chocolate. Let sit for 1 minute, then stir until smooth. Add the optional tablespoon of butter for extra shine. Let the ganache cool for 5‑10 minutes until slightly thickened but still pourable.
Step 12: Remove the springform pan from the refrigerator. Carefully pour the ganache over the top of the mousse layer. Tilt the pan to spread the ganache evenly, letting it drip over the edges if desired (a drippy look is beautiful). Refrigerate again for 30‑60 minutes until the ganache is set.
Part 5 – Unmold and Serve
Step 13: Run a thin knife around the inside edge of the springform pan. Release the latch and carefully lift off the side ring. Use a spatula to transfer the cake to a serving platter if desired (the base should be sturdy enough). For clean slices, use a large knife warmed under hot water and wiped dry between cuts.
Step 14: Garnish with chocolate shavings, fresh berries, or a dusting of cocoa powder. Serve chilled or at room temperature (the mousse is best cold, the ganache becomes softer at room temp).
Pro Tips for the Best Chocolate Mousse Cake
Follow these expert tips for a flourless chocolate cake with mousse that earns rave reviews:
Use high‑quality chocolate – The flavor of this cake comes almost entirely from chocolate. Use a good brand like Ghirardelli, Guittard, or Callebaut. At least 60% cacao is ideal for a balanced, not‑too‑sweet taste.
Do not rush the mousse setting – Four hours minimum, but overnight is best. The mousse needs time to set into a sliceable layer.
Fold gently – The key to light, airy mousse is folding the whipped cream and egg whites without deflating them. Use a wide rubber spatula and a “cut and fold” motion.
Cool the melted chocolate – If the chocolate is too hot when added to egg yolks, it will cook them into lumps. Cool to lukewarm (about 100°F).
Use a springform pan – This is essential for removing the cake cleanly without destroying the mousse layers. If you don’t have one, line a regular cake pan with parchment “slings” on the sides, but a springform is much easier.
Warm your knife – For clean, professional slices, run a long knife under hot water, dry it, then slice. Wipe the blade clean between cuts.
Make ahead – This cake can be made 2‑3 days in advance and kept refrigerated. In fact, the flavors meld and improve.
Want the full truth and the practical next steps?
Page 2 continues with the real explanation, the key details many readers skip, and the simple takeaways that make this guide more useful.