
There are some recipes that carry more than just flavor. They carry history, resilience, and the quiet wisdom of people who learned to make the most out of very little. This homemade pickled vegetable recipe is one of them.
During the Great Depression, Jewish families — like so many others — faced hard times. Money was tight. Fresh vegetables were precious. Nothing could be wasted. Pickling became a lifeline. It preserved garden harvests, stretched ingredients, and added bright, tangy flavor to otherwise simple meals.
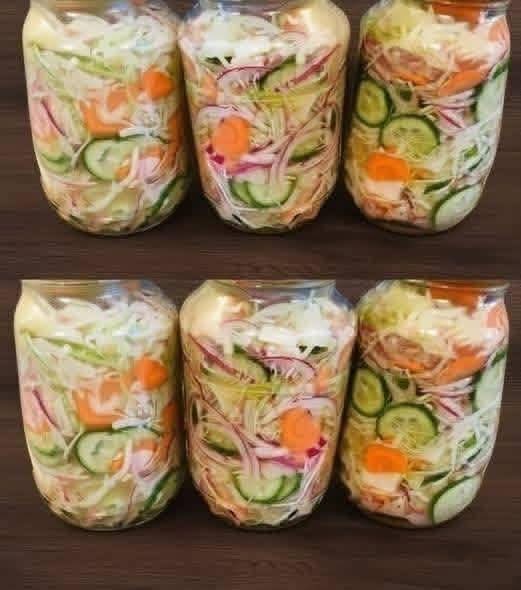
This is one of the original recipes from that era. It is humble, resourceful, and surprisingly delicious. And while the traditional version often includes green bell peppers, I have made one small change: I substitute cucumber slices for the green peppers. I have never been a fan of green bell pepper, and cucumbers bring a crisp, refreshing bite that works beautifully in this brine.
The result is a jar of pickled vegetables that tastes like history — but also like something you will want to make again and again.
Why Pickling Was Essential During the Great Depression
The Great Depression (1929–1939) was a time of widespread poverty, unemployment, and food scarcity. Families could not afford to waste a single scrap. Gardens were planted wherever there was space — backyards, vacant lots, even windowsills. When vegetables ripened all at once, pickling was the answer.
Pickling preserved food without refrigeration. A simple brine of vinegar, water, salt, and sometimes sugar could keep vegetables edible for months. Jewish immigrants, especially those from Eastern Europe, brought deep pickling traditions with them. In the Old Country, they pickled cucumbers, cabbages, and beets. In America, they adapted to what was available and affordable.
This recipe is a direct descendant of those survival kitchens. It uses inexpensive, sturdy vegetables: onions, carrots, cauliflower, and (in the original) green peppers. The brine is basic but balanced. The result is a crunchy, tangy, savory pickle that brightens up beans, potatoes, bread, or whatever else was on the table.
Why I Swap Cucumbers for Green Peppers
The original Depression‑era recipe often calls for green bell peppers. They were cheap, abundant, and held up well in brine. But not everyone loves the sharp, slightly bitter taste of green peppers. I certainly do not.
Cucumbers are a natural substitute. They are crisp, mild, and soak up the pickling brine beautifully. They add a refreshing crunch without overpowering the other vegetables. Plus, cucumbers are just as affordable and widely available as peppers were back then.
If you love green peppers, feel free to add them back. This recipe is flexible. But for my version — and for anyone who prefers a milder, more classic pickle flavor — cucumbers are the way to go.
The Complete Homemade Pickled Vegetable Recipe
This recipe fills about two 1‑quart jars (or one 2‑quart jar). It can easily be doubled.
Ingredients
Vegetables (choose a mix):
· 1 medium cucumber (pickling cucumbers are best, but any fresh cucumber works), sliced into rounds or spears
· 1 medium onion, sliced into rings
· 2 carrots, peeled and sliced into thin rounds or sticks
· 1 cup cauliflower florets, broken into small pieces
· Optional: 1 bell pepper (any color), sliced, if you prefer the original version
For the Brine:
· 1 cup white vinegar (5% acidity)
· 1 cup water
· 1 tablespoon pickling salt (or kosher salt; do not use table salt with iodine)
· 1 tablespoon granulated sugar (optional, for a slightly sweet pickle)
· 1 teaspoon black peppercorns
· 1 teaspoon mustard seeds
· 2 cloves garlic, smashed
· 1 teaspoon dill seeds or 2 fresh dill sprigs (optional)
Equipment
· 2 clean 1‑quart glass jars with lids
· Small saucepan
· Knife and cutting board
· Measuring cups and spoons
Step‑by‑Step Instructions
Step 1 – Prepare the Vegetables
Wash all vegetables thoroughly. Slice the cucumber into ¼‑inch rounds or into spears (spears are great for snacking). Slice the onion into thin rings. Peel and slice the carrots into rounds or thin sticks. Break the cauliflower into bite‑sized florets.
If you are using green peppers, remove seeds and slice into strips.
Step 2 – Pack the Jars
Divide the vegetables evenly between the two jars. Pack them fairly tightly but leave about ½ inch of headspace at the top. You want the brine to cover everything.
Add the garlic cloves, peppercorns, mustard seeds, and dill (if using) to each jar, distributing evenly.
Step 3 – Make the Brine
In a small saucepan, combine the vinegar, water, pickling salt, and sugar (if using). Bring to a boil over medium heat, stirring until the salt and sugar dissolve completely. Remove from heat.
Step 4 – Pour the Brine
Carefully pour the hot brine over the vegetables in the jars, filling to within ½ inch of the rim. Use a chopstick or knife to gently poke around the jar to release any air bubbles. Add more brine if needed.
Step 5 – Seal and Cool
Wipe the rims of the jars with a clean, damp cloth to remove any spills. Place the lids on and screw on the bands until fingertip‑tight (do not overtighten).
Let the jars cool to room temperature on the counter. As they cool, you may hear the lids pop — that is the seal forming.
Step 6 – Refrigerate or Process for Shelf Stability
For quick refrigerator pickles, simply place the cooled jars in the refrigerator. They will be ready to eat in 24–48 hours and will keep for 2–3 months.
For shelf‑stable pickles (no refrigeration needed until opened), you must process the jars in a boiling water bath. Submerge the sealed jars in boiling water for 10 minutes (adjust for altitude). Remove and let cool. Check that the lids have sealed (no popping when pressed). Store in a cool, dark place for up to one year.
How Long Until They Are Ready?
Refrigerator pickles are best after at least 24 hours. The flavor deepens over the next week. For canned shelf‑stable pickles, wait at least two weeks before opening to allow the flavors to meld.
The cucumbers will stay crisp for several weeks. Over time, they may soften slightly, but they will still be delicious.
Want the full truth and the practical next steps?
Page 2 continues with the real explanation, the key details many readers skip, and the simple takeaways that make this guide more useful.