
There are some desserts that never go out of style. Apple pie. Chocolate chip cookies. And then there is the vanilla slice — a classic that sits somewhere between a custard square, a Napoleon, and pure nostalgia.
A creamy vanilla slice with flaky puff pastry is the kind of dessert that makes people close their eyes and smile. Two layers of golden, buttery puff pastry sandwiching a thick, silky vanilla custard, all topped with a glossy icing that cracks perfectly when you cut into it.
It is elegant enough for a dinner party. Simple enough for a Tuesday afternoon. And addictive enough that you will watch the last piece disappear before you even get a second helping.
The best part? You do not need to be a professional pastry chef. With a few smart shortcuts (store‑bought puff pastry is your friend) and a foolproof vanilla custard, you can make a vanilla slice that tastes like it came from a high‑end bakery.
In this guide, you will learn the complete recipe, pro tips for perfect layers, variations, storage instructions, and why this dessert is the ultimate crowd‑pleaser.
What Is a Vanilla Slice?
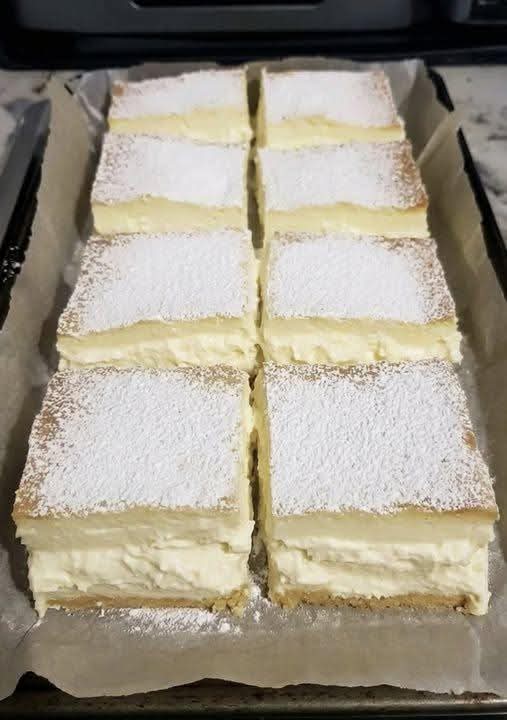
A vanilla slice (also known as a custard slice, mille-feuille, or Napoleon in some countries) is a layered dessert made with puff pastry and vanilla custard. The traditional version has three layers: pastry, custard, pastry. The top is usually finished with a white icing or dusted with powdered sugar.
Unlike many custard desserts, a vanilla slice is meant to be served cold. The custard sets into a firm, sliceable layer that holds its shape when cut. The puff pastry stays crisp and flaky, creating a wonderful contrast of textures.
In Australia and New Zealand, the vanilla slice is a bakery icon, often called a “snot block” (affectionately) because of its wobbly custard. In France, the mille-feuille (“thousand leaves”) is more delicate and often layered with pastry cream. But the heart of all versions is the same: creamy vanilla, flaky pastry, pure bliss.
Why This Recipe Works (And Why You Will Love It)
This recipe is designed for home bakers who want spectacular results without stress.
Here is what makes it great:
· No‑bake custard – The custard is cooked on the stovetop, then poured over the pastry. No oven needed for the filling.
· Store‑bought puff pastry – Saves hours of work. Just bake until golden and flaky.
· Thick, sliceable custard – Uses cornstarch and egg yolks to set perfectly. No gelatin required.
· Glossy icing – A simple powdered sugar glaze that hardens into a beautiful, crackled top.
· Make‑ahead friendly – The vanilla slice needs to chill for several hours (or overnight), so you can prepare it the day before serving.
· Impressive but easy – Looks like you spent all day in the kitchen. You did not.
Ingredients for Creamy Vanilla Slice with Flaky Puff Pastry
This recipe makes one 9×9‑inch (23×23 cm) square vanilla slice, about 9–12 generous portions.
For the Puff Pastry Layers
· 1 sheet (about 8–10 oz / 230–280g) frozen puff pastry, thawed (use all‑butter puff pastry for best flavor)
· Powdered sugar (optional, for dusting before baking – helps prevent sogginess)
For the Vanilla Custard Filling
· 2 cups (480 ml) whole milk
· 1 cup (240 ml) heavy cream (or use all milk for lighter version)
· ¾ cup (150g) granulated sugar
· 1 vanilla bean pod (or 1 tablespoon vanilla bean paste, or 2 teaspoons vanilla extract)
· 6 large egg yolks
· ½ cup (60g) cornstarch (cornflour)
· 2 tablespoons unsalted butter (for extra richness)
For the Icing
· 1 cup (120g) powdered sugar (icing sugar)
· 2–3 tablespoons milk or water
· ½ teaspoon vanilla extract (optional)
· Optional decoration: melted dark chocolate for drizzling or piping
Equipment
· 9×9‑inch square baking pan (or similar size)
· Parchment paper (to line the pan)
· Heavy‑bottomed saucepan
· Whisk
· Fine mesh strainer (optional but helpful)
· Plastic wrap (to cover custard surface)
Step‑by‑Step Instructions
Part 1: Bake the Puff Pastry
- Preheat your oven to 400°F (200°C). Line a baking sheet with parchment paper.
- Roll out the puff pastry slightly if needed. You want it to be about 1/8‑inch thick and large enough to cut into two 9×9‑inch squares (or you can bake one large sheet and cut it later).
- Prick the pastry all over with a fork. This prevents it from puffing up too unevenly.
- Optional but recommended: Place another piece of parchment paper on top of the pastry and set another baking sheet on top to weigh it down. This creates very flat, even pastry layers.
- Bake for 15–20 minutes until golden brown and fully cooked. If using a weight, remove it halfway through to let the pastry crisp up.
- Cool completely on a wire rack. Once cool, trim the pastry into two 9×9‑inch squares (if you baked a larger sheet). Set aside.
Part 2: Make the Vanilla Custard
- Prepare the pan. Line the 9×9‑inch baking pan with parchment paper, leaving some overhang on the sides (for easy removal later). Place one of the baked puff pastry squares in the bottom of the pan.
- Heat the milk and cream. In a heavy‑bottomed saucepan, combine the whole milk, heavy cream, and half of the sugar (6 tablespoons / 75g). If using a vanilla bean pod, split it lengthwise and scrape the seeds into the milk mixture; add the pod as well. Heat over medium heat until steaming but not boiling.
- Whisk the egg yolks, sugar, and cornstarch. In a separate bowl, whisk the egg yolks, remaining sugar (6 tablespoons / 75g), and cornstarch until pale and thick. The mixture should be smooth and slightly ribbon‑like.
- Temper the eggs. Slowly pour about 1 cup of the hot milk mixture into the egg mixture while whisking constantly. This raises the temperature of the eggs without scrambling them.
- Combine and cook. Pour the tempered egg mixture back into the saucepan with the remaining hot milk. Whisk continuously over medium heat. The mixture will thicken quickly – in about 2–3 minutes. Keep whisking until it becomes very thick and begins to bubble. Remove from heat.
- Add butter and vanilla. If you used a vanilla bean pod, remove it now. Stir in the butter and vanilla extract (if using, or vanilla bean paste). Whisk until the butter melts and the custard is smooth.
- Strain (optional). For an ultra‑smooth custard, pour it through a fine mesh strainer into a clean bowl.
- Pour over the pastry. Immediately pour the hot custard onto the puff pastry layer in the prepared pan. Spread it evenly with a spatula.
- Place the second pastry layer on top of the custard, pressing down gently so it adheres. The custard will still be soft – that is fine.
- Cover and chill. Press a piece of plastic wrap directly onto the surface of the top pastry (to prevent a skin from forming). Refrigerate for at least 4 hours, preferably overnight. The custard will set completely.
Part 3: Make the Icing
- Whisk the icing ingredients together in a small bowl: powdered sugar, 2 tablespoons of milk or water, and vanilla extract. Add more liquid 1 teaspoon at a time until you have a thick, pourable consistency. It should be opaque and smooth but not runny.
- Spread the icing evenly over the top puff pastry layer. Use an offset spatula or the back of a spoon.
- Optional decoration: While the icing is still wet, drizzle melted dark chocolate in lines, then drag a toothpick through to create a feather pattern. Or simply leave it white.
- Let the icing set at room temperature for about 30 minutes, or refrigerate for 10 minutes to speed it up.
Part 4: Slice and Serve
- Remove the vanilla slice from the pan using the parchment paper overhang. Place it on a cutting board.
- Use a sharp knife to trim the edges for a clean look (optional – the trimmings are the baker’s treat).
- Cut into squares or rectangles. For clean cuts, wipe the knife with a damp cloth between slices.
- Serve cold or at room temperature. The vanilla slice is best enjoyed within 24 hours of assembly.
Pro Tips for the Perfect Vanilla Slice
Keep the Puff Pastry Crisp
Puff pastry naturally softens when in contact with custard. To maintain some flakiness:
· Bake the pastry until very golden and crisp.
· Cool completely before assembling.
· Serve within 24 hours – the longer it sits, the softer the pastry becomes.
· Some bakers brush the pastry with melted butter or egg white before baking to create a moisture barrier.
Get a Silky Smooth Custard
· Whisk constantly while cooking to prevent lumps.
· Strain the finished custard for absolute smoothness.
· Do not overcook – remove from heat as soon as it thickens and bubbles.
Prevent a Skin on the Custard
When chilling, press plastic wrap directly onto the surface of the custard before adding the top pastry. This prevents a rubbery skin from forming.
Clean Cuts Every Time
· Use a serrated knife for the pastry layers.
· Wipe the knife clean between each cut.
· For the cleanest slices, refrigerate the vanilla slice for at least 6 hours or overnight.
Want the full truth and the practical next steps?
Page 2 continues with the real explanation, the key details many readers skip, and the simple takeaways that make this guide more useful.