
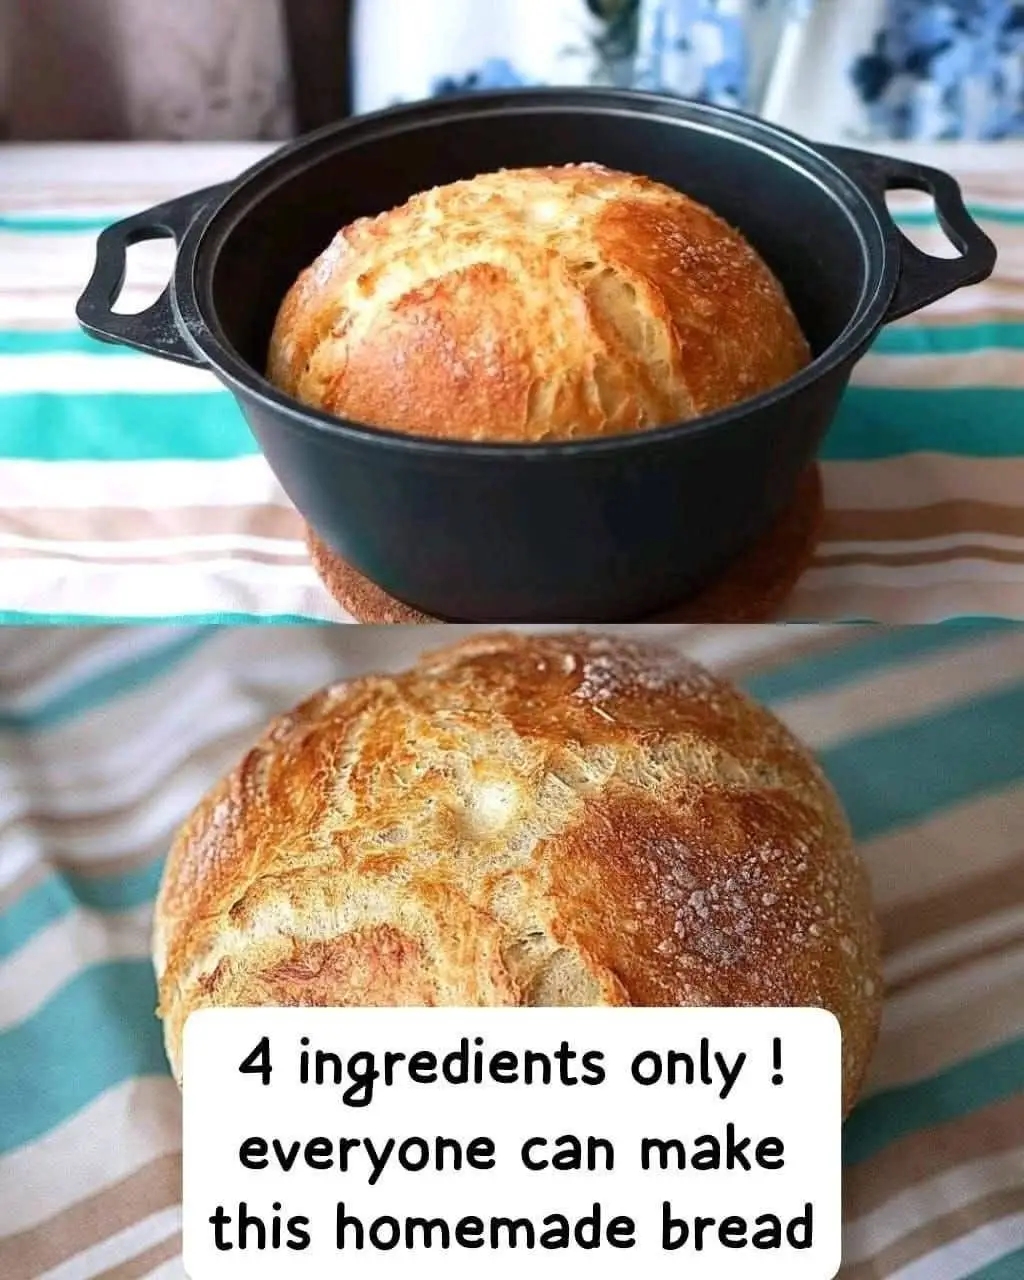
Imagine pulling a perfectly golden, crusty loaf of bread out of your oven – warm, fragrant, and crackling with a crisp crust while revealing a soft, airy crumb inside. Now imagine that you made this bread with just four simple ingredients and almost no effort. No stand mixer, no kneading, no fancy techniques. This 4‑ingredient Dutch oven bread is the ultimate foolproof recipe for anyone who wants to experience the joy of homemade artisan bread without the intimidation. With just flour, water, yeast, and salt, you can create a loaf that rivals any bakery. The Dutch oven traps steam, creating that signature crusty exterior, while the long, slow rise develops incredible flavor. Whether you are a seasoned baker or a complete beginner, this recipe will make you feel like a pro.
⏲️ Prep: 10 mins⏰ Rise: 1.5 – 2.5 hrs🔥 Bake: 40-45 mins🍽️ Yields: 1 large loaf🥖 Crusty artisan⭐ 4 ingredients
✨ Why This Dutch Oven Bread Is a Game‑Changer
This recipe is the definition of minimalist baking. With just flour, water, yeast, and salt, you can create a loaf that is crusty on the outside, chewy and airy on the inside, and bursting with that tangy, fermented flavor that makes artisan bread so special. The magic happens in the Dutch oven – it traps steam as the bread bakes, mimicking the environment of a professional steam‑injection oven. This steam keeps the crust pliable during the first phase of baking, allowing the bread to rise fully before the crust sets and turns golden. The result is a loaf with a crackling, blistered crust that shatters when you cut into it, revealing a tender, hole‑studded crumb. It is the kind of bread that makes you want to tear off a piece and eat it warm, slathered with butter.
💡 The Secret to the Perfect Crust: The Dutch oven traps steam, which is essential for a crispy, crackly crust. The high heat also creates those beautiful blisters on the surface – a hallmark of artisan bread. Do not skip the preheating step; it is crucial for that dramatic oven spring.
📝 The 4 Simple Ingredients
You need just four pantry staples for this recipe. 1½ cups of warm water – the temperature is important; it should be about 110°F (43°C), warm to the touch but not hot. 2 teaspoons of active dry yeast – this is the standard instant or active dry yeast found in most grocery stores. 4 cups of all‑purpose flour – you can also use bread flour for an even chewier texture. And 1 teaspoon of salt – fine sea salt or kosher salt works best.
That is truly it. No sugar, no oil, no eggs, no milk. The yeast feeds on the natural sugars in the flour, and the long rise develops the gluten and flavor. This is bread at its most honest and simple.
👩🍳 Step‑by‑Step Instructions
First, activate the yeast. In a large mixing bowl, combine the warm water and the dry yeast. Stir gently and let it sit for about 5 minutes, until the mixture becomes slightly foamy and bubbly. This is called “proofing” – it ensures the yeast is alive and ready to work.
Next, add the flour and salt. Add the 4 cups of flour and the 1 teaspoon of salt to the yeast mixture. Use a wooden spoon or a spatula to mix everything together until a rough, sticky dough forms. The dough will be shaggy and wet – this is exactly what you want. Do not add extra flour at this stage.
Let the dough rise. Cover the bowl with plastic wrap or a clean kitchen towel. Set it aside in a warm, draft‑free place and let it rise for 1 to 2 hours, until the dough has doubled in size. The time will vary depending on the warmth of your kitchen.
Shape the loaf. Sprinkle a little flour on your work surface. Turn the dough out onto the floured surface – it will be sticky, which is normal. Gently shape it into a round loaf by folding the edges in toward the center. Do not knead heavily; just coax it into a rough ball. The dough should be soft and slightly tacky.
Second rest. Place the shaped dough on a piece of parchment paper. Cover it loosely with a towel and let it rest for another 30 minutes. During this time, the dough will puff up slightly and relax.
Preheat the Dutch oven. While the dough is resting, place your Dutch oven or oven‑safe pot with its lid into the oven. Preheat the oven to 450°F (230°C). Let the pot heat up for at least 30 minutes – this ensures the bottom of the bread gets a head start and develops a nice crust.
Bake the bread. Carefully remove the hot pot from the oven. Using the parchment paper as a sling, lift the dough and lower it gently into the hot pot. The parchment will keep it from sticking and make it easy to transfer. Cover the pot with the lid and return it to the oven.
Bake covered, then uncovered. Bake the bread covered for 30 minutes. This traps the steam and allows the bread to rise fully. Then remove the lid and bake for an additional 10 to 15 minutes, until the crust is deep golden brown and crackly. The internal temperature of the bread should reach about 200°F (93°C) for a fully baked loaf.
Cool before slicing. Remove the bread from the pot and let it cool on a wire rack for at least 20 minutes before slicing. This is a crucial step – cutting into it too early can make the crumb gummy and dense. The bread continues to set as it cools.
💡 Pro Tips for the Best Dutch Oven Bread
Use warm, not hot, water. Water that is too hot will kill the yeast. If it feels uncomfortably hot on your wrist, it is too hot. Aim for lukewarm – about 110°F (43°C).
Do not add too much extra flour. The dough should be sticky and wet. Adding too much flour will make the bread dense. Trust the process – the wet dough is what gives you those large, airy holes.
Preheat the Dutch oven thoroughly. A hot pot is essential for a good crust. Let it heat in the oven for at least 30 minutes before adding the dough.
Experiment with add‑ins. Once you master the basic recipe, you can add garlic powder, dried herbs, grated cheese, or seeds to the dough for extra flavor. Just fold them in during the shaping stage.
Store properly. To keep the crust crispy, store the bread cut‑side down on a cutting board. For longer storage, wrap it in a clean towel or paper bag.
🥗 Nutritional Snapshot (per slice, 1/16 of loaf)
🔥 Calories: 120
💪 Protein: 4g
🥑 Fat: 0.5g
🍚 Carbs: 25g
🌾 Fiber: 1g
🧂 Sodium: 140mg
Values are estimates using all‑purpose flour. This bread is a simple, wholesome addition to any meal – perfect for sandwiches, toasting, or eating warm with butter.
🌟 7 Delicious Variations to Try
Garlic & Herb Bread: Add 1 teaspoon of garlic powder and 1 tablespoon of dried mixed herbs (rosemary, thyme, oregano) to the flour before mixing. The herbs infuse the bread with a savory aroma.
Cheese Bread: Fold 1 cup of shredded sharp cheddar or Parmesan cheese into the dough during the shaping stage. The cheese melts into pockets of savory goodness.
Seeded Bread: Sprinkle sesame seeds, poppy seeds, or sunflower seeds onto the dough before baking. The seeds add a nutty crunch and a beautiful finish.
Olive Bread: Fold ½ cup of chopped Kalamata olives and a teaspoon of dried oregano into the dough. The briny olives add a Mediterranean twist.
Whole Wheat Version: Replace 2 cups of the all‑purpose flour with whole wheat flour. You may need to add an extra ¼ cup of water, as whole wheat flour absorbs more liquid.
Rosemary & Sea Salt: Add 1 tablespoon of fresh chopped rosemary and sprinkle coarse sea salt on top of the loaf before baking. The aroma is incredible.
Cinnamon Raisin Bread: Add ½ cup of raisins and 1 teaspoon of cinnamon to the dough. This makes a wonderful breakfast toast bread.
❄️ How to Store & Freeze
This bread is best enjoyed fresh on the day it is baked, but it stores well for a few days. Keep it at room temperature wrapped in a clean kitchen towel or in a paper bag for up to 2 days – this allows the crust to stay crispy. Avoid storing it in plastic wrap, which can make the crust soft. For longer storage, you can freeze the bread for up to 2 months. Let it cool completely, then wrap it tightly in plastic wrap and foil. To thaw, leave it at room temperature for a few hours, then refresh it in a 350°F oven for 5‑10 minutes to bring back the crust.
📦 Freezer tip: Slice the bread before freezing so you can toast individual slices straight from the freezer. It is perfect for quick breakfasts or impromptu meals.
Want the full truth and the practical next steps?
Page 2 continues with the real explanation, the key details many readers skip, and the simple takeaways that make this guide more useful.