
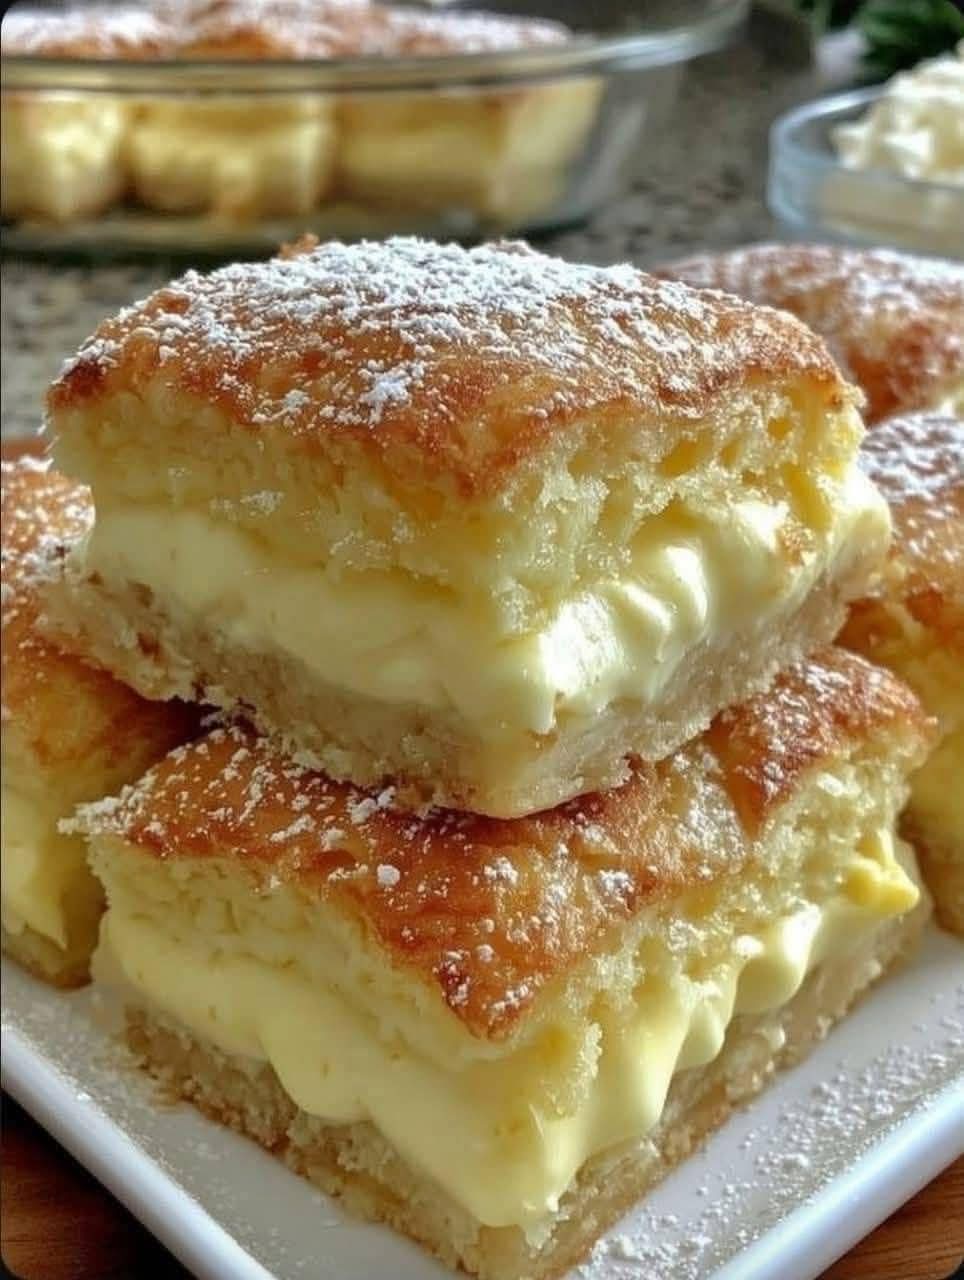
There’s a certain magic in a dessert that bridges the gap between a fancy patisserie treat and a beloved childhood memory. Vanilla Custard Cream Squares, also known as Custard Slice or Millionaire’s Slice in some families, are precisely that kind of culinary alchemy. With a buttery, flaky pastry base, a layer of luxuriously thick and creamy homemade vanilla custard, and a glossy blanket of sweet icing, this dessert is a masterpiece of texture and flavor. It’s not just a recipe; it’s a journey back to bakeries of old, to family gatherings, and to the simple, profound joy of a perfectly crafted slice.
Today, we’re ditching the store-bought versions and diving deep into creating this iconic treat from scratch. This isn’t just an easy dessert recipe; it’s a foundational baking tutorial that will equip you with skills for a lifetime. We’ll cover the secrets to a crack-free top, a custard that sets perfectly, and the kind of make-ahead dessert that guarantees you’re the star of any potluck, bake sale, or family dinner.
Why This Recipe is a Must-Try (Beyond the Incredible Taste)
Before we preheat the oven, let’s talk about why Vanilla Custard Cream Squares deserve a prime spot in your dessert repertoire.
· Crowd-Pleasing Comfort Food: This is universally loved. It appeals to all ages and is a guaranteed hit at any event.
· Stunning Visual Appeal: When sliced to reveal those pristine layers, it’s a show-stopping dessert that looks far more complex than it is.
· The Homemade Advantage: The difference between a gelatinous, artificially-flavored slab and this rich, eggy, vanilla-speckled creation is astronomical. Once you taste the homemade version, there’s no going back.
· Perfect for Beginners & Experts Alike: It breaks down into simple components. Mastering the custard (or crème pâtissière) is a right of passage for any home baker.
The Ultimate Vanilla Custard Cream Squares Recipe
This recipe is designed for clarity and success. Read through it once before beginning.
Yield: One 9×13 inch pan, about 20 generous squares
Prep Time: 45 minutes
Cook Time: 45 minutes
Chill Time: 4 hours (minimum) or overnight
Difficulty: Intermediate (but totally achievable!)
Equipment You’ll Need:
· 9×13 inch baking pan
· Parchment paper
· Medium saucepan
· Whisk
· Heatproof spatula
· Mixing bowls
· Fine-mesh sieve
· Electric mixer (stand or hand)
Ingredients:
For the Flaky Pastry Layers:
· 2 sheets (about 1 lb) of all-butter puff pastry, thawed (or your favorite homemade recipe)
· Why puff pastry? It gives that iconic, airy, shattering crisp layer that contrasts the creamy custard.
For the Luxurious Vanilla Custard Filling:
· 2 ½ cups (600ml) whole milk
· 1 cup (240ml) heavy cream (for extra richness)
· 1 vanilla bean, split and seeds scraped (or 2 teaspoons high-quality pure vanilla bean paste)
· 6 large egg yolks (save the whites for macarons or meringues!)
· ¾ cup (150g) granulated sugar
· ⅓ cup (40g) cornstarch
· ⅓ cup (40g) all-purpose flour
· A pinch of fine sea salt
· ¼ cup (55g) unsalted butter, cubed and softened
For the Simple Glaze & Decoration:
· 1 ½ cups (180g) confectioners’ sugar, sifted
· 2-3 tablespoons milk or water
· A few drops of pure vanilla extract (optional)
· ½ cup (50g) chopped pistachios or a drizzle of melted dark chocolate for garnish (optional)
Step-by-Step Instructions:
Part 1: The Pastry Base & Top
Prep & Preheat: Line your 9×13 inch pan with parchment paper, leaving an overhang on two sides for easy removal. This is your secret to clean slices. Preheat your oven to 400°F (200°C).
Pastry Prep: Unfold the puff pastry sheets. Using the bottom of your pan as a guide, trim one sheet to fit exactly into the bottom of the pan. Prick it all over with a fork—this is called “docking” and prevents huge air pockets.
First Bake: Place the trimmed sheet on a separate parchment-lined baking sheet. Bake for 15-18 minutes, or until it is puffed and a deep golden brown. It will look enormous! Once out of the oven, gently press it down with a clean kitchen towel or the bottom of another pan to deflate it slightly. This will be your top layer.
Second Layer: While the first sheet bakes, press the second sheet of pastry directly into the bottom of your parchment-lined pan. Prick it thoroughly with a fork.
Second Bake: Once the first sheet is out, reduce the oven temperature to 375°F (190°C). Bake the pastry in the pan for 20-25 minutes, or until golden and cooked through. Set aside to cool completely in the pan. This is your bottom layer.
Why bake separately? Baking the top layer on a sheet ensures it gets crisp all over. Baking the bottom in the pan gives it sturdy edges to contain the custard.
Part 2: The Heart of It All: Homemade Vanilla Custard
This is where the magic happens. Don’t rush the custard.
Infuse the Milk: In a medium saucepan, combine the milk, cream, and the scraped vanilla bean seeds and pod (or vanilla paste). Heat over medium until it just begins to simmer. Remove from heat, cover, and let steep for 20-30 minutes to build incredible flavor. Remove the bean pod.
Whisk the Yolks: In a large, heatproof bowl, whisk the egg yolks and sugar until pale and slightly thickened, about 2 minutes. Whisk in the cornstarch, flour, and salt until you have a very thick, smooth paste.
Temper the Eggs: This is the crucial step to avoid scrambled eggs. While whisking the egg mixture constantly, slowly drizzle in about 1 cup of the warm milk mixture. Once incorporated, slowly whisk the now-warm egg mixture back into the saucepan with the remaining milk.
Cook to Perfection: Place the saucepan back over medium heat. Whisk constantly and vigorously, making sure to get into the corners of the pan. The mixture will thicken dramatically. Once large bubbles begin to break the surface, cook for exactly 2 more minutes, whisking non-stop. This cooks out the starchy flavor.
Finish with Butter: Remove from heat. Whisk in the softened butter cubes until fully melted and the custard is glossy and smooth.
Strain & Cover: Immediately pour the custard through a fine-mesh sieve into a clean bowl. This guarantees a flawless, silky texture. Press plastic wrap directly onto the surface to prevent a skin from forming. Let it cool at room temperature for 30 minutes, then refrigerate for at least 2 hours until completely cold and set.
Part 3: Assembly & The Signature Glaze
Build the Layers: Ensure your bottom pastry layer in the pan is completely cool. Give your chilled custard a good stir with a spatula to loosen it. Spread it evenly over the bottom pastry layer with an offset spatula.
Place the Top: Carefully place the pre-baked, flattened top pastry sheet onto the custard. Press down gently and evenly.
Create the Glaze: In a small bowl, whisk the sifted confectioners’ sugar with 2 tablespoons of milk or water and vanilla extract (if using). You want a thick but pourable consistency—like heavy cream. Add more liquid a teaspoon at a time if needed.
The Final Touch: Pour the glaze over the top pastry layer, spreading it quickly to the edges with your spatula. For a classic finish, use a fork or a skewer to create elegant swirls in the glaze before it sets.
The Grand Finale – Chill: This is the hardest but most important step. Refrigerate the entire assembled dessert for at least 4 hours, preferably overnight. This allows the custard to firm up completely and the flavors to meld, making slicing cleanly possible.
Part 4: Slicing & Serving for Maximum Impact
The Clean Slice: Use the parchment paper overhang to lift the entire slab onto a cutting board. Using a large, sharp chef’s knife, wipe it clean with a hot, damp towel between each cut. This is the professional tip for those pristine, photogenic squares.
Garnish & Serve: Sprinkle with chopped pistachios or a delicate drizzle of melted chocolate if desired. Serve chilled.
Pro Tips, Troubleshooting & FAQ: Your Guide to Custard Square Mastery
Can I make this ahead of time?
Absolutely! This is the quintessential make-ahead dessert. It will keep beautifully, covered, in the refrigerator for up to 3 days. The flavors improve, and it slices even better on day two.
My custard is lumpy! What do I do?
Don’t panic. Your sieve is your best friend. If you notice small lumps while cooking, simply strain the finished custard vigorously. It will smooth right out.
Why is my custard layer runny?
This usually means it wasn’t cooked long enough after thickening or wasn’t chilled thoroughly. Ensure you cook for the full 2 minutes after the first bubbles appear and allow for the full, uninterrupted chill time.
Can I use vanilla extract instead of a bean or paste?
Yes, but for the best vanilla flavor, bean or paste is superior. If using extract, add 2 teaspoons directly to the egg yolk mixture in step 2, skipping the steeping process.
What’s the best way to store leftovers?
Store in an airtight container in the refrigerator. Avoid leaving at room temperature for more than an hour, as the custard is dairy-based.
Creative Flavor Twists:
· Chocolate Custard Squares: Add 4 oz of melted dark chocolate to the finished custard.
· Lemon Bliss: Add the zest of two lemons to the milk when infusing, and use a lemon juice-based glaze.
· Berry Compote Layer: Spread a thin layer of seedless raspberry or strawberry jam over the bottom pastry before adding the custard.
The Joy of Sharing a Classic
Baking Vanilla Custard Cream Squares is more than following a recipe; it’s about preserving and sharing a piece of classic baking heritage. It’s a testament to the fact that the most satisfying desserts often come from patience, quality ingredients, and a bit of loving technique.
So, the next time you’re searching for a show-stopping dessert, a potluck favorite, or a project that fills your kitchen with the sublime scent of vanilla and baked pastry, return to this recipe. Share it with friends, pass it down to family, and enjoy the incomparable satisfaction of biting into a perfect, creamy, flaky square of pure nostalgia.
Now it’s your turn! Have you made custard squares before? Do you have a family variation? Share your stories, photos, and questions in the comments below. And if you loved this deep-dive into a classic, subscribe for more from-scratch baking tutorials and decadent dessert recipes delivered straight to your inbox. Happy Baking
-

Ginger Lemon Digestive Tea: The Simple, Honest Drink That Supports Your Body
Discover the simple, realistic benefits of ginger lemon tea. This warm, soothing drink aids digestion, reduces bloating, and supports hydration—no fake promises, just gentle, natural support. Let me tell you about the drink that became my morning ritual—and my after‑dinner reset. For years, I chased health trends. I tried detox teas that promised overnight weight…
-
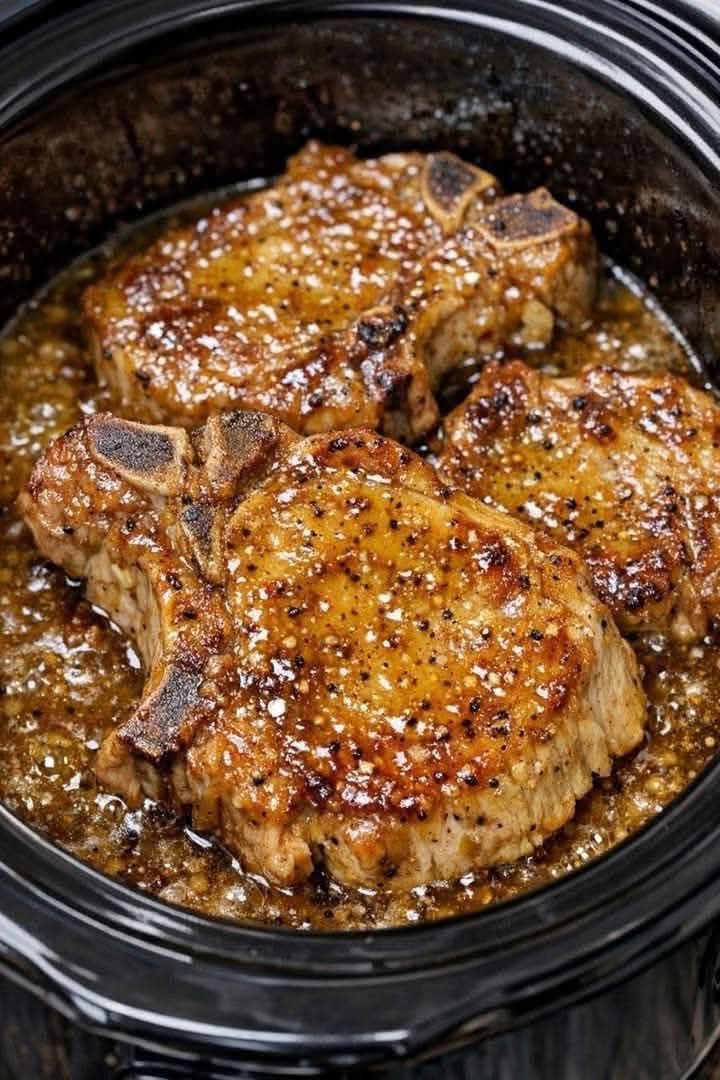
Glazed Pork Chops: The Ultimate Slow Cooker Comfort Meal
Discover the secret to the most tender, glazed slow cooker pork chops! Sweet, savory, and fall-apart delicious. This easy recipe uses simple ingredients for a meal the whole family will love. Let me tell you about the pork chops that changed my mind about slow cooker pork. I used to think pork chops were best…
-

3 Ingredient Fried Cornmeal Mush: A Classic, Crispy, Comfort Food
Learn how to make crispy, golden fried cornmeal mush with just 3 simple ingredients. This old-fashioned comfort food is perfect for breakfast, brunch, or any meal. Easy, budget-friendly, and irresistible. Let me take you back to a time when breakfast was simple, filling, and made with love. I grew up spending summers at my grandmother’s…