
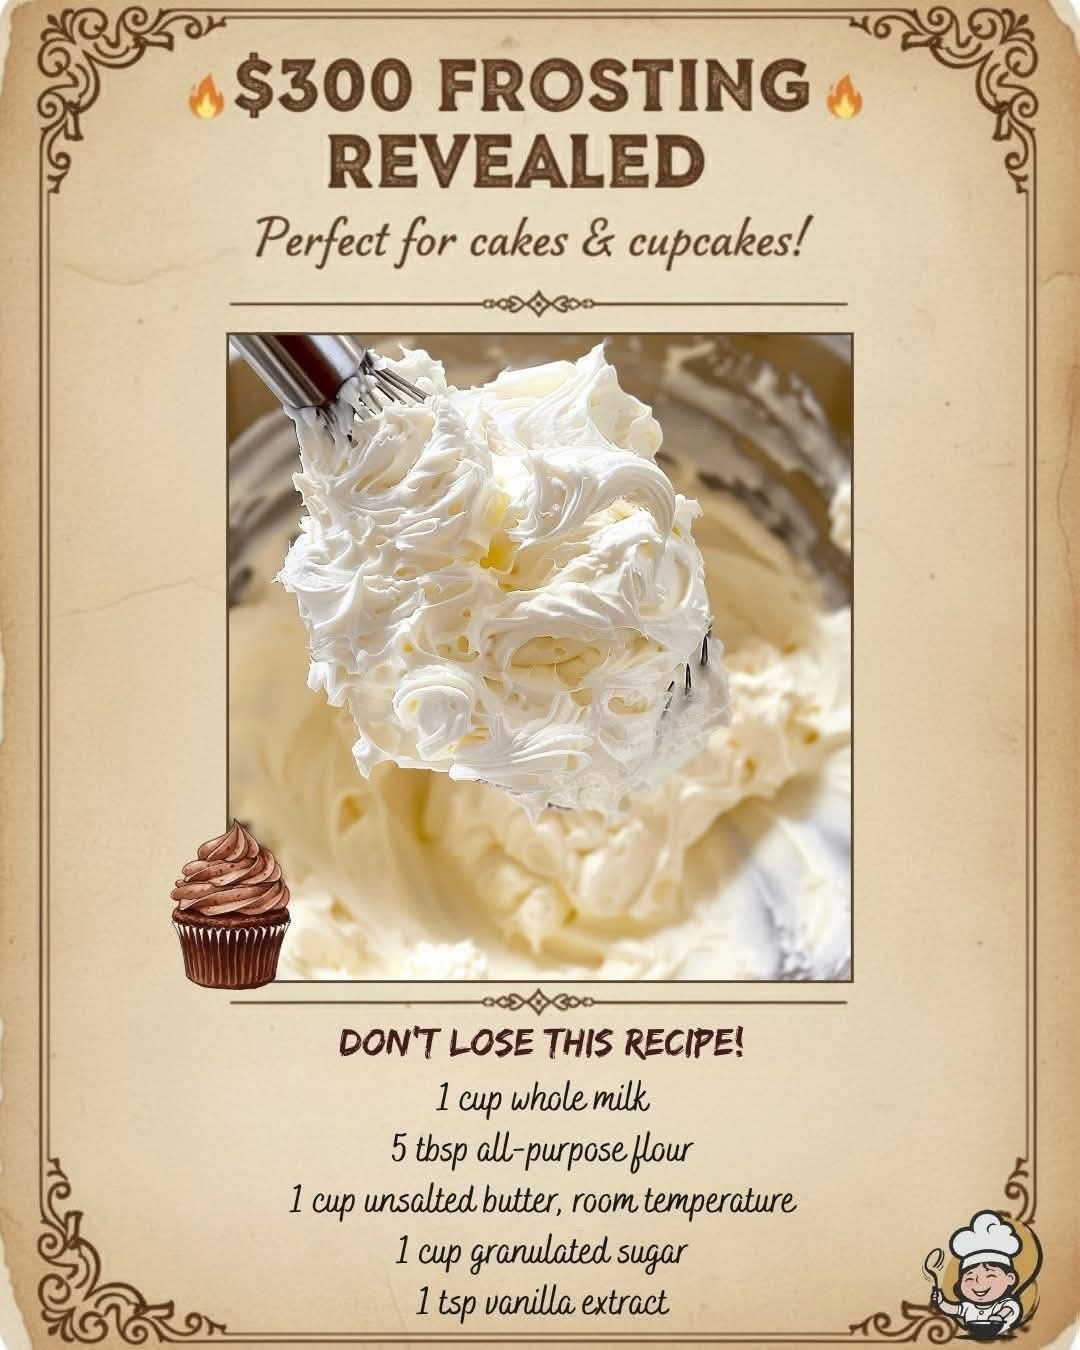
Discover the legendary $300 Frosting recipe! This vintage ermine frosting is silky smooth, not-too-sweet, and perfectly stable for cakes and cupcakes. The best buttercream you’ll ever taste!
Every baker has a “holy grail” recipe—that one perfect formula that transforms good desserts into unforgettable creations. For countless home bakers and pastry enthusiasts, that recipe is the legendary $300 Frosting.
You may have heard whispers of this frosting on baking forums or seen it pinned across social media. The story goes that someone paid $300 for this recipe, convinced it was worth every penny. And after one taste, you’ll understand why. This isn’t just any buttercream. It’s a vintage recipe, often called “ermine frosting” or “flour frosting,” that dates back to a time when bakers understood the magic of simple ingredients transformed by technique.
So what makes this frosting worth $300? It’s the texture—incredibly silky, luxuriously smooth, and somehow both light and rich at the same time. It’s the flavor—sweet but not cloying, with a pure butter taste that lets the other elements of your dessert shine. And it’s the stability—this frosting pipes like a dream, holds its shape perfectly, and doesn’t form that unpleasant crust that some buttercreams develop.
The best part? This supposedly “secret” recipe is made from everyday ingredients you probably already have in your kitchen: milk, flour, butter, sugar, and vanilla. No fancy equipment, no hard-to-find items—just simple pantry staples transformed by a little kitchen alchemy.
In this comprehensive guide, we’ll walk you through everything you need to know to master this legendary frosting. We’ll share the step-by-step process, pro tips for guaranteed success, delicious variations, and answers to all your burning questions. Get ready to make the best frosting of your life!
The Story Behind the $300 Frosting
Before we dive into the recipe, let’s talk about the legend. Where did this recipe get its name, and why is it so highly prized?
The story, as it’s often told in baking circles, goes something like this: A home baker came across an elderly woman who made the most incredible frosting she’d ever tasted. When she asked for the recipe, the woman jokingly said she’d sell it for $300. The baker, desperate to recreate that magical frosting, actually paid it—and discovered it was worth every single cent.
Whether the story is literally true or simply a charming piece of baking folklore, the name stuck. And once you try this frosting, you’ll understand why someone might believe it’s worth paying for.
What makes this frosting special is its unique base. Unlike American buttercream, which is simply butter and powdered sugar, or Swiss meringue buttercream, which requires cooking egg whites, this frosting starts with a cooked flour and milk paste. This technique, known as ermine frosting, was the standard for red velvet cakes long before cream cheese frosting took over. It produces a frosting that’s:
· Incredibly silky and smooth —no graininess from powdered sugar
· Less sweet than American buttercream, letting the butter flavor shine
· Perfectly stable for piping, yet light on the palate
· Crust-free—it stays soft and creamy
Why You’ll Love This $300 Frosting
This recipe has earned its legendary status for good reason. Here’s why it deserves a permanent place in your baking repertoire:
The Perfect Texture
This frosting is often described as “whipped cream meets buttercream.” It’s light, airy, and silky smooth, yet sturdy enough to hold intricate piping. It spreads like a dream and creates beautiful, professional-looking finishes on cakes and cupcakes.
Not-Too-Sweet Flavor
If you find American buttercream cloyingly sweet, this frosting is your answer. The flour paste base adds body without extra sugar, allowing the pure butter flavor to take center stage. It’s perfectly balanced and lets the flavors of your cake shine through.
Incredibly Versatile
This frosting works beautifully on almost any cake—vanilla, chocolate, red velvet, carrot cake, and more. It pipes beautifully for cupcakes, creates smooth finishes on layer cakes, and can even be used as a filling.
Made with Simple Ingredients
No expensive ingredients or specialty items required. Milk, flour, butter, sugar, and vanilla—that’s it! These are pantry staples you likely already have on hand.
Vintage Charm
There’s something special about reviving a classic technique. This frosting connects you to generations of bakers who understood that the best recipes are often the simplest.
Ingredients for the Legendary $300 Frosting
The beauty of this recipe lies in its simplicity. Here’s what you’ll need:
The Essential Ingredients:
· 1 cup whole milk —Whole milk provides the richness and body needed for the perfect paste. Lower-fat milks will work but may result in a slightly less luxurious texture .
· 5 tablespoons all-purpose flour —Regular all-purpose flour is perfect. This forms the base of the frosting and gives it that signature silky texture .
· 1 cup unsalted butter, room temperature —This is crucial! The butter must be properly softened to cream smoothly with the sugar. Salted butter will alter the flavor, so stick with unsalted .
· 1 cup granulated sugar —Not powdered sugar! This recipe uses granulated sugar, which dissolves completely into the butter base .
· 1 teaspoon vanilla extract —Pure vanilla extract provides the best flavor. You can also experiment with other extracts (see variations below).
Optional Add-Ins:
· Pinch of salt —If using unsalted butter, a tiny pinch of salt can enhance the flavors .
· Food coloring —For colored frosting, add gel food coloring after the frosting is complete .
Step-by-Step Instructions
Follow these steps carefully, and you’ll be rewarded with the most incredible frosting of your life.
Part 1: Make the Flour Paste
Combine Milk and Flour: In a small saucepan, whisk together the 1 cup of whole milk and 5 tablespoons of all-purpose flour until completely smooth. There should be no lumps .
Cook the Mixture: Place the saucepan over medium heat. Cook, whisking constantly, until the mixture thickens to a paste-like consistency. This usually takes about 3-5 minutes. You’ll know it’s ready when it’s thick enough to hold whisk marks and resembles thick pudding or wallpaper paste .
Cool Completely: Remove from heat and transfer the paste to a small bowl. Press a piece of plastic wrap directly onto the surface of the paste to prevent a skin from forming . Let it cool to room temperature, then refrigerate until completely cold. The paste must be fully chilled before proceeding—warm paste will melt the butter and ruin the frosting .
Part 2: Cream Butter and Sugar
Beat the Butter: In a large mixing bowl, beat the room temperature unsalted butter with an electric mixer until creamy and smooth, about 1-2 minutes .
Add Sugar Gradually: With the mixer running, gradually add the granulated sugar, about ¼ cup at a time. Beat well after each addition. Continue beating for several minutes until the mixture is light, fluffy, and pale in color. This step is important—you want the sugar to dissolve as much as possible into the butter .
Part 3: Combine and Beat
Add the Cooled Paste: With the mixer on medium speed, begin adding the completely cooled flour paste, one spoonful at a time. Beat well after each addition until fully incorporated .
Add Vanilla: Add the vanilla extract and continue beating until the frosting is light, fluffy, and silky smooth. This may take 3-5 minutes of beating. Scrape down the sides and bottom of the bowl occasionally to ensure everything is evenly mixed .
Adjust Consistency: If the frosting seems too soft, refrigerate it for 15-20 minutes, then beat again. If it seems too stiff, let it sit at room temperature for a few minutes and beat again .
Part 4: Use or Store
Frost Your Cake: Use immediately to frost your favorite cake or cupcakes. This frosting pipes beautifully and creates smooth finishes .
Store Properly: If not using immediately, store the frosting in an airtight container in the refrigerator for up to one week. Before using, let it come to room temperature and beat briefly to restore its silky texture .
The Science Behind the Magic
Understanding a little about why this frosting works can help you troubleshoot and perfect it.
Why Flour?
The cooked flour and milk paste acts as a stabilizer and thickener. When heated, the starches in the flour absorb the milk and swell, creating a gel-like structure. This paste provides body to the frosting without the need for excessive sugar, resulting in a lighter, less sweet final product .
Why Granulated Sugar?
Unlike American buttercream, which relies on powdered sugar (which contains cornstarch) for thickening, this recipe uses granulated sugar. The sugar dissolves into the butter during the lengthy creaming process, creating a smooth texture without any graininess .
The Importance of Temperature
Every component needs to be at the right temperature for success. The butter must be properly softened (cool room temperature, not melted). The flour paste must be completely chilled. If the paste is even slightly warm, it will melt the butter and you’ll end up with soupy, separated frosting .
Pro Tips for Perfect $300 Frosting
Want to ensure your frosting is absolutely perfect? Here are some expert tips:
Cook the Paste Thoroughly: Undercooked flour paste will taste raw and starchy. Cook it until it’s genuinely thick—it should hold its shape when stirred . The raw flour taste disappears with proper cooking .
Chill the Paste Completely: This is non-negotiable. The paste must be cold to the touch before adding it to the butter. Warm paste will melt the butter, and you’ll have a soupy mess .
Beat, Beat, Beat: Don’t skimp on the beating time. Cream the butter and sugar for several minutes until light and fluffy. Beat thoroughly after adding the paste. This incorporates air and creates that signature silky texture .
Room Temperature Butter is Crucial: Butter that’s too cold won’t cream properly and will leave lumps. Butter that’s too warm will be greasy. Aim for butter that’s cool room temperature—it should hold its shape but give slightly when pressed .
Use a Stand Mixer if Possible: While a hand mixer works, a stand mixer with the paddle attachment makes beating this frosting much easier, especially during the lengthy creaming process .
Don’t Worry If It Looks Curdled: Sometimes when you first add the paste to the butter mixture, it may look curdled or separated. Keep beating! It will come together into a smooth, silky frosting .
Troubleshooting Common Issues
Even experienced bakers occasionally encounter challenges. Here’s how to solve the most common problems:
Problem: Frosting is too soft or runny.
Solution: This usually means the flour paste wasn’t cold enough, or the butter was too warm. Refrigerate the frosting for 20-30 minutes, then beat again. If it’s still too soft, you may need to start over with properly chilled paste .
Problem: Frosting is grainy.
Solution: Graininess usually means the sugar didn’t fully dissolve. Make sure you beat the butter and sugar long enough—at least 3-5 minutes. Also, ensure your flour paste was completely smooth before cooking .
Problem: Frosting tastes like raw flour.
Solution: The flour paste wasn’t cooked long enough. Next time, cook until it’s genuinely thick—it should have no raw flour taste. For this batch, there’s no fix, but it will still be usable .
Problem: Frosting separated or looks curdled.
Solution: Keep beating! Often, separated frosting will come together with continued beating. If it won’t come together, the temperature may be off. Try refrigerating for 15 minutes, then beating again .
Problem: Frosting is too stiff.
Solution: Let it sit at room temperature for a bit, then beat again. You can also add a tablespoon of milk and beat to loosen it up .
Delicious Variations to Try
This basic recipe is a wonderful canvas for creativity. Here are some popular variations:
- Chocolate $300 Frosting
Add ½ cup of unsweetened cocoa powder to the butter and sugar mixture during creaming. You may need to adjust with a little extra milk if it becomes too stiff .
- Almond or Coconut Variation
Replace the vanilla extract with almond extract or coconut extract. For coconut frosting, you can also fold in ½ cup of toasted shredded coconut at the end .
- Lemon or Citrus Frosting
Add 2 tablespoons of fresh lemon juice and 1 tablespoon of lemon zest to the finished frosting. Reduce the vanilla to ½ teaspoon. This bright, tangy version is perfect for spring cakes .
- Coffee Frosting
Dissolve 1 tablespoon of instant espresso powder in 1 tablespoon of hot water and add it to the frosting along with the vanilla. This creates a sophisticated mocha flavor .
- Strawberry Frosting
Add ½ cup of finely pureed freeze-dried strawberries to the finished frosting. This adds intense strawberry flavor without thinning the frosting like fresh berries would .
- Cream Cheese Variation
For a tangier frosting, replace 4 tablespoons of the butter with 4 oz of cream cheese. The cream cheese must be softened and beaten smooth with the butter .
- Peppermint Frosting
Replace the vanilla with ½ teaspoon of peppermint extract. This is perfect for holiday baking .
How to Use This Frosting
This versatile frosting works beautifully in many applications:
For Cakes:
· Layer Cakes: This frosting is sturdy enough for多层 cakes. It creates smooth finishes and holds its shape beautifully between layers .
· Naked Cakes: Its stability makes it perfect for the trendy “naked cake” look .
· Sheet Cakes: Spreads like a dream over sheet cakes for quick, delicious desserts .
For Cupcakes:
· Piped Designs: This frosting holds even intricate piping designs. Use your favorite piping tip to create beautiful swirls, rosettes, and more .
· Simple Spread: For a rustic look, simply spread it over cupcakes with an offset spatula .
As a Filling:
This frosting makes an excellent filling for layer cakes, sandwich cookies, cream puffs, and éclairs .
Storage and Make-Ahead Tips
Refrigerator Storage:
Store leftover frosting in an airtight container in the refrigerator for up to one week . Before using, let it come to room temperature and beat briefly to restore its silky texture .
Freezer Storage:
This frosting freezes beautifully for up to 3 months . Place it in a freezer-safe container or zip-top bag. Thaw overnight in the refrigerator, then bring to room temperature and beat before using .
Make-Ahead Timeline:
· Up to 1 week ahead: Make the frosting and store in the refrigerator.
· Up to 3 months ahead: Freeze the frosting for future use.
· Day before: Frost your cake or cupcakes and store in the refrigerator. Bring to room temperature before serving for the best texture and flavor .
Frequently Asked Questions (FAQs)
Q: Why is it called $300 frosting?
A: According to baking legend, someone paid $300 for this recipe, believing it was worth every penny. Whether the story is true or simply folklore, the name stuck because this frosting truly is that good .
Q: Can I use 2% or skim milk instead of whole milk?
A: Whole milk provides the richest, creamiest results. However, you can use 2% in a pinch. Skim milk will work but may result in a slightly less luxurious texture .
Q: Can I use salted butter?
A: It’s best to use unsalted butter so you can control the salt level. If you only have salted butter, omit any additional salt in the recipe .
Q: Does this frosting need to be refrigerated?
A: Yes, because it contains milk and butter, this frosting should be refrigerated if not used immediately. However, frosted cakes can sit at room temperature for several hours for serving .
Q: Can I color this frosting?
A: Absolutely! Use gel food coloring for the best results. Add it after the frosting is complete and beat until evenly colored .
Q: How much frosting does this recipe make?
A: This recipe makes enough to generously frost a 2-layer 8-inch or 9-inch cake, or about 24 cupcakes with moderate piping .
Q: Can I double the recipe?
A: Yes! This recipe doubles beautifully. Just ensure your mixer bowl is large enough to accommodate the increased volume .
Q: Is this frosting gluten-free?
A: Traditional all-purpose flour contains gluten. You can try substituting a gluten-free all-purpose flour blend, but results may vary. The starch composition in gluten-free flours is different and may affect texture .
Q: Why is my frosting separating?
A: Separation usually indicates a temperature issue. Either the flour paste was too warm when added, or the butter was too warm or too cold. Continue beating—it often comes together. If not, try refrigerating for 15 minutes and beating again .
Q: Can I make this frosting without a mixer?
A: While possible, it would require significant arm strength! A hand mixer or stand mixer is highly recommended for achieving that light, fluffy texture .
Nutritional Information
Please note that the following is an estimate and will vary based on specific ingredients and portion sizes (based on 24 servings).
Nutrient Amount per Serving (2 tablespoons)
Calories 110-130
Total Fat 8-10g
Saturated Fat 5-7g
Cholesterol 25-30mg
Sodium 5-10mg
Total Carbohydrates 10-12g
Dietary Fiber 0g
Sugars 8-10g
Protein 1g
Note: Nutritional information is an estimate and should not replace professional dietary advice.
Conclusion
The legendary $300 Frosting lives up to every bit of its reputation. With its silky smooth texture, perfectly balanced sweetness, and incredible versatility, it’s no wonder this recipe has been passed down through generations of bakers. It transforms simple cakes and cupcakes into extraordinary desserts that people remember and request again and again.
What makes this recipe truly special is its simplicity. Made from everyday ingredients—milk, flour, butter, sugar, and vanilla—it proves that you don’t need fancy techniques or hard-to-find items to create something exceptional. You just need patience, attention to detail, and a willingness to master a classic technique.
We hope this comprehensive guide has given you everything you need to create perfect $300 Frosting in your own kitchen. Remember the key tips: cook the paste thoroughly, chill it completely, beat the butter and sugar until light and fluffy, and add the paste gradually. Follow these steps, and you’ll be rewarded with the best frosting of your life.
Now it’s your turn! Gather your ingredients, fire up your mixer, and experience the magic of this legendary recipe. When you do, we’d love to hear about it. Leave a comment below and let us know how your frosting turned out, what you used it on, and whether you agree that it’s worth every bit of its famous name.
And if you’re looking for more vintage baking recipes and classic desserts, be sure to check out our guides for Old-Fashioned Red Velvet Cake, Perfect Vanilla Layer Cake, and Chocolate Cupcakes with Ermine Frosting.
Happy baking! 🧁✨
Did you make this legendary $300 Frosting? We’d love to see your creations! Leave a comment below and let us know what you frosted. Don’t forget to pin this recipe for your next baking project!
More Recipes You Might Like
-

Slow Cooker 4 Ingredient Mushroom Beef Tips – The Easiest, Tenderest Comfort Food You’ll Ever Make
These slow cooker mushroom beef tips use just 4 ingredients – beef, cream of mushroom soup, onion soup mix, and broth. Tender, savory, and perfect over noodles, rice, or mashed potatoes. Set it and forget it. Let’s be honest: some of the best meals are the ones you barely have to think about. You toss…
-
3 Ingredient No Bake Dessert – The Creamiest, Easiest Sweet Treat You’ll Ever Make
This 3-ingredient no-bake dessert is ultra creamy, silky smooth, and ready in minutes. Made with milk, vanilla pudding mix, and sweetened condensed milk – topped with crunchy biscuits. Perfect for last-minute cravings. Let’s be honest: sometimes you want dessert – like, right now. You don’t want to preheat the oven, measure a dozen ingredients, or…
-
4 Ingredient Homemade Ice Cream – No Machine, No Churning, Ultra Creamy (Strawberry & Pineapple)
Learn how to make creamy, scoopable homemade ice cream with just 4 ingredients – no ice cream machine needed! Includes strawberry and pineapple variations. Better than store‑bought. Let’s be honest: homemade ice cream sounds like a project. You need a special machine, endless patience, and the fear of ending up with a block of ice…