
I have a confession to make. I’ve become that person at work. You know the one—the colleague who walks in with a brown paper bag, and suddenly everyone in the break room is hovering, asking questions, hoping for a taste. The one whose desk mysteriously attracts visitors around snack time. The one who gets asked, “Did you bring any today?” more often than they get asked about actual work.
That person is me, and it’s all because of this bread.
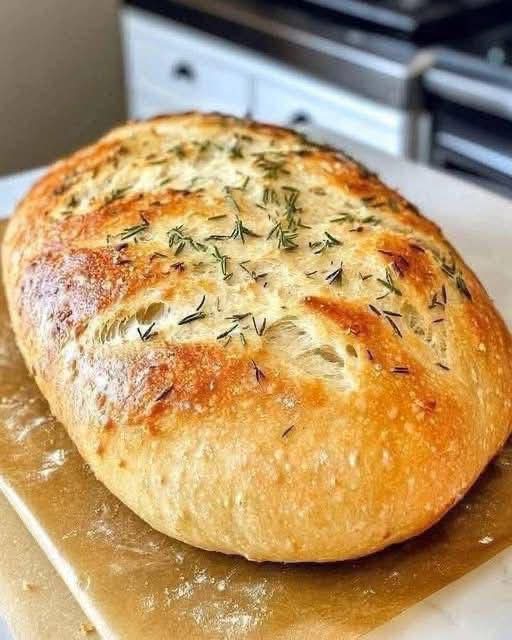
It started innocently enough. I had sourdough starter discard piling up in my fridge, a craving for garlic bread, and a sudden determination to create something that combined the tangy perfection of sourdough with the buttery, garlicky goodness of everyone’s favorite side dish. I wanted it crusty on the outside, soft on the inside, and packed with so much garlic flavor that it would be impossible to eat just one slice.
The first loaf came out of the oven, and I literally stood at the counter, tearing off pieces and burning my fingers because I couldn’t wait for it to cool. It was everything I’d dreamed of and more.
I brought the second loaf to work, just to share. Bad idea. Now I can’t stop. My coworkers have become addicted. They text me on weekends asking if I’m baking. They volunteer to come to my desk the moment they smell that telltale aroma. They’ve started bringing their own butter, just in case.
And the best part? This bread is ridiculously easy to make. No kneading, no complicated techniques, no fancy equipment. Just a little patience and a lot of garlic.
Today, I’m sharing this recipe with you. Fair warning: once you make it, your coworkers might start stalking you too.
Why You’ll Be Obsessed With This Sourdough Garlic Bread
No kneading required. This is a true no-knead bread. The long, slow fermentation does all the work for you.
Incredible flavor. The tangy sourdough perfectly complements the rich, buttery garlic. It’s a match made in heaven.
Perfect texture. Crusty, crackly exterior. Soft, airy interior with pockets of buttery garlic goodness throughout.
Great for sourdough discard. If you keep a sourdough starter, this is the perfect way to use that discard.
Make-ahead friendly. The dough rests in the refrigerator, so you can prep it days ahead and bake when ready.
Impressive but easy. It looks and tastes like you spent hours in a professional bakery. Your secret is safe with me.
Crowd-pleasing. I’ve never met anyone who didn’t love this bread. It’s impossible to resist.
Customizable. Add cheese, herbs, spices—make it your own.
The Complete Ingredient Breakdown
For the Dough:
3 cups (360g) all-purpose or bread flour
Bread flour gives a chewier texture with more structure. All-purpose works beautifully too, creating a slightly tenderer crumb.
1½ teaspoons salt
Essential for flavor and for controlling fermentation. Don’t skip it.
½ teaspoon active dry yeast OR ½ cup sourdough starter discard
This recipe works both ways. For a true sourdough flavor with more tang, use the discard. For a quicker version with commercial yeast, use the active dry yeast.
1½ cups (360ml) warm water
If using yeast, the water should be about 110°F. If using sourdough discard, room temperature water is fine.
For the Garlic Butter Swirl:
½ cup (1 stick) unsalted butter, softened
Real butter is non-negotiable here. It creates those rich, garlicky pockets throughout the bread.
4-6 cloves garlic, minced
Fresh garlic is essential. The amount depends on how garlicky you want it. I use 6. Don’t judge me.
¼ cup fresh parsley, chopped
Adds freshness and color. You can also use chives or a mix of herbs.
½ teaspoon salt
¼ teaspoon black pepper
¼ teaspoon red pepper flakes (optional)
For a little heat.
¼ cup grated Parmesan cheese (optional)
Adds salty, nutty depth.
For Topping:
Flaky sea salt
Additional butter for brushing
Step-by-Step Instructions
Step 1: Mix the Dough
In a large bowl, combine the flour and salt. If using commercial yeast, add it now and mix well.
Add the water (and sourdough discard if using). Stir with a wooden spoon or your hands until a shaggy, sticky dough forms. It will be messy—that’s correct.
Cover the bowl with plastic wrap or a clean kitchen towel.
Step 2: The Long, Slow Rise
Let the dough rest at room temperature for 12-18 hours. Yes, that long. This is where the magic happens—the gluten develops on its own, and the flavor deepens.
The dough should be bubbly, doubled in size, and dotted with bubbles on the surface.
Step 3: Make the Garlic Butter
While the dough rises, make the garlic butter. In a small bowl, combine the softened butter, minced garlic, parsley, salt, pepper, red pepper flakes, and Parmesan if using. Mix until well combined. Set aside at room temperature.
Step 4: Shape the Dough
Turn the dough out onto a well-floured surface. It will be sticky—that’s normal. With floured hands, gently stretch and fold the dough into a rough rectangle.
The garlic butter layer: Dot half of the garlic butter mixture over the surface of the dough. Fold the dough over itself like a letter, then dot with the remaining butter. Fold again, creating layers of butter throughout.
Gently shape the dough into a ball or oval. Don’t knead—just shape gently.
Step 5: Second Rise
Place the shaped dough on a piece of parchment paper. Cover with a towel and let rise for 1-2 hours, until puffy and increased in size.
About 30 minutes before baking, place a Dutch oven (with its lid) in your oven and preheat to 450°F (230°C).
Step 6: Bake
Carefully remove the hot Dutch oven from the oven. Using the parchment paper as a sling, lower the dough into the pot. Score the top with a sharp knife or lame if desired.
Cover and bake for 30 minutes.
Remove the lid and bake for another 10-15 minutes, until the crust is deep golden brown and the bread sounds hollow when tapped.
Step 7: Butter the Top
As soon as the bread comes out of the oven, brush the top with additional melted butter and sprinkle with flaky sea salt. This step is non-negotiable—it adds incredible flavor and keeps the crust perfect.
Step 8: Cool (If You Can)
Let the bread cool on a wire rack for at least 30 minutes before slicing. I know it’s hard, but cutting into hot bread can make it gummy.
Step 9: Serve and Watch It Disappear
Slice and serve warm. Stand back as your family, friends, or coworkers descend.
The Science Behind No-Knead Bread
Long fermentation develops gluten. Gluten is what gives bread structure. Traditionally, you develop it by kneading. In no-knead bread, time does the work. Over 12-18 hours, the flour proteins naturally align and create gluten networks without any effort from you.
Sourdough adds tang. If using sourdough discard, the natural bacteria and yeast create that distinctive tangy flavor. Commercial yeast gives a milder, more neutral taste.
High heat creates crust. Baking in a preheated Dutch oven traps steam, which keeps the crust from setting too quickly, allowing maximum oven spring. Removing the lid for the last part of baking lets the crust dry out and become golden and crackly.
Garlic butter layers. Folding the butter into the dough creates layers of rich, garlicky goodness throughout the bread. As it bakes, the butter melts into the crumb, creating those irresistible pockets.
Troubleshooting Common Issues
My Dough Is Too Sticky
That’s normal! No-knead dough is intentionally wet and sticky. Use plenty of flour on your work surface and hands when shaping.
My Bread Didn’t Rise Enough
Several possible causes:
· Yeast was old or inactive
· Kitchen was too cold (find a warmer spot)
· Not enough fermentation time
The Crust Is Too Hard
Your oven may have been too hot, or you baked too long without the lid. Next time, check at the minimum baking time.
The Garlic Burned
If your garlic is on the outside of the dough, it can burn. Make sure it’s folded inside. You can also use roasted garlic for a mellower, sweeter flavor.
My Bread Is Dense
Not enough fermentation time, or the dough was handled too roughly during shaping. Be gentle and give it the full rise time.
The Butter Leaked Out
If your butter was too soft or the dough wasn’t sealed well, some butter may escape during baking. It’s still delicious, just a little messier.
Delicious Variations
Once you’ve mastered the classic, try these variations.
Cheesy Garlic Sourdough
Add 1 cup shredded mozzarella or provolone along with the garlic butter. The cheese melts into incredible pockets throughout.
Rosemary Garlic Sourdough
Add 2 tablespoons fresh chopped rosemary to the garlic butter. Rosemary and garlic are a classic pairing.
Roasted Garlic and Herb Sourdough
Replace raw garlic with 1 head of roasted garlic (squeezed from the skins). The roasted garlic is sweet and mellow, not pungent.
Spicy Jalapeño Cheddar Sourdough
Add 2 diced jalapeños and 1 cup shredded cheddar to the garlic butter. The spicy, cheesy combination is incredible.
Everything Bagel Garlic Bread
After brushing with butter at the end, sprinkle generously with everything bagel seasoning. The sesame, poppy, garlic, and onion flavors are perfect.
Sun-Dried Tomato and Basil Sourdough
Add ¼ cup chopped sun-dried tomatoes and ¼ cup fresh chopped basil to the garlic butter.
Pesto Swirl Garlic Bread
Spread a layer of pesto along with the garlic butter. The basil and pine nut flavor is wonderful.
Vegan Garlic Sourdough
Use vegan butter and nutritional yeast instead of Parmesan. It’s still incredibly delicious.
What to Serve With Sourdough Garlic Bread
Pasta: The classic pairing. Serve alongside spaghetti, lasagna, or any Italian dish.
Soup: Perfect for dipping into tomato soup, minestrone, or creamy vegetable soups.
Salad: Alongside a big Caesar salad or simple green salad.
Grilled meats: The perfect side for steak, chicken, or burgers.
Charcuterie board: Tear into pieces and serve with cheeses, meats, and olives.
On its own: With a glass of wine or a cold beer, this bread is a meal in itself.
For breakfast: Toast slices and spread with butter and jam. Amazing.
As a sandwich: Use slices for the ultimate grilled cheese or turkey sandwich.
Storage and Make-Ahead Tips
Room temperature: Store in a paper bag or bread box at room temperature for up to 3 days. The crust will soften slightly but will still be delicious.
Refrigerator: Not recommended—it speeds up staling.
Freezer: This bread freezes beautifully. Slice it first, wrap tightly in plastic wrap and foil, and freeze for up to 3 months. Toast slices directly from frozen.
Make-ahead for parties: You can prepare the dough through the first rise, then refrigerate for up to 3 days. Shape and bake when ready.
Reheating: To refresh day-old bread, spritz with water and warm in a 350°F oven for 5-10 minutes.
Why Your Coworkers Will Beg for This Bread
There’s something about homemade bread that brings people together. The aroma alone is enough to draw a crowd. But this bread—this garlicky, buttery, crusty masterpiece—takes it to another level.
When you walk into work with this loaf, you’re not just bringing food. You’re bringing an experience. The first slice torn from the warm loaf. The sound of that crackly crust. The sight of steam rising from the soft interior. The first bite, when eyes close and someone inevitably says, “Oh my God.”
Your coworkers won’t just ask for the recipe. They’ll start planning their week around your baking schedule. They’ll offer to trade you lunch, coffee, maybe even actual money. They’ll become your biggest fans and most loyal taste-testers.
I speak from experience. My coworkers now have a shared Google Doc tracking when I’m baking. They’ve formed a committee to decide who gets the end piece. It’s ridiculous and wonderful.
And it all started with this bread.
Why This Recipe Deserves a Place in Your Baking Rotation
This Sourdough No-Knead Garlic Bread represents everything I love about baking. It’s simple enough for beginners but impressive enough for experts. It transforms humble ingredients into something extraordinary. It fills your home with incredible aromas and brings people together. And it’s genuinely, consistently, undeniably delicious.
I’ve made this bread for quiet dinners at home and for parties where it was the first thing to disappear. I’ve made it for my family on ordinary nights and for special occasions. I’ve made it for my coworkers, who now refuse to let me stop.
Every single time, it delivers. Every single time, that first bite of crusty, garlicky, buttery perfection makes everything better.
This recipe has become a staple in my kitchen for good reason. It’s reliable, versatile, and always welcome at the table.
And now it can be that for you too.
So mix that dough. Wait that long rise. Fold in that garlic butter. And get ready to become the most popular person in your office.
Your coworkers are about to become very, very happy.
Have you made this Sourdough No-Knead Garlic Bread? What variations did you try? I’d love to hear about your experience in the comments below!
More Recipes You Might Like
-

Sandwich Crust Garlic Rolls – The Zero-Waste Appetizer You’ll Make Again and Again
Don’t throw away your sandwich crusts! Turn them into crispy, buttery garlic rolls in minutes. This zero-waste recipe is perfect for snacks, soups, or party appetizers. Let’s be honest: how many sandwich crusts have you tossed in the trash over the years? If you have kids (or picky adults) at home, the answer is probably…
-

Hospital Emptying Drink: What Science Really Says About This Healthy Blend
“hospital emptying” drinks promise to cure everything from cancer to high blood pressure. We separate fact from fiction, examine the science behind soursop, hibiscus, and turmeric, and offer a safe, realistic recipe. Let’s be honest: every few months, the internet finds a new “miracle drink.” One week it’s a detox tonic. The next, it’s a…
-

Air Fryer Sliced Potatoes – Crispy, Golden, and Ready in 20 Minutes
These air fryer sliced potatoes are crispy on the outside, tender on the inside, and ready in 20 minutes. Perfect for a quick side dish, breakfast hash, or snack. Only 4 ingredients! Let’s be honest: roasted potatoes are a comfort food classic. But who has time to wait 45 minutes for the oven to do…