
There are cakes that impress with their towering layers and elaborate frosting. There are cakes that wow with exotic ingredients and complicated techniques. And then there are cakes like this one—cakes that astonish not through complexity, but through sheer, breathtaking simplicity.
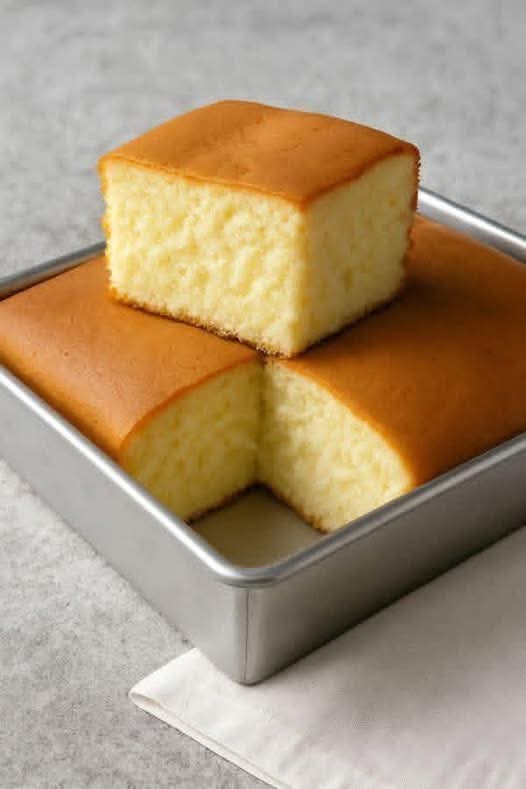
This Soft & Fluffy Cotton Cake is exactly what the name promises. It’s impossibly light, tender, and airy—so soft that it literally feels like cotton on your tongue. It has the delicate, jiggly texture of a Japanese cheesecake but without the cream cheese. It’s rich and satisfying without being heavy. And it’s made with just four ingredients.
Four.
Yes, you read that correctly. Four ingredients. Things you probably already have in your kitchen. And yet, when this cake emerges from the oven—pale golden, perfectly risen, gently trembling—people will think you spent hours perfecting a complicated recipe.
I first encountered this style of cake on a trip to Japan, where I became obsessed with the fluffy, cloud-like confections that seem to float on the plate. Cotton cheesecake, Japanese cheesecake, soufflé pancakes—all variations on a theme of incredibly aerated, tender texture.
When I returned home, I was determined to recreate that experience. After many experiments, I discovered that the magic isn’t in a long ingredient list—it’s in technique. The right method transforms simple components into something extraordinary.
This four-ingredient version has become my most-requested dessert. It’s what I make when I want to impress without stress. It’s what I make when ingredients are limited but cravings are strong. It’s what I make when I need a reminder that simple can be sublime.
Today, I’m sharing everything you need to know to make this cake at home, including all the tips and tricks that ensure success.
Why You’ll Fall in Love With This Cotton Cake
Only four ingredients. That’s it. Four simple, accessible ingredients that you probably already have.
No fancy equipment required. A hand mixer or stand mixer helps, but you can even whisk by hand if you’re patient and strong.
Incredible texture. This cake is genuinely, remarkably soft and fluffy. It’s light as air but still satisfying, with a delicate crumb that melts in your mouth.
Versatile. Serve it plain, dusted with powdered sugar, topped with fresh fruit, drizzled with chocolate, or alongside whipped cream. It’s perfect for breakfast, dessert, or afternoon tea.
Naturally lower in calories. Without butter or oil, this cake is significantly lighter than traditional cakes. It’s a dessert you can feel good about.
Gluten-free adaptable. With a simple flour swap, this cake can be gluten-free while maintaining its incredible texture.
Impressive but easy. People will be amazed that this cake came from your kitchen. You can smile and nod, or you can share the secret—it’s up to you.
The Four Simple Ingredients
Let’s talk about each ingredient and why it’s essential.
- 4 large eggs, separated
Eggs are the true stars here. They provide structure, leavening, and richness. Separating them is crucial—the whites get whipped into a meringue that provides the cake’s incredible lift and airy texture, while the yolks add richness and help emulsify the batter.
Egg temperature matters. Cold eggs separate more easily, but room-temperature egg whites whip to a greater volume. Here’s the strategy: separate your eggs while cold, then let the whites sit at room temperature for about 30 minutes before whipping.
Fresh eggs are best. Fresher eggs have thicker whites that whip more stably. If your eggs are older, you may need a stabilizer like cream of tartar.
- 120 grams (about 1 cup) cake flour
Cake flour is lower in protein than all-purpose flour, which means less gluten development and a more tender, delicate crumb. This is essential for that cotton-soft texture.
If you don’t have cake flour: Make your own by replacing 2 tablespoons of all-purpose flour with 2 tablespoons of cornstarch per cup. Sift together several times to combine thoroughly.
For gluten-free version: Use a good gluten-free flour blend designed for baking. Look for one that includes xanthan gum for structure.
- 120 grams (about ½ cup plus 2 tablespoons) granulated sugar
Sugar does more than sweeten. It stabilizes the egg white meringue, contributes to browning, and helps create a tender texture by interfering with gluten formation.
The sugar is divided—some goes with the yolks, some with the whites. This distribution is important for proper structure.
Can you reduce the sugar? You can reduce by up to 2 tablespoons, but don’t go too far. Sugar is structurally important in this cake. If you reduce too much, the meringue may be less stable and the texture less tender.
- 60 ml (about ¼ cup) milk
Milk adds moisture and helps create the right batter consistency. Whole milk gives the richest result, but any milk works—2%, 1%, or even plant-based milks like almond or oat.
For dairy-free version: Use unsweetened almond milk, oat milk, or another plant-based milk. Avoid canned coconut milk—it’s too thick and fatty.
That’s It.
No butter. No oil. No baking powder (the lift comes entirely from whipped egg whites). No vanilla (though you can add some if you want—I won’t tell). Four ingredients, transformed by technique into something magical.
Step-by-Step Instructions
Step 1: Preheat and Prep
Preheat your oven to 325°F (160°C). Position a rack in the middle of the oven.
Prepare an 8-inch round cake pan. Line the bottom with parchment paper but do not grease the sides. The batter needs to climb the ungreased sides as it rises.
If your springform pan has any chance of leaking, wrap the outside tightly with aluminum foil to prevent water from seeping in during the water bath.
Step 2: Separate the Eggs
Separate your eggs carefully, placing the whites in a large, clean, grease-free bowl (preferably metal or glass—plastic can retain grease residue). Place the yolks in another bowl.
Critical: Any trace of yolk in the whites will prevent them from whipping properly. If you get any yolk in your whites, start over with a fresh egg.
Step 3: Prepare the Water Bath
Place your foil-wrapped cake pan inside a larger roasting pan. Set aside. You’ll add hot water later.
Step 4: Make the Yolk Base
To the bowl with the egg yolks, add:
· About 2 tablespoons of the sugar (from your total 120 grams)
· The milk
Whisk vigorously until well combined and slightly frothy.
Sift the cake flour into the yolk mixture. Sifting is important—it aerates the flour and ensures no lumps.
Whisk until smooth and well combined. The mixture will be thick and paste-like. Set aside.
Step 5: Whip the Egg Whites
Add the remaining sugar to a small bowl and set aside near your mixer.
Begin whipping the egg whites on medium speed. When they become foamy and opaque, start adding the sugar gradually, about a tablespoon at a time, while continuing to whip.
Once all sugar is added, increase speed to medium-high and whip until stiff peaks form. This means when you lift the whisk, the peaks stand straight up without drooping. The meringue should be glossy and smooth, not dry or curdled.
How to test: Stop the mixer and lift the whisk. The meringue should form a sharp peak that holds its shape. If it flops over, keep whipping. If it looks curdled or dry, you’ve gone too far—unfortunately, you’ll need to start over.
Step 6: Fold the Meringue Into the Yolk Base
This is the most delicate step. You need to combine the two mixtures without deflating all the precious air you just whipped into the egg whites.
Add about one-third of the meringue to the yolk mixture. Using a rubber spatula, fold gently—cut down through the center, scrape along the bottom, and bring up the side. Rotate the bowl as you go.
This first addition will be thick and not fully incorporated. That’s fine—it’s meant to lighten the yolk base.
Add the remaining meringue in two more additions, folding gently each time until just combined. A few streaks are okay—better to have a few streaks than to deflate the batter by overmixing.
The final batter should be light, airy, and uniform in color.
Step 7: Transfer to Pan
Gently pour or spoon the batter into your prepared pan. It will be thick and billowy. Use the spatula to spread it evenly, but handle it gently.
Tap the pan gently on the counter a few times to release any large air bubbles.
Step 8: Create the Water Bath
Place the roasting pan with the cake pan on the oven rack. Carefully pour hot (not boiling) water into the roasting pan until it reaches about halfway up the sides of the cake pan.
The water bath serves two purposes: it provides gentle, even heat, and it adds moisture to the oven, helping prevent the cake from drying out or cracking.
Step 9: Bake
Bake at 325°F (160°C) for 50-60 minutes, or until the cake is golden brown on top and a skewer inserted into the center comes out clean.
The cake will rise dramatically during baking and may crack slightly on top—this is normal. It will settle slightly as it cools.
Step 10: Cool in the Oven (Important!)
This step is crucial for preventing the cake from collapsing.
When the baking time is complete, turn off the oven but leave the cake inside with the door slightly ajar (prop it open with a wooden spoon). Let it cool gradually for about 1 hour.
This slow cooling prevents the sudden temperature change that can cause the cake to deflate.
Step 11: Remove and Cool Completely
After an hour, remove the cake from the oven and water bath. Run a thin knife around the edges to loosen, then invert onto a wire rack. Remove the parchment paper, then flip right-side up onto another rack to cool completely.
Step 12: Serve
Once completely cool, slice with a serrated knife using a gentle sawing motion to preserve the delicate crumb.
Serve plain, dusted with powdered sugar, or with your favorite toppings.
The Science Behind the Magic
Understanding what’s happening helps you troubleshoot and perfect your technique.
Egg white meringue is the sole leavening agent. There’s no baking powder or baking soda. The air bubbles trapped in the whipped whites expand in the oven heat, lifting the cake. The proteins coagulate around these bubbles, setting the structure.
Sugar stabilizes the meringue by interacting with the egg white proteins, helping them form a stable network that holds air.
Cake flour has lower protein than all-purpose, so less gluten forms. This keeps the cake tender and delicate rather than tough and chewy.
The water bath provides gentle, even heat and adds moisture to the oven. This prevents the outside from setting too quickly before the inside is cooked, reducing cracks and ensuring even texture.
Cooling slowly prevents thermal shock. A sudden temperature drop can cause the delicate structure to collapse. Gradual cooling lets the proteins firm up gradually.
Troubleshooting Common Issues
My Cake Didn’t Rise Enough
Several possible causes:
· Egg whites weren’t whipped to stiff peaks
· Meringue was deflated during folding
· Oven temperature too low (use an oven thermometer to check)
· Egg whites had traces of yolk or grease
My Cake Collapsed After Baking
Most likely caused by underbaking or cooling too quickly. Make sure the cake is fully baked (test with a skewer) and cool slowly in the oven with the door ajar.
My Cake Is Dense and Heavy
This usually means the meringue was deflated. Next time, fold more gently and stop while a few streaks remain. Also ensure your oven temperature is accurate.
My Cake Cracked on Top
Some cracking is normal for this style of cake. If it’s excessive, your oven may be too hot, or you may have overmixed the batter. The water bath helps prevent cracking.
My Cake Has a Rubbery Texture
This can happen if you overmix the batter, developing too much gluten. Mix just until combined. Also, make sure you’re using cake flour, not all-purpose.
My Cake Tastes Eggy
Fresh eggs shouldn’t taste eggy. If yours do, a tiny amount of vanilla extract (not one of the four ingredients, but acceptable as a flavor enhancer) can help. Also, ensure the cake is fully baked.
Delicious Variations
While the plain cake is wonderful, these variations add new dimensions.
Citrus Cotton Cake
Add the zest of one lemon or orange to the yolk mixture. The bright citrus flavor complements the delicate cake beautifully.
Vanilla Cotton Cake
Add 1 teaspoon of vanilla extract to the yolk mixture. It’s not one of the four ingredients, but it’s a common pantry staple and adds lovely warmth.
Matcha Cotton Cake
Replace 1 tablespoon of flour with 1 tablespoon of matcha powder. Sift together thoroughly. The result is a beautiful pale green cake with gentle earthy flavor.
Chocolate Cotton Cake
Replace 2 tablespoons of flour with 2 tablespoons of unsweetened cocoa powder. Sift together thoroughly. This creates a delicate chocolate version.
Coffee Cotton Cake
Dissolve 1 teaspoon of instant espresso powder in the milk before adding to the yolks. The coffee flavor enhances the cake’s richness.
Coconut Cotton Cake
Replace the milk with coconut milk and add 2 tablespoons of toasted shredded coconut to the batter. Tropical and delicious.
How to Serve Cotton Cake
This versatile cake works for any occasion.
Simple and classic: Dust with powdered sugar and serve with fresh berries.
Elegant dessert: Serve with lightly sweetened whipped cream and a fruit coulis.
Breakfast treat: Enjoy a slice with coffee or tea for a luxurious morning.
Afternoon tea: Cut into small squares and serve with assorted teas.
With ice cream: A slice of cotton cake alongside vanilla ice cream is a perfect pairing.
With fruit: Top with macerated strawberries, raspberries, or a berry compote.
Chocolate drizzle: Melt dark chocolate and drizzle over the top for extra indulgence.
Storage and Make-Ahead Tips
Room temperature: Store in an airtight container at room temperature for up to 2 days. The texture is best on day one.
Refrigerator: Store in an airtight container in the refrigerator for up to 5 days. Bring to room temperature before serving for best texture.
Freezer: This cake freezes beautifully. Wrap tightly in plastic wrap, then foil, and freeze for up to 3 months. Thaw in the refrigerator overnight, then bring to room temperature before serving.
Make-ahead for parties: Bake a day ahead, cool completely, and store wrapped at room temperature. Dust with powdered sugar just before serving.
The Equipment You’ll Need
8-inch round cake pan: Preferably a springform pan for easy removal. Regular cake pans work too—just line with parchment.
Electric mixer: A stand mixer with whisk attachment is ideal, but a hand mixer works perfectly. You can whip by hand with a balloon whisk, but your arm will get a workout.
Large mixing bowls: One for egg whites, one for yolk mixture.
Rubber spatula: For folding gently.
Roasting pan: Large enough to hold your cake pan with space around it.
Oven thermometer: To ensure accurate temperature.
Why This Cake Is Worth the Effort
This Soft & Fluffy Cotton Cake is proof that you don’t need fancy ingredients or complicated techniques to create something extraordinary. Four simple components, transformed by understanding and care, become a dessert that rivals anything from a professional bakery.
The first time I made this cake, I couldn’t believe the result. It looked like something from a Japanese pastry case—pale golden, perfectly risen, with that signature jiggle. The first bite was revelatory. So light, so tender, so delicately sweet. It didn’t need frosting or filling or fancy presentation. It was perfect exactly as it was.
Since then, this cake has become my go-to for countless occasions. It’s what I bring to dinner parties when I want to impress without stress. It’s what I make on quiet weekends when I crave something special. It’s what I bake for friends who need comfort, for celebrations that call for something sweet, for no reason at all except that life is short and we deserve cake.
And every single time, people ask for the recipe. They’re always surprised by the short ingredient list. They’re always amazed that something so simple can be so good.
That’s the magic of this cake. It reminds us that complexity isn’t always necessary. That technique matters more than ingredients. That patience and care can transform the ordinary into the extraordinary.
So gather your four ingredients. Preheat your oven. Separate those eggs with care. And get ready to experience the most impossibly soft, fluffy, cotton-like cake you’ve ever made.
Your kitchen is about to smell incredible. Your family and friends are about to be amazed. And you’re about to prove that you don’t need much to create something wonderful.
Have you tried making this Cotton Cake? What variation did you try? I’d love to hear about your experience in the comments below!
More Recipes You Might Like
-
Cherry Dump Cake: The 3-Ingredient Dessert That’s Almost Too Easy
Discover the magic of Cherry Dump Cake! With just 3 ingredients and 5 minutes of prep, this impossibly easy dessert creates a golden, buttery topping over sweet, tart cherry filling. Perfect for last-minute craving Let me tell you about the dessert that saved my reputation as a baker. I love to bake. I really do.…
-

Apple Pie Prepared with Only 3 Apples and in 10 Minutes – It Drives Me Crazy!
Discover the magic of this incredible apple pie made with just 3 apples and ready in 10 minutes! It’s the easiest, most delicious dessert you’ll ever make. Perfect for last-minute cravings and unexpected guests. Let me tell you about the apple pie that changed my life. I know that sounds dramatic, but hear me out.…
-

4 Ingredient Slow Cooker Unstuffed Cabbage Beef: The Easiest Comfort Food Ever
Discover the magic of 4-Ingredient Slow Cooker Unstuffed Cabbage Beef! All the flavor of traditional cabbage rolls without the fuss. Just toss it in the slow cooker and come home to a hearty, delicious dinner. Let me tell you about the recipe that saved my sanity on a hundred busy weeknights. I love cabbage rolls.…