
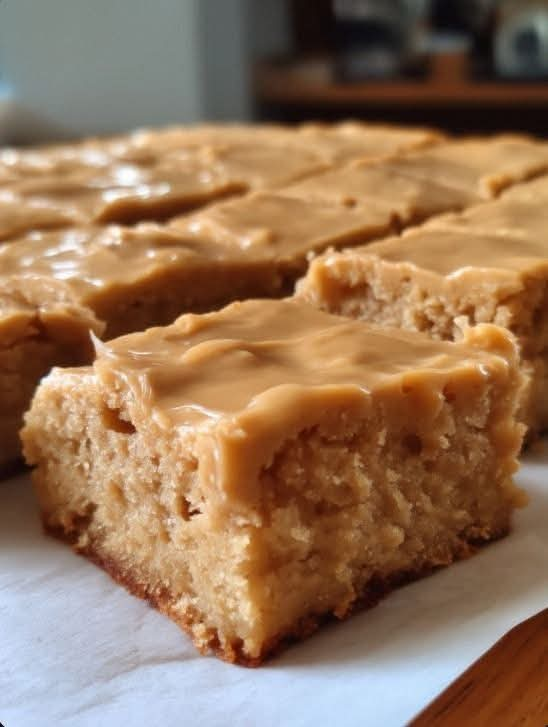
There are certain desserts that transport you straight back to childhood. For so many of us, the peanut butter bars served in the school cafeteria are one of those treats. Those soft, chewy, peanut buttery squares with that thick, fudgy chocolate frosting—they were the highlight of any lunch tray, the thing you hoped would be waiting for you when you walked through the cafeteria doors.
I remember those bars vividly. The way the soft, almost cake-like peanut butter base would give way to that rich chocolate topping. The way you’d try to make yours last through the entire lunch period, savoring every bite. The way you’d trade your apple for a friend’s extra bar if you were lucky.
But here’s the thing: as delicious as those cafeteria bars were, homemade is always better. These Peanut Butter Lunch Lady Bars capture all the nostalgia of that school lunch favorite while elevating it with better ingredients and that unmistakable homemade touch. They’re soft, chewy, perfectly peanut buttery, and topped with the most incredible chocolate frosting that sets up just right.
I developed this recipe after years of searching for that perfect cafeteria bar memory. I tried countless versions—some too cakey, some too dense, some with frosting that was too thin or too hard. Finally, I landed on this combination, and it’s everything I remembered and more.
Today, I’m sharing this recipe with you, along with everything I’ve learned about making them perfect every single time.
Why You’ll Love These Peanut Butter Lunch Lady Bars
Pure nostalgia. One bite and you’ll be transported back to the school cafeteria, trading snacks with friends and savoring every moment.
Perfect texture. Soft, chewy, and slightly dense—just like the original. Not too cakey, not too heavy.
Incredible peanut butter flavor. Real peanut butter in the base ensures every bite is packed with that nutty, savory-sweet goodness.
That fudgy chocolate frosting. The thick, rich chocolate topping is the perfect counterpart to the peanut butter base. It sets up beautifully but stays soft enough to sink your teeth into.
Simple ingredients. Nothing fancy—just pantry staples that come together easily.
Crowd-pleasing. Kids love them, adults love them, everyone loves them. They disappear fast.
Perfect for any occasion. Bake sales, potlucks, parties, or just because.
Better than the original. As much as we loved those cafeteria bars, homemade is always better.
The Complete Ingredient Breakdown
For the Peanut Butter Base:
½ cup (1 stick) unsalted butter, softened
Butter adds richness and helps create that perfect soft-yet-chewy texture. Make sure it’s truly softened to room temperature for proper creaming.
½ cup creamy peanut butter
The star of the show. Use regular creamy peanut butter (like Jif or Skippy), not natural peanut butter that separates. Natural peanut butter can make the bars greasy and affect the texture.
1 cup packed brown sugar
Brown sugar adds moisture and a hint of molasses depth that complements the peanut butter beautifully.
¼ cup granulated sugar
A little granulated sugar balances the brown sugar and helps with structure.
2 large eggs
Eggs provide structure and richness. Room temperature eggs incorporate more easily.
1 teaspoon vanilla extract
Enhances all the flavors.
1½ cups all-purpose flour
All-purpose flour gives the perfect structure—tender but with enough heft to hold up to the frosting.
1 teaspoon baking powder
Provides just enough lift for that soft, chewy texture.
½ teaspoon salt
Essential for balancing sweetness and enhancing flavor.
For the Chocolate Frosting:
¼ cup (½ stick) unsalted butter
The foundation of the frosting. Real butter is non-negotiable for that rich, creamy texture.
¼ cup milk
Helps create the right consistency. Whole milk gives the richest result.
¼ cup unsweetened cocoa powder
Use good-quality cocoa for the best flavor. Dutch-processed gives a smoother, more mellow chocolate taste; natural cocoa is more intense.
2½ to 3 cups powdered sugar
This provides sweetness and structure. The exact amount depends on your desired consistency.
1 teaspoon vanilla extract
Adds warmth and depth.
Pinch of salt
Balances the sweetness.
Step-by-Step Instructions
Step 1: Preheat and Prep
Preheat your oven to 350°F (175°C). Grease a 9×13-inch baking pan or line with parchment paper for easy removal.
Step 2: Cream Butter, Peanut Butter, and Sugars
In a large bowl, beat the softened butter, peanut butter, brown sugar, and granulated sugar with an electric mixer until light and fluffy, about 2-3 minutes. Scrape down the sides as needed.
Step 3: Add Eggs and Vanilla
Add the eggs one at a time, beating well after each addition. Beat in the vanilla extract.
Step 4: Combine Dry Ingredients
In a separate bowl, whisk together the flour, baking powder, and salt.
Step 5: Mix Dry into Wet
Gradually add the dry ingredients to the wet mixture, mixing on low speed just until combined. Do not overmix. The batter will be thick and sticky.
Step 6: Spread in Pan
Spread the batter evenly in your prepared pan. It will be thick—use a spatula to push it to the edges.
Step 7: Bake
Bake at 350°F for 18-22 minutes, until the edges are lightly golden and a toothpick inserted in the center comes out clean or with just a few moist crumbs. The top should look set.
Do not overbake—these bars should be soft and chewy, not dry and cakey.
Step 8: Cool Completely
Let the bars cool completely in the pan on a wire rack before frosting. This is crucial—warm bars will melt the frosting into a mess.
Step 9: Make the Frosting
While the bars cool, make the frosting.
In a medium saucepan, melt the butter over medium heat. Stir in the milk and cocoa powder. Bring to a gentle simmer, stirring constantly, then remove from heat.
Gradually whisk in the powdered sugar, 1 cup at a time, until smooth. Add the vanilla and salt. Whisk until completely smooth and glossy.
For thicker frosting, add more powdered sugar. For thinner, add a tiny splash more milk.
Step 10: Frost the Bars
Pour the warm frosting over the completely cooled bars. Spread evenly with a spatula.
Step 11: Let Frosting Set
Let the frosting set for at least 1 hour before cutting. This allows it to firm up to that perfect fudgy consistency.
Step 12: Cut and Serve
Cut into squares and serve. Store any leftovers in an airtight container.
The Science Behind Perfect Lunch Lady Bars
Why regular peanut butter matters: Natural peanut butter has more oil that can separate, leading to greasy bars. Commercial peanut butter contains stabilizers that help maintain the right texture.
Don’t overbake: These bars should be soft and chewy, not dry and cakey. Pull them from the oven when a toothpick comes out with just a few moist crumbs.
Cool completely before frosting: Warm bars will melt the frosting, creating a gooey mess instead of that perfect layered look.
Warm frosting spreads best: Pouring the frosting while it’s still warm ensures it spreads smoothly and sets to the perfect consistency.
Troubleshooting Common Issues
My Bars Are Too Dry
Overbaked. Next time, check at 18 minutes. They should be soft and slightly underdone-looking in the center.
My Bars Are Too Greasy
You may have used natural peanut butter or too much butter. Stick with regular peanut butter and measure carefully.
The Frosting Won’t Set
Either too much milk or not enough powdered sugar. You can add more powdered sugar to thicken it, or let it sit longer—it may set up with time.
The Frosting Is Too Hard
Too much powdered sugar or it cooled too much before spreading. Next time, use slightly less sugar and spread while warm.
The Bars Stuck to the Pan
Line with parchment paper next time, leaving overhang for easy removal.
My Bars Didn’t Rise Enough
Check your baking powder freshness. Old baking powder won’t give proper lift.
Delicious Variations
Once you’ve mastered the classic, try these variations.
Chocolate Peanut Butter Bars
Add ½ cup chocolate chips to the batter before baking. Double the chocolate, double the deliciousness.
Peanut Butter Cup Bars
Press mini peanut butter cups into the warm frosting for an extra decadent treat.
Reese’s Pieces Bars
Sprinkle Reese’s Pieces over the frosting before it sets for color and crunch.
Salted Peanut Bars
Sprinkle flaky sea salt over the frosting for that sweet-salty combination.
Gluten-Free Version
Substitute the all-purpose flour with a 1-to-1 gluten-free baking blend. The texture may be slightly different but still delicious.
Add Crushed Pretzels
Sprinkle crushed pretzels over the frosting for a sweet-salty-crunchy twist.
Peanut Butter Blondies
Skip the chocolate frosting and serve as peanut butter blondies with a dusting of powdered sugar.
Marshmallow Peanut Butter Bars
Add a layer of mini marshmallows under the frosting for a s’mores-inspired treat.
What to Serve With Peanut Butter Lunch Lady Bars
Cold glass of milk: The classic pairing. The milk perfectly complements the rich peanut butter and chocolate.
Vanilla ice cream: Serve warm bars à la mode for an extra special dessert.
Coffee or hot chocolate: For the adults, coffee pairs beautifully.
Fresh fruit: Berries or apple slices balance the richness.
More peanut butter: Because you can never have too much.
Storage and Make-Ahead Tips
Room temperature: Store in an airtight container at room temperature for up to 5 days. Layer with wax paper between layers to prevent sticking.
Refrigerator: Store in the refrigerator for up to a week. The frosting will be firmer; let come to room temperature before serving.
Freezer: These bars freeze beautifully. Wrap tightly in plastic wrap and foil, or place in a freezer container. Freeze for up to 3 months. Thaw at room temperature.
Make-ahead for parties: Make a day ahead and store at room temperature. They’re actually even better the next day.
The Lunch Lady Legacy
For generations of American schoolchildren, the lunch lady was a beloved (and sometimes feared) figure. She stood behind the counter, ladle in hand, doling out scoops of mystery meat and squares of pizza with the authority of a general.
But when dessert came around, she was everyone’s best friend. Those peanut butter bars, with their soft texture and chocolate frosting, were pure magic. They made the cafeteria line worth standing in. They made eating all your vegetables a little more bearable. They were the highlight of countless school days.
This recipe honors that legacy. It captures the essence of those cafeteria bars while elevating them with real butter, good cocoa, and the love that only homemade baking can provide.
Every time I make these bars, I think about those school days. I think about sitting at long tables with friends, trading snacks, and savoring every bite of that precious dessert. And I smile.
Why This Recipe Deserves a Permanent Place in Your Kitchen
These Peanut Butter Lunch Lady Bars represent everything I love about nostalgic baking. They take us back to simpler times while being even better than we remember. They’re simple enough for a weekday treat but special enough for any occasion.
I’ve made these bars for bake sales where they sold out in minutes. I’ve made them for family gatherings where everyone had a story about their own school cafeteria memories. I’ve made them for no reason at all except that I wanted a taste of childhood.
Every single time, they deliver. Every single time, people close their eyes on the first bite and smile. Every single time, I’m reminded why this recipe is a keeper.
The soft, chewy peanut butter base. The rich, fudgy chocolate frosting. The way they taste exactly like you remember, only better. It’s nostalgia on a plate.
This recipe has become a staple in my kitchen for good reason. It’s reliable, delicious, and always welcome at the table.
And now it can be that for you too.
So preheat that oven. Cream that butter and peanut butter. Make that fudgy frosting. And get ready to taste the bars that will transport you straight back to the school cafeteria.
Your inner child is about to be very, very happy.
Have you made these Peanut Butter Lunch Lady Bars? Did they bring back memories? I’d love to hear about your experience in the comments below!
More Recipes You Might Like
-
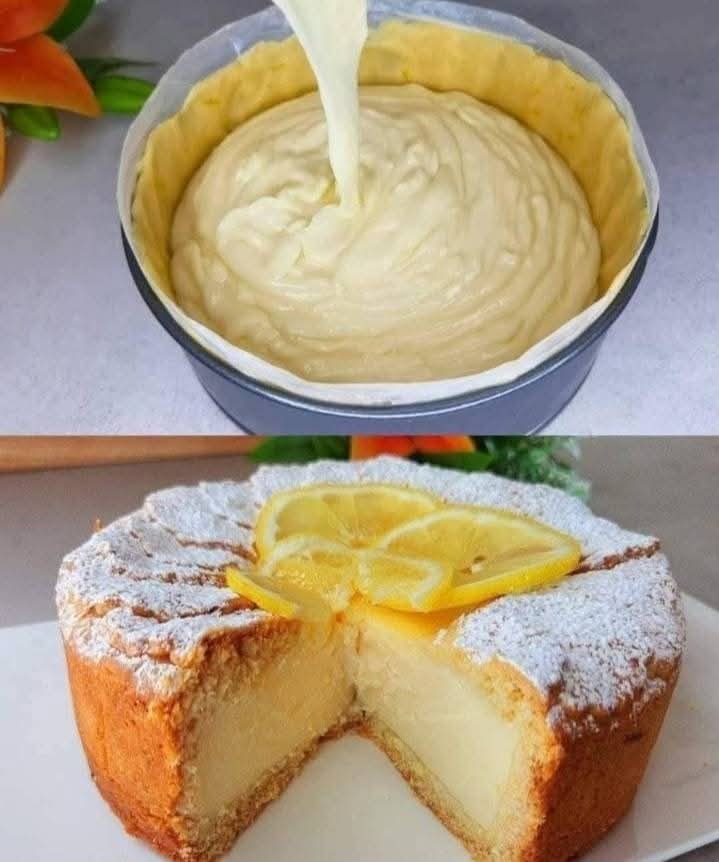
Italian Cloud Cake: The Most Loved Cake in Italy (You’ll Make It Every Week!)
Discover the magic of Italian Cloud Cake! This incredibly soft, buttery, lemon-scented cake lives up to its name—it’s light as a cloud. The most loved cake in Italy, and after one bite, you’ll understand why. Let me tell you about the cake that made me fall in love with Italian baking. I was wandering through…
-
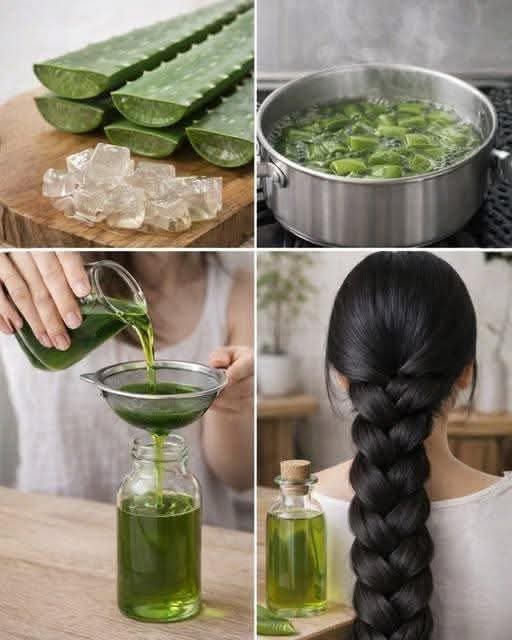
DIY Aloe Vera Oil: The Natural Secret to Faster Hair Growth and Less Hair Loss
Learn how to make powerful aloe vera oil at home to combat hair fall and boost growth. We share 3 easy methods, pro tips, and the science behind why it works. Let me tell you about the moment I realized I needed to take my hair health into my own hands. After months of noticing…
-
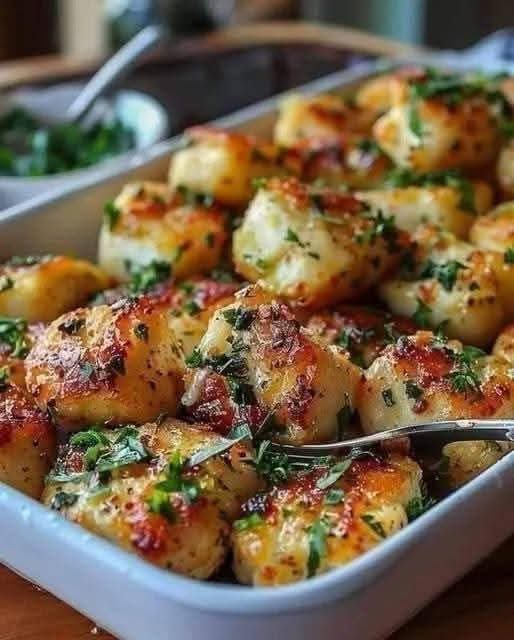
Lemon and Garlic Chicken Bites: The 15-Minute Dinner That Disappears Fast
Discover the magic of Lemon and Garlic Chicken Bites! Juicy, golden chicken pieces coated in a luscious lemon garlic butter sauce. Ready in just 15 minutes, perfect for busy weeknights or party appetizers. Let me tell you about the recipe that has saved me on more busy weeknights than I can count. It was one…