

There are certain candy bars that have achieved legendary status. The Mounds bar is one of them. That perfect combination of dark chocolate and sweet, chewy coconut has been satisfying cravings for generations. It’s simple, it’s classic, and it’s absolutely irresistible.
Now imagine that beloved flavor combination transformed into brownie form. A rich, fudgy brownie base. A layer of sweet, chewy coconut filling. A final blanket of smooth, dark chocolate on top. Each bite delivers the familiar Mounds bar experience but in a more substantial, shareable, and honestly even more delicious format.
These Mounds Candy Bar Brownies are everything you want them to be. They’re decadent without being overwhelming. They’re rich without being heavy. They capture the essence of the classic candy bar while elevating it into something new and special.
I developed this recipe after a serious Mounds bar craving hit on a rainy afternoon. I didn’t have any candy bars in the house, but I had all the components—chocolate, coconut, sweetened condensed milk. A little experimentation later, and these brownies were born. They’ve been a staple in my kitchen ever since.
Today, I’m sharing this recipe with all the tips and tricks I’ve learned along the way. Whether you’re a Mounds bar devotee, a coconut lover, or just someone who appreciates an extraordinary brownie, this recipe is for you.
Why You’ll Love These Mounds Candy Bar Brownies
Three incredible layers. A fudgy brownie base, a sweet coconut filling, and a rich chocolate topping. Each layer is delicious on its own, but together they create something magical.
Better than the candy bar. As much as I love Mounds bars, these brownies take everything great about them and make it even better. More texture, more depth, more satisfaction.
Perfect for coconut lovers. If you’re part of the coconut-loving club, this recipe is your dream come true. The coconut filling is sweet, chewy, and absolutely packed with coconut flavor.
Make-ahead friendly. These brownies actually get better after a day in the refrigerator, making them perfect for entertaining.
Crowd-pleasing. I’ve served these at parties, potlucks, and family gatherings. They disappear every single time.
Customizable. Love almonds? Add them for an Almond Joy variation. Prefer milk chocolate? Use it instead of dark. This recipe welcomes creativity.
The Complete Ingredient Breakdown
For the Brownie Base:
½ cup (1 stick) unsalted butter
Butter provides richness, flavor, and the right texture. Unsalted gives you control over the salt level. Make sure it’s fully melted for easy mixing.
1 cup granulated sugar
Adds sweetness and helps create that crackly top that brownie lovers crave.
2 large eggs
Provide structure and richness. Room temperature eggs incorporate more easily.
1 teaspoon vanilla extract
Enhances the chocolate flavor and adds warmth.
⅓ cup unsweetened cocoa powder
Use good-quality cocoa for the best flavor. Dutch-processed gives a smoother, more mellow chocolate taste; natural cocoa gives a brighter, more intense chocolate flavor. Both work beautifully.
½ cup all-purpose flour
Provides just enough structure to hold the brownies together while keeping them fudgy.
¼ teaspoon salt
Enhances all the flavors and balances sweetness.
For the Coconut Filling:
2 cups sweetened shredded coconut
This is the heart of the Mounds bar experience. Sweetened coconut provides the right texture and sweetness. Unsweetened coconut will result in a less sweet, drier filling—not recommended for this recipe.
1 can (14 ounces) sweetened condensed milk
The magic ingredient that binds the coconut into a chewy, sweet, irresistible filling. It caramelizes slightly during baking, adding depth and richness.
1 teaspoon vanilla extract
Enhances the coconut flavor and adds warmth.
For the Chocolate Topping:
1 cup semi-sweet or dark chocolate chips
Semi-sweet is classic, but dark chocolate (60-70% cacao) provides a more authentic Mounds bar experience. The slight bitterness balances the sweet coconut perfectly.
1 tablespoon coconut oil or butter
This helps the chocolate melt smoothly and gives it a beautiful shine. Coconut oil reinforces the coconut flavor; butter adds richness.
Step-by-Step Instructions
Step 1: Preheat and Prep
Preheat your oven to 350°F (175°C). Line an 8×8-inch baking pan with parchment paper, leaving overhang on two opposite sides. This will make it easy to lift the brownies out later. Lightly grease the parchment.
Step 2: Make the Brownie Base
In a medium microwave-safe bowl, melt the butter in 30-second intervals until completely melted. Alternatively, melt it in a small saucepan over low heat.
Add the sugar to the melted butter and whisk until well combined.
Add the eggs one at a time, whisking well after each addition. The mixture should look smooth and slightly glossy.
Whisk in the vanilla extract.
Sift the cocoa powder, flour, and salt directly into the bowl. Sifting prevents lumps and ensures even distribution.
Stir with a spatula until just combined. Do not overmix—a few streaks are fine. The batter will be thick and glossy.
Pour the brownie batter into your prepared pan and spread it evenly. It will be a thin layer—this is correct.
Step 3: Make the Coconut Filling
In a medium bowl, combine the sweetened shredded coconut, sweetened condensed milk, and vanilla extract.
Stir until everything is well combined. The mixture will be thick and sticky.
Drop spoonfuls of the coconut mixture over the brownie base, then gently spread it into an even layer. It’s okay if it doesn’t cover perfectly—it will spread slightly during baking.
Step 4: Bake
Place the pan in the preheated oven and bake for 25-30 minutes, or until the edges are set and the coconut layer is lightly golden. The center may still look slightly soft—that’s fine.
Remove from the oven and place on a wire rack to cool completely in the pan. This is important—if the brownies are warm when you add the chocolate topping, it will melt and slide off instead of setting properly.
Step 5: Make the Chocolate Topping
Once the brownies are completely cool, make the topping.
In a small microwave-safe bowl, combine the chocolate chips and coconut oil or butter.
Microwave in 30-second intervals, stirring between each, until the chocolate is completely melted and smooth. This usually takes 1-2 minutes total.
Alternatively, melt using a double boiler on the stovetop for more control.
Step 6: Spread the Topping
Pour the melted chocolate over the cooled coconut layer. Use a spatula to spread it evenly, reaching all the way to the edges.
Step 7: Chill to Set
Place the pan in the refrigerator for at least 1 hour, or until the chocolate topping is completely firm and set.
Step 8: Cut and Serve
Once the chocolate is firm, use the parchment overhang to lift the entire block of brownies out of the pan.
Place on a cutting board and use a sharp knife to cut into squares. For cleanest cuts, wipe the knife clean between cuts.
For the best texture, let the brownies sit at room temperature for 10-15 minutes before serving. This softens the chocolate and coconut layers slightly, making them easier to bite through.
The Science Behind the Perfection
Brownie layer: The high ratio of butter to flour, combined with the eggs and sugar, creates that signature fudgy texture. The cocoa provides intense chocolate flavor without additional liquid that would make the brownies cakey.
Coconut filling: Sweetened condensed milk is the secret to the chewy, candy-like texture. As it bakes, the sugars caramelize slightly, adding depth and binding the coconut into a cohesive layer that’s soft but not runny.
Chocolate topping: Adding coconut oil or butter to the melting chocolate creates a smoother, shinier finish and helps the chocolate set with a pleasant snap rather than becoming brittle. It also makes cutting easier—the topping is less likely to crack or shatter.
Layering order: Baking the brownie and coconut layers together allows them to meld slightly at the interface, preventing separation. Adding the chocolate topping after baking and cooling ensures a clean, distinct layer that doesn’t melt into the coconut.
Troubleshooting Common Issues
My Brownie Layer Is Too Thick or Too Thin
The 8×8 pan is important for this recipe. A larger pan will give you thin layers; a smaller pan will be too thick and may not bake through. Stick to 8×8 for the proportions given.
My Coconut Layer Is Too Sticky
This is normal—the coconut filling is meant to be soft and chewy. If it’s excessively sticky and difficult to spread, your sweetened condensed milk may have been extra thick. Add a tablespoon of milk to thin it slightly.
My Chocolate Topping Won’t Set
If your chocolate topping remains soft after refrigeration, you may have used chocolate with a low cocoa butter content or added too much oil. High-quality chocolate chips should set firmly. You can try placing the brownies in the freezer for 30 minutes to help them set.
The Layers Are Separating
This can happen if the brownies weren’t completely cool when you added the chocolate topping, or if you cut them while still cold from the refrigerator. Let them come to room temperature slightly before cutting, and use a sharp knife.
My Brownies Are Difficult to Cut
For cleanest cuts, use a long, sharp knife and wipe it clean between each cut. You can also run the knife under hot water, dry it quickly, and then cut—the warmth helps slice through the chocolate cleanly.
Delicious Variations
Almond Joy Brownies
Add ½ cup chopped toasted almonds to the coconut filling. The nuts add crunch and transform these into an Almond Joy version.
Toasted Coconut Brownies
Toast the shredded coconut in a dry skillet over medium heat for 3-5 minutes until golden brown before using in the filling. This adds deeper, nuttier coconut flavor.
Milk Chocolate Version
Use milk chocolate chips instead of semi-sweet or dark for a sweeter, creamier topping that more closely mimics milk chocolate candy bars.
White Chocolate Coconut Brownies
Replace the dark chocolate topping with white chocolate for a completely different (but equally delicious) experience. Add a drop of coconut extract to the white chocolate for extra coconut punch.
Salted Chocolate Version
Sprinkle a pinch of flaky sea salt over the chocolate topping immediately after spreading. The salt enhances all the flavors and adds a sophisticated touch.
Peanut Butter Coconut Brownies
Swirl ¼ cup of melted peanut butter into the coconut filling before baking. The combination of peanut butter, coconut, and chocolate is unexpectedly wonderful.
Double Chocolate Version
Add ½ cup chocolate chips to the brownie batter before baking for extra chocolate throughout.
Tropical Twist
Add ½ cup dried pineapple or mango, finely chopped, to the coconut filling. The tropical fruit adds sweetness and texture.
How to Serve Mounds Candy Bar Brownies
These brownies are versatile enough for any occasion.
Room temperature: The classic way to enjoy them. The layers are soft and cohesive, and the chocolate has a slight give.
Chilled: Some people prefer them straight from the refrigerator—the chocolate is snappy, and the coconut layer is firmer and chewier.
Slightly warmed: Pop a brownie in the microwave for 10-15 seconds. The chocolate softens, the coconut warms, and the experience becomes almost like a fresh-baked dessert.
With ice cream: Serve a brownie warm with a scoop of vanilla or coconut ice cream. Drizzle with chocolate sauce for extra indulgence.
With coffee: The combination of dark chocolate, coconut, and coffee is absolutely divine. Perfect for afternoon treats or after-dinner desserts.
On a dessert platter: Arrange these brownies alongside other bar cookies and candies for a beautiful dessert spread.
Storage and Make-Ahead Tips
Room temperature: Store in an airtight container at room temperature for up to 3 days. If your kitchen is warm, the chocolate may soften—refrigeration is better in hot weather.
Refrigerator: Store in an airtight container in the refrigerator for up to 2 weeks. The texture becomes firmer and chewier when cold. Bring to room temperature before serving if desired.
Freezer: These brownies freeze beautifully. Wrap individual brownies tightly in plastic wrap, then place in a freezer bag or container. Freeze for up to 3 months. Thaw at room temperature for about 30 minutes, or enjoy them slightly frozen for a different texture experience.
Make-ahead for parties: These are perfect make-ahead desserts. Prepare them 1-2 days ahead and store in the refrigerator. They actually improve as the flavors meld and the layers settle.
Gifting: Packaged in a pretty box or tin, these brownies make wonderful homemade gifts. Include a note that they’re best kept refrigerated.
The Mounds Bar Legacy
The Mounds bar has been satisfying candy lovers since 1920, when it was introduced by the Peter Paul Candy Manufacturing Company. Its simple formula—dark chocolate coating over sweetened coconut—has remained virtually unchanged for over a century, a testament to the perfection of that combination.
The name “Mounds” evokes images of tropical islands and coconut palms, and indeed the candy bar has always carried that exotic, escapist appeal. Taking a bite of a Mounds bar is a mini-vacation for your taste buds.
These brownies capture that same spirit. They’re a tribute to a classic, transformed into something new while honoring what made the original great. Every bite carries that same tropical, chocolatey, coconutty magic.
Why This Recipe Deserves a Place in Your Collection
These Mounds Candy Bar Brownies represent everything I love about creative baking. They take a familiar, beloved flavor combination and reimagine it in a new format. They’re recognizable enough to satisfy cravings but novel enough to feel special.
The process is straightforward enough for a Tuesday night but the results are impressive enough for a holiday gathering. The ingredients are simple and accessible but the final product tastes like something from a fancy bakery.
I’ve made these brownies for Mounds bar lovers who declared them even better than the original. I’ve made them for coconut skeptics who became converts. I’ve made them for people who “don’t really like sweets” who couldn’t stop at just one.
Every time, they disappear. Every time, someone asks for the recipe.
That’s the mark of a keeper. A recipe that delivers consistently, that pleases reliably, that becomes a requested favorite.
These brownies are that recipe for me. And now they can be that for you too.
So preheat your oven. Open that can of sweetened condensed milk. Get ready to fill your kitchen with the incredible aroma of chocolate and coconut baking together.
Your Mounds bar cravings are about to be satisfied in the most delicious way possible.
Have you tried these Mounds Candy Bar Brownies? Did you add your own twist? I’d love to hear about your experience in the comments below!
More Recipes You Might Like
-

Diabetic Strawberry Dessert: Sugar-Free, Low-Calorie, and Only 3 Ingredients!
Discover the ultimate guilt-free treat! This diabetic-friendly strawberry applesauce bread requires just 3 ingredients, has no added sugar, and is incredibly low in calories. Perfect for a healthy dessert or snack! Let me tell you about the dessert that changed how I think about healthy eating. I have a massive sweet tooth. Always have. But…
-
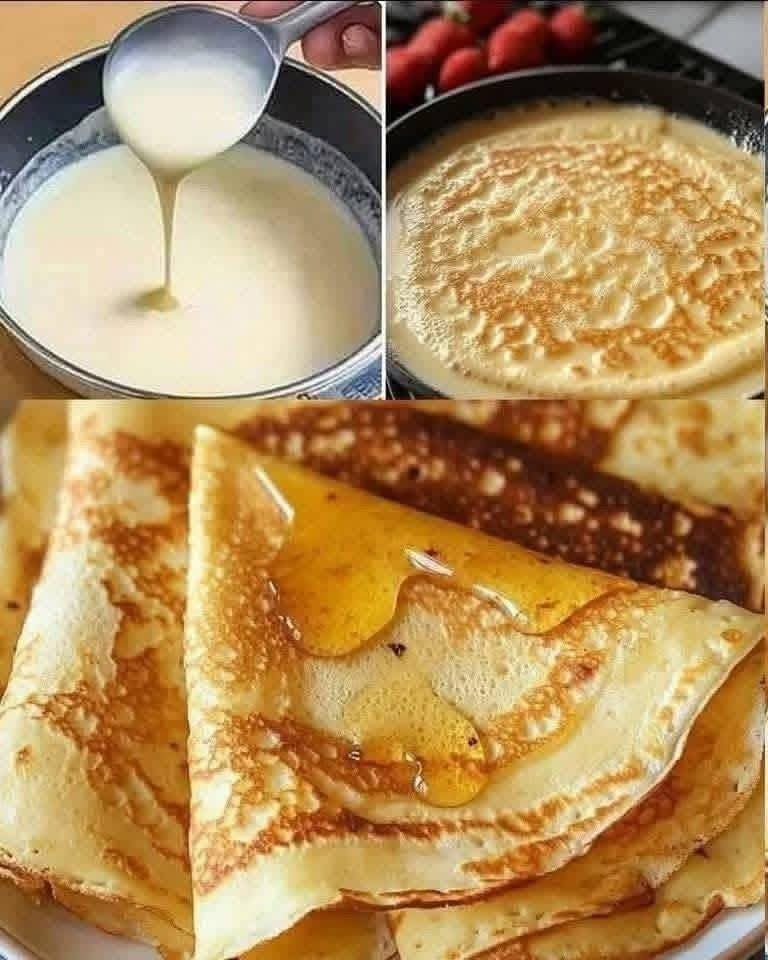
Classic French Crepes with Honey: A Taste of Paris at Home
Discover the secret to authentic Classic French Crepes with Honey! These paper-thin, buttery crepes are incredibly easy to make and absolutely divine drizzled with golden honey. Perfect for breakfast, dessert, or anytime! Close your eyes and imagine yourself sitting at a tiny sidewalk café in Paris. The Eiffel Tower looms in the distance, the scent…
-
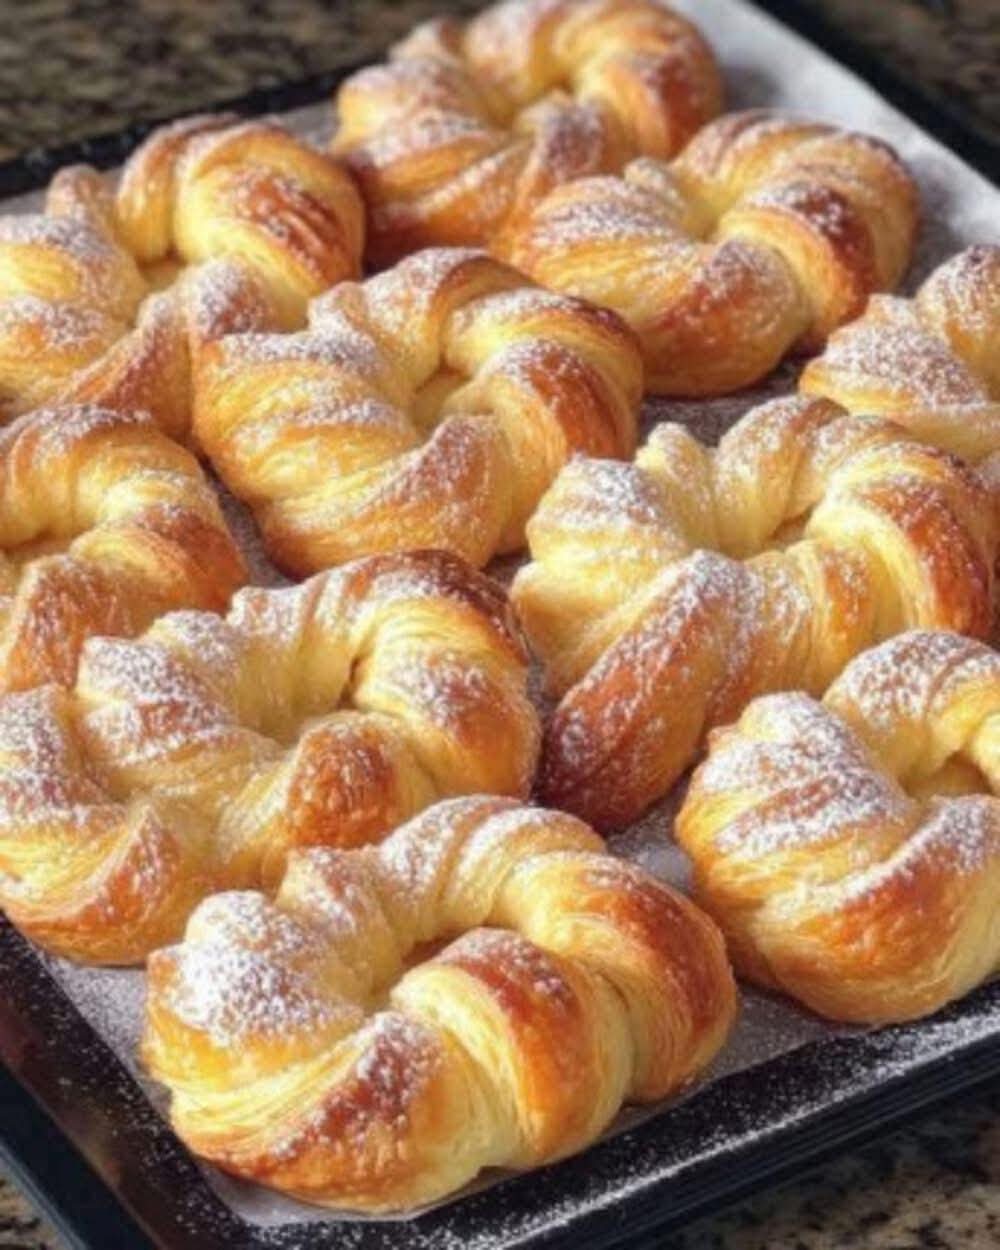
Puff Pastry Cinnamon Sugar Twists: 20-Minute Magic from the Freezer
Discover the magic of Puff Pastry Cinnamon Sugar Twists! With just a few simple ingredients, you can create golden, flaky, buttery pastries that taste like they came from a fancy bakery. Ready in under 20 minutes! Let me tell you about the dessert that makes people think I spent hours in the kitchen when I…