
There are some things that no store-bought loaf can ever replicate. The smell of yeast blooming in warm milk. The feel of dough transforming under your hands. The anticipation as a golden loaf cools on the counter, filling your kitchen with an aroma that says “home” more clearly than any word ever could.
Homemade white bread is that experience.
I still remember the first time I made bread from scratch. I was intimidated, convinced that bread-making was a skill reserved for grandmothers and professional bakers. But I had a craving for warm, fresh bread that the grocery store just couldn’t satisfy, so I gathered my courage, cleared my schedule, and tried.
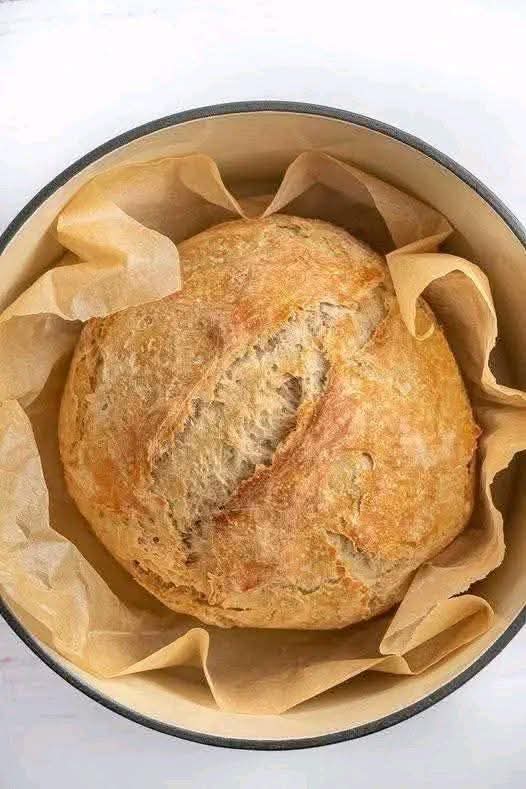
When I pulled that first golden loaf from the oven, I actually teared up. It was beautiful—tall, golden, perfectly domed. And when I sliced into it, still warm, and slathered a piece with butter, I understood why people have been making bread for thousands of years. There’s nothing else like it.
Since then, homemade white bread has become a regular in my kitchen. I make it for Sunday dinners, for sandwiches, for toast, for no reason at all except that I want my house to smell amazing. And every single time, it’s worth every minute.
Today, I’m sharing everything I’ve learned about making the perfect homemade white bread. This recipe is simple, forgiving, and absolutely delicious.
Why You’ll Love This Homemade White Bread
Incredible flavor. The taste of fresh-baked bread is something no store-bought loaf can match. It’s slightly sweet, deeply satisfying, and absolutely perfect.
Soft and tender. This bread has the perfect texture—soft enough for sandwiches but sturdy enough to hold up to toasting.
Simple ingredients. Flour, yeast, milk, butter, sugar, salt. Things you probably already have.
Beginner-friendly. With clear instructions and a little patience, anyone can make this bread.
Versatile. Use it for sandwiches, toast, French toast, bread pudding, or just eat it warm with butter.
Freezer-friendly. Make two loaves and stash one for later.
Budget-friendly. A loaf of homemade bread costs pennies compared to bakery prices.
Better than store-bought. Once you’ve made your own, you’ll never go back.
The smell alone is worth it. Your kitchen will smell like heaven.
The Complete Ingredient Breakdown
For the Bread:
4 cups all-purpose flour (plus more for kneading)
All-purpose flour gives the perfect texture—tender but with enough structure to create a beautiful loaf. Bread flour can be used for a chewier result.
2¼ teaspoons active dry yeast (one packet)
This is the magic that makes bread rise. Active dry yeast needs to be activated in warm liquid. Make sure it’s fresh—old yeast won’t give you the rise you need.
¼ cup granulated sugar
Sugar adds a touch of sweetness and helps the yeast do its job. It also contributes to browning.
1 teaspoon salt
Essential for flavor. Don’t skip it—bread without salt tastes flat and sad.
1 cup warm milk (about 110°F)
Milk adds richness, tenderness, and helps create a softer crust. Whole milk gives the best result.
¼ cup warm water (about 110°F)
Water helps activate the yeast and creates the right dough consistency.
¼ cup unsalted butter, melted and cooled slightly
Butter adds richness, flavor, and tenderness. It also helps create a softer crust.
For Brushing:
2 tablespoons unsalted butter, melted
This gets brushed on hot loaves straight from the oven, creating a soft, buttery crust.
Step-by-Step Instructions
Step 1: Activate the Yeast
In a small bowl or the bowl of your stand mixer, combine:
· ¼ cup warm water (110°F)
· 1 tablespoon of the sugar (from your ¼ cup total)
· 2¼ teaspoons active dry yeast
Stir gently and let sit for 5-10 minutes until foamy. This foam means your yeast is alive and ready to work. If it doesn’t foam, start over with fresh yeast.
Step 2: Combine Wet Ingredients
In a separate bowl or large measuring cup, whisk together:
· 1 cup warm milk
· ¼ cup melted butter (cooled slightly)
· Remaining sugar (about 3 tablespoons)
Step 3: Combine Dry Ingredients
In a large bowl or the bowl of your stand mixer, whisk together:
· 4 cups flour
· 1 teaspoon salt
Step 4: Bring It Together
Add the yeast mixture and the milk mixture to the flour. Stir until a shaggy dough forms.
Step 5: Knead the Dough
If using a stand mixer: Fit with the dough hook and knead on medium-low speed for 5-7 minutes until the dough is smooth, elastic, and slightly tacky.
If kneading by hand: Turn the dough onto a lightly floured surface. Knead for 8-10 minutes, pushing the dough away with the heel of your hand, folding it back, and repeating. Add flour sparingly—just enough to prevent sticking. The dough should become smooth and elastic.
Step 6: First Rise
Place the dough in a lightly greased bowl, turning to coat all sides. Cover with a clean kitchen towel or plastic wrap.
Let rise in a warm, draft-free place until doubled in size, about 1-1½ hours. The dough should be puffy and hold an indentation when poked.
Step 7: Shape the Loaves
Punch down the risen dough to release the air. Turn onto a lightly floured surface.
Divide the dough in half. Shape each half into a loaf by flattening it into a rectangle, then rolling it tightly from the short end, pinching the seam to seal.
Place the shaped loaves seam-side down in greased 9×5-inch loaf pans.
Step 8: Second Rise
Cover the loaves with a towel and let rise again until doubled and the dough rises about 1 inch above the rim of the pans, about 30-45 minutes.
Step 9: Preheat and Bake
About 20 minutes into the second rise, preheat your oven to 375°F (190°C).
Bake at 375°F for 25-30 minutes, until the loaves are golden brown and sound hollow when tapped. An instant-read thermometer inserted in the center should read 190°F.
Step 10: Butter the Tops
As soon as the loaves come out of the oven, brush the tops generously with melted butter. This adds incredible flavor and keeps the crust soft.
Step 11: Cool
Let the loaves cool in the pans for 10 minutes, then transfer to a wire rack to cool completely before slicing.
Step 12: Enjoy
Slice and serve warm with butter, or let cool completely for sandwiches.
The Science Behind Perfect White Bread
Yeast activation: Yeast is a living organism. It needs warmth (but not too hot) to wake up and start producing the carbon dioxide that makes dough rise.
Gluten development: Kneading develops gluten, the protein network that gives bread structure and that wonderful chewy texture. Proper gluten development means a loaf that rises well and holds its shape.
Two rises create flavor: The first rise develops flavor and structure. The second rise (after shaping) creates the final texture and ensures a light, airy crumb.
Butter adds tenderness: Fat coats flour particles, limiting gluten formation and creating a more tender loaf. It also adds incredible flavor.
Hot oven, then steam: The initial burst of heat creates oven spring—the final rapid rise. Steam in the oven (from the dough’s moisture) keeps the crust from setting too quickly, allowing maximum expansion.
Troubleshooting Common Issues
My Bread Didn’t Rise
Several possible causes:
· Yeast was too old or dead (did it foam?)
· Liquid was too hot and killed the yeast
· Kitchen was too cold
· Too much salt inhibited yeast
Next time, proof your yeast first and ensure liquid is warm, not hot.
My Bread Is Dense and Heavy
Likely causes:
· Not enough kneading (gluten didn’t develop)
· Too much flour worked in
· First rise wasn’t long enough
Knead thoroughly and use flour sparingly. The dough should be soft and slightly tacky.
My Bread Is Too Dry
Usually means too much flour was added. Next time, use the lower amount and add gradually. Also, don’t overbake—check at the minimum time.
My Bread Collapsed
The second rise may have gone too long, or the bread was underbaked. Next time, check the dough during the second rise and bake when it’s risen but still has some spring.
The Crust Is Too Hard
Your oven may be too hot, or you didn’t butter the top after baking. Brushing with butter immediately after baking keeps the crust soft.
The Inside Is Gummy
Underbaked. Next time, use an instant-read thermometer to ensure the center reaches 190°F.
Delicious Variations
Once you’ve mastered the classic, try these variations.
Honey White Bread
Replace the sugar with ¼ cup honey. Reduce the milk slightly to compensate for the extra liquid.
Herb and Garlic Bread
Add 2 tablespoons fresh chopped herbs (rosemary, thyme, chives) and 2 cloves minced garlic to the dough.
Cinnamon Swirl Bread
After rolling the dough for shaping, sprinkle with a mixture of ¼ cup sugar and 1 tablespoon cinnamon, then roll up.
Cheese Bread
Add 1 cup shredded cheddar or Parmesan to the dough during the final kneading.
Whole Wheat White Bread
Replace half the all-purpose flour with whole wheat flour. You may need a little extra liquid.
Potato Bread
Replace ½ cup of the flour with ½ cup mashed potatoes. The potatoes add incredible moisture and tenderness.
Milk Bread (Hokkaido-Style)
Use the tangzhong method: cook 3 tablespoons flour with ½ cup milk into a paste before adding to the dough. This creates an incredibly soft, fluffy bread.
Dinner Rolls
Shape the dough into 12-15 rolls instead of loaves. Bake for 15-18 minutes.
What to Serve With Homemade White Bread
With butter and jam: The classic. Nothing beats warm bread with good butter and your favorite jam.
For sandwiches: Use it for turkey, ham, grilled cheese, or any sandwich.
For toast: The best breakfast. Top with butter, eggs, avocado, or cinnamon sugar.
With soup: Perfect for dipping into tomato soup, potato soup, or any creamy soup.
For French toast: Day-old bread makes the best French toast.
For bread pudding: Another great use for day-old bread.
With olive oil and balsamic: Tear off pieces and dip in good olive oil.
For garlic bread: Slice, butter, add garlic, and toast.
Storage and Make-Ahead Tips
Room temperature: Store in a bread box or paper bag at room temperature for up to 3 days. Plastic bags can make the crust soft.
Refrigerator: Not recommended—it speeds up staling.
Freezer: This bread freezes beautifully. Slice it first, wrap tightly in plastic wrap and foil, and freeze for up to 3 months. Toast slices directly from frozen.
Make-ahead for busy days: You can prepare the dough through the first rise, then refrigerate for up to 24 hours. Shape and bake when ready.
Reviving day-old bread: Sprinkle with water and warm in a 350°F oven for 5-10 minutes. It’ll taste almost fresh-baked.
The Magic of Homemade Bread
There’s something almost spiritual about making bread. You start with simple ingredients—flour, water, yeast—things that seem ordinary on their own. Then you mix, knead, wait, and watch as they transform into something entirely new. Something alive. Something that fills your home with an aroma that no candle can replicate.
Bread-making connects us to generations of people who have done the same thing for thousands of years. It’s a tradition as old as civilization itself, and every time you bake a loaf, you’re participating in that tradition.
There’s also something deeply satisfying about feeding people with bread you made yourself. When you slice into a warm loaf and watch the steam rise, when you see the faces of your family light up at that first bite, you know you’ve done something good.
This recipe is your invitation into that world. It’s simple enough for a first-time baker but satisfying enough for someone who’s been baking for years. It’s a foundation you can build on, a recipe you’ll come back to again and again.
Why This Recipe Deserves a Place in Your Kitchen
This Homemade White Bread represents everything I love about baking. It’s simple enough for a beginner to master. It’s satisfying enough to make you feel like a real baker. It’s versatile enough to use in countless ways. And it’s genuinely, consistently, undeniably delicious.
I’ve made this bread for Sunday dinners and weekday sandwiches. I’ve made it for French toast and bread pudding. I’ve made it for no reason at all except that I wanted my house to smell like bread.
Every single time, it delivers. Every single time, that first slice of warm, buttery bread makes everything better.
This recipe has become a staple in my kitchen for good reason. It’s reliable, versatile, and always welcome at the table.
And now it can be that for you too.
So proof that yeast. Knead that dough. Wait for that rise. And get ready to experience the magic of homemade bread.
Your kitchen is about to smell incredible.
Have you made this Homemade White Bread? What variations did you try? I’d love to hear about your experience in the comments below!
More Recipes You Might Like
-

Sandwich Crust Garlic Rolls – The Zero-Waste Appetizer You’ll Make Again and Again
Don’t throw away your sandwich crusts! Turn them into crispy, buttery garlic rolls in minutes. This zero-waste recipe is perfect for snacks, soups, or party appetizers. Let’s be honest: how many sandwich crusts have you tossed in the trash over the years? If you have kids (or picky adults) at home, the answer is probably…
-

Hospital Emptying Drink: What Science Really Says About This Healthy Blend
“hospital emptying” drinks promise to cure everything from cancer to high blood pressure. We separate fact from fiction, examine the science behind soursop, hibiscus, and turmeric, and offer a safe, realistic recipe. Let’s be honest: every few months, the internet finds a new “miracle drink.” One week it’s a detox tonic. The next, it’s a…
-

Air Fryer Sliced Potatoes – Crispy, Golden, and Ready in 20 Minutes
These air fryer sliced potatoes are crispy on the outside, tender on the inside, and ready in 20 minutes. Perfect for a quick side dish, breakfast hash, or snack. Only 4 ingredients! Let’s be honest: roasted potatoes are a comfort food classic. But who has time to wait 45 minutes for the oven to do…