
Discover the magic of Danish Dream Cake (Drømmekage)! This legendary Nordic dessert features a light, fluffy sponge topped with a caramelized coconut layer. Authentic recipe with history, pro tips, and variations.
Let me tell you about the cake that has captured the hearts—and taste buds—of Denmark for over 50 years.
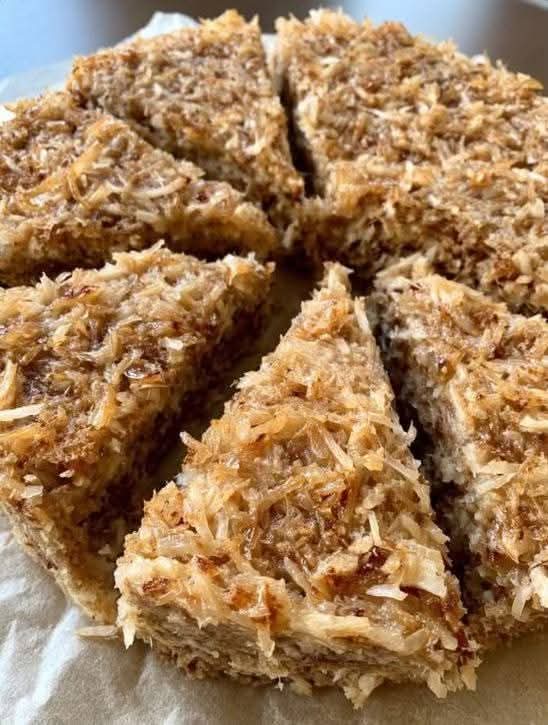
Imagine a cake so light and airy that it practically floats off the plate, topped with a rich, chewy, caramelized coconut layer that crackles slightly as you bite into it. This is Drømmekage—literally “Dream Cake”—and it’s one of Denmark’s most beloved desserts .
I first encountered this cake at a small bakery in Copenhagen, tucked away in a corner of the city that smelled of cinnamon, cardamom, and freshly brewed coffee. One bite, and I understood immediately why it earned its dreamy name. The sponge was impossibly light and fluffy, almost like a cloud, while the topping—a buttery, caramelized coconut mixture—added the perfect balance of sweetness, crunch, and chew.
But this cake isn’t just delicious. It has a story that makes it even more special. Born from a baking competition in the 1960s, this humble cake rose to become one of the most iconic desserts in Danish culinary history . Today, it’s the cake that Danish grandmothers teach their grandchildren to bake, the treat that appears at birthday parties and afternoon coffee breaks, and the dessert that visitors to Copenhagen’s famous Freetown Christiania seek out for a taste of pure nostalgia .
In this comprehensive guide, I’ll share everything you need to know to make authentic Danish Dream Cake in your own kitchen. From the perfect fluffy sponge to that signature coconut-caramel topping, you’ll find all the tips, tricks, and variations you need to create this Nordic masterpiece.
What Is Danish Dream Cake? A Slice of History
The Origin Story
Every great cake has a story, and Dream Cake’s is one for the books. The recipe dates back to the 1960s, when a woman in Hjallerup, a small village in the Jutland region of Denmark, created a cake that would become legendary . Her granddaughter, Jytte Andersen, entered the recipe into a baking competition organized by a large Danish food company—and it won .
The cake was renamed “Drømmekage” (Dream Cake) and quickly became one of the most consumed cakes in Danish history . Over the past 50 years, it has remained a staple at birthday parties, office coffee breaks, afternoon teas, and bakeries across Denmark . Today, it’s the cake that most Danes learn to bake from their grandmothers .
Why It’s Called a “Dream” Cake
The name comes from the cake’s ethereal texture. The sponge is remarkably light and fluffy—so soft that when you press it, it springs back into place . Paired with the rich, caramelized coconut topping, it creates a dessert that truly feels like a dream. As one Danish food expert noted, “It’s adored by both children and adults. It’s very easy to prepare and a very appealing cake, with two very different layers and variation in texture” .
Why You’ll Love This Danish Dream Cake
Perfectly Balanced Flavors
The light, vanilla-scented sponge provides a delicate base that lets the rich, caramelized coconut topping shine. It’s sweet but not cloying, with a perfect balance of textures .
Surprisingly Simple
Despite its impressive appearance, this cake uses basic pantry ingredients and straightforward techniques. It’s the cake that Danish grandmothers teach their grandchildren for a reason .
Crowd-Pleasing Favorite
Children love the sweet coconut topping; adults appreciate the sophisticated balance of flavors. It’s guaranteed to disappear quickly at any gathering.
Make-Ahead Friendly
This cake actually improves after a day or two, as the topping softens and becomes creamier . It keeps well at room temperature for up to three days.
Authentic Nordic Experience
Whether you’re celebrating Midsummer, hosting a fika (coffee break), or simply craving a taste of Scandinavia, this cake delivers an authentic Danish experience.
Ingredients for Authentic Danish Dream Cake
Here’s everything you’ll need to create this legendary dessert. I’ve gathered the best ratios from multiple sources to give you the most reliable recipe .
For the Light & Fluffy Sponge:
Ingredient Amount Notes
All-purpose flour 1 ¾ cups (225 g) Sifted for lightness
Baking powder 2 teaspoons Fresh for best rise
Unsalted butter 5 tablespoons (75 g) Melted and slightly cooled
Whole milk ⅔ cup (150 ml) Room temperature
Eggs 3 large Room temperature
Granulated sugar 1 cup (225 g) Caster sugar works too
Vanilla sugar or extract 1 teaspoon Vanilla sugar is traditional; extract works
Salt ¼ teaspoon Enhances all flavors
For the Signature Coconut-Caramel Topping:
Ingredient Amount Notes
Unsalted butter ½ stick (100 g) Adds richness
Dark brown sugar 1 cup (250 g) Packed firmly
Whole milk ⅓ cup (75 ml) Creates the caramel
Desiccated coconut 1½ cups (150 g) Unsweetened for authentic flavor
Salt Pinch Balances sweetness
Step-by-Step Instructions
Follow these steps for a perfect Danish Dream Cake every time.
Part 1: Prepare for Baking
- Preheat your oven to 350°F (175°C) .
- Prepare your pan: Butter a 9-inch square or round cake pan. Line the bottom with parchment paper, then butter the paper as well . (A 9-inch springform pan also works beautifully .)
Part 2: Make the Light & Fluffy Sponge
- Whisk dry ingredients: In a small bowl, whisk together the flour, baking powder, and salt. Set aside.
- Beat eggs and sugar: In a large mixing bowl, beat the eggs and sugar with an electric mixer on high speed for 2-5 minutes, until the mixture is pale yellow, thick, and fluffy . This step is crucial for achieving that airy, dreamlike texture.
- Add vanilla: Beat in the vanilla sugar or extract.
- Heat milk and butter: In a small saucepan, combine the milk and butter. Heat over medium-low until the butter melts and the mixture is steaming—just before boiling .
- Combine: Carefully pour the hot milk-butter mixture into the egg mixture, beating briefly until you have a smooth, runny batter .
- Add dry ingredients: Sift in the flour mixture and fold gently until just combined. Be careful not to overmix.
- Pour and bake: Pour the batter into your prepared pan. Bake for 20-25 minutes (depending on your oven and pan size) . The cake is done when the top springs back when lightly pressed and a toothpick inserted in the center comes out clean .
Part 3: Make the Coconut-Caramel Topping
While the cake bakes, prepare the topping:
- Combine ingredients: In a medium saucepan, combine the butter, brown sugar, milk, and a pinch of salt .
- Melt and simmer: Heat over medium, stirring occasionally, until the butter melts and the sugar dissolves. Bring to a gentle simmer—just until bubbles appear at the edges .
- Add coconut: Remove from heat and stir in the desiccated coconut until evenly coated.
Part 4: Finish and Bake
- Remove cake from oven: Take the cake out when it’s done but still hot.
- Increase oven temperature: Turn the oven up to 400°F (200°C) .
- Spread the topping: Spoon the coconut mixture evenly over the hot cake. Gently spread it with a spatula .
- Return to oven: Bake for an additional 5-10 minutes, until the topping is bubbling and golden brown .
- Optional broiler method: For a deeper caramelization, you can place the cake under the broiler for the last 1-2 minutes, watching carefully to prevent burning .
Part 5: Cool and Serve
- Cool in pan: Let the cake cool in the pan on a wire rack for 10-15 minutes .
- Remove and cool completely: Gently remove from the pan and allow to cool completely on the wire rack. If you can wait that long—this cake is irresistible when warm!
- Serve: Cut into squares or wedges and serve with coffee or tea.
Pro Tips for the Perfect Dream Cake
- Beat Eggs and Sugar Thoroughly
The fluffiness of the sponge depends entirely on properly aerating the eggs and sugar. Beat until the mixture is pale, thick, and leaves a ribbon trail when you lift the beaters—this usually takes 2-5 minutes with an electric mixer .
- Use Room Temperature Ingredients
Cold eggs and milk can cause the batter to seize. Bring eggs to room temperature and use room temperature milk for the smoothest results .
- Don’t Overmix the Batter
Once you add the flour, fold gently until just combined. Overmixing develops gluten, which can make the cake dense instead of light and fluffy.
- Watch the Topping
The topping should be spread onto the cake while it’s still hot. This allows it to soak slightly into the sponge and creates that signature chewy layer .
- Check for Doneness
The cake is ready for the topping when it springs back when lightly pressed—about 20-25 minutes depending on your pan . It will continue baking with the topping, so slight underbaking is preferable to overbaking.
- Cool Before Slicing
Let the cake cool completely for clean slices. If you can’t wait, enjoy it warm with a spoon—it’s delicious either way !
Delicious Variations to Try
- Lazy Daisy Cake
This American cousin of Dream Cake uses the same topping but a slightly different sponge. The entire cake (still in its pan) is run under the broiler until the brown sugar melts and the coconut singes . It’s a beloved vintage recipe from the 1960s.
- Extra-Caramelized Topping
For a deeper, more intense flavor, increase the brown sugar in the topping to 1¼ cups (250 g) and bake for an additional 5 minutes .
- Double the Topping
For a more indulgent cake, double the topping mixture. This creates a thicker, more decadent coconut layer .
- Modern Nordic Version
For a grown-up twist, replace the coconut topping with barley flakes and add a swirl of dark malt flour. Add fresh lingonberries or black currants to the batter for a tart contrast to the sweetness .
- Cardamom-Infused Sponge
Add 1 teaspoon of ground cardamom to the flour mixture for a warm, aromatic variation that’s very Nordic .
- Citrus Dream
Add the zest of one lemon or orange to the batter for a bright, citrusy note that complements the caramel coconut beautifully.
- Gluten-Free Version
Use a 1:1 gluten-free flour blend. The texture may be slightly different, but the flavor remains delicious.
Serving Suggestions
The Danish Way
Serve slices of Dream Cake with a cup of strong coffee or tea. In Denmark, this is the quintessential fika (coffee break) treat.
With Vanilla Ice Cream
For an extra-indulgent dessert, serve warm dream cake with a scoop of vanilla ice cream. The cold cream against the warm cake is heavenly.
As a Birthday Cake
This cake is a traditional birthday treat in Denmark. Decorate with fresh berries or a dusting of powdered sugar for a festive touch.
With Fresh Berries
The sweetness of the cake pairs beautifully with tart berries like raspberries, lingonberries, or black currants .
Storage and Make-Ahead Tips
Room Temperature Storage
Store the cake in an airtight container at room temperature for up to 3 days. The topping will soften and become creamier over time, which many people consider even better than day one .
Refrigerator Storage
You can refrigerate the cake, but bring it to room temperature before serving for the best texture.
Freezer Instructions
This cake freezes well for up to 2 months.
- Cool completely.
- Wrap tightly in plastic wrap, then foil.
- Thaw at room temperature before serving.
Make-Ahead Timeline
· Up to 2 days ahead: Bake the cake, cool completely, and store in an airtight container at room temperature.
· Day of serving: For best texture, bring to room temperature if refrigerated.
Frequently Asked Questions (FAQs)
Q: Where did Danish Dream Cake originate?
A: The cake originated in Hjallerup, a village in Jutland, Denmark, in the 1960s. It was created by a woman whose granddaughter, Jytte Andersen, entered it into a baking competition where it won, becoming one of Denmark’s most beloved cakes .
Q: Why is it called “Dream Cake”?
A: The name “Drømmekage” (Dream Cake) reflects its light, airy texture that’s soft and spongy—like biting into a dream .
Q: Can I make this cake without an electric mixer?
A: Yes, though it will take some arm strength! Whisk the eggs and sugar vigorously by hand until pale and thick—this may take 8-10 minutes .
Q: What’s the difference between Danish Dream Cake and Lazy Daisy Cake?
A: They’re very similar! Lazy Daisy Cake is an American vintage recipe with nearly identical topping. Both likely share common origins .
Q: Can I use sweetened shredded coconut?
A: Yes, though unsweetened is more traditional. If using sweetened coconut, you may want to reduce the brown sugar slightly .
Q: Why is my cake dense instead of light and fluffy?
A: This usually happens when the eggs and sugar aren’t beaten enough, or when the batter is overmixed. Beat until pale and thick, and fold in flour gently.
Q: How do I know when the cake is ready for the topping?
A: The cake should spring back when lightly pressed and be set around the edges. It will be slightly underbaked in the center—that’s perfect, as it will continue baking with the topping .
Nutritional Information
Please note that the following is an estimate and will vary based on specific ingredients and portion sizes (based on 10 servings).
Nutrient Amount per Serving
Calories ~350-380
Total Fat 18-20g
Saturated Fat 12-14g
Cholesterol 80-95mg
Sodium 200-250mg
Total Carbohydrates 45-48g
Dietary Fiber 2-3g
Sugars 33-36g
Protein 4-5g
Source: Nutritional estimates from NYT Cooking and Epicurious .
Conclusion
Danish Dream Cake is more than just a dessert—it’s a slice of Nordic culinary history. From its humble beginnings in a Jutland kitchen to its status as one of Denmark’s most beloved cakes, this treat has earned its dreamy name through generations of devoted bakers and happy taste-testers.
What I love most about this cake is its beautiful simplicity. With basic ingredients and straightforward techniques, you can create something that tastes like it came from a Copenhagen bakery. The light, airy sponge and the rich, caramelized coconut topping come together in perfect harmony—a dessert that’s both humble and extraordinary.
I hope this guide has given you everything you need to create authentic Danish Dream Cake in your own kitchen. Remember the key tips: beat those eggs until pale and fluffy, spread the topping while the cake is hot, and don’t be afraid to let it cool completely before slicing (if you can wait).
Now it’s your turn! Gather your ingredients, preheat that oven, and experience the joy of pulling this golden, coconut-topped beauty from the oven. When you do, we’d love to hear about it. Leave a comment below and let us know how your Dream Cake turned out—are you serving it with coffee, ice cream, or just enjoying it straight from the pan?
Velbekomme! (That’s Danish for “Enjoy your meal!”) 🇩🇰✨
And if you’re looking for more Scandinavian-inspired recipes, be sure to check out our guides for Swedish Cinnamon Buns, Norwegian Krumkake, and Finnish Cardamom Bread.
Happy baking!
Did you make this Danish Dream Cake? We’d love to see your creations! Leave a comment below and let us know how it went. Don’t forget to pin this recipe for your next fika!
More Recipes You Might Like
-

Sandwich Crust Garlic Rolls – The Zero-Waste Appetizer You’ll Make Again and Again
Don’t throw away your sandwich crusts! Turn them into crispy, buttery garlic rolls in minutes. This zero-waste recipe is perfect for snacks, soups, or party appetizers. Let’s be honest: how many sandwich crusts have you tossed in the trash over the years? If you have kids (or picky adults) at home, the answer is probably…
-

Hospital Emptying Drink: What Science Really Says About This Healthy Blend
“hospital emptying” drinks promise to cure everything from cancer to high blood pressure. We separate fact from fiction, examine the science behind soursop, hibiscus, and turmeric, and offer a safe, realistic recipe. Let’s be honest: every few months, the internet finds a new “miracle drink.” One week it’s a detox tonic. The next, it’s a…
-

Air Fryer Sliced Potatoes – Crispy, Golden, and Ready in 20 Minutes
These air fryer sliced potatoes are crispy on the outside, tender on the inside, and ready in 20 minutes. Perfect for a quick side dish, breakfast hash, or snack. Only 4 ingredients! Let’s be honest: roasted potatoes are a comfort food classic. But who has time to wait 45 minutes for the oven to do…