
Meta Description: Discover the magic of Chocolate Rice Krispie Balls! This easy no-bake recipe combines crispy cereal with rich chocolate for the perfect bite-sized dessert. Includes 5 delicious variations, pro tips, and FAQs.
Some desserts are more than just food—they’re memories. For many of us, the snap, crackle, and pop of Rice Krispies cereal mixed with gooey marshmallows takes us straight back to childhood. Now, imagine that nostalgic treat transformed into elegant, bite-sized spheres, enrobed in rich, glossy chocolate. Welcome to the wonderful world of Chocolate Rice Krispie Balls!
These delightful treats are the perfect intersection of simplicity and sophistication. They’re crunchy, chocolatey, and irresistibly fun—a no-bake wonder that comes together in minutes yet looks like you spent hours in the kitchen . Whether you’re planning a birthday party, need a last-minute contribution to a potluck, or simply want to satisfy a sweet craving on a Tuesday night, these little spheres of joy are your answer.
What makes Chocolate Rice Krispie Balls so special is their incredible versatility. The basic formula—crispy cereal bound together with a sweet, sticky mixture and coated in chocolate—is a blank canvas waiting for your creative touch. You can keep them classic, dress them up for the holidays, or customize them with your favorite mix-ins .
In this comprehensive guide, we’ll walk you through everything you need to know to make perfect Chocolate Rice Krispie Balls every single time. We’ll cover five delicious variations, share professional tips and tricks, answer all your burning questions, and help you create treats that will have everyone asking for the recipe. Get ready to become the hero of your next gathering!
Why Chocolate Rice Krispie Balls Deserve a Spot in Your Recipe Collection
Before we dive into the kitchen, let’s talk about why this recipe deserves a permanent place in your dessert repertoire.
The Ultimate No-Bake Convenience
In the heat of summer or the chaos of the holiday season, the last thing you want to do is turn on your oven. Chocolate Rice Krispie Balls require zero baking, making them the perfect no-bake dessert for any time of year . With just a saucepan or microwave, you can have these treats ready in under 30 minutes.
Incredibly Versatile
This recipe is a chameleon in the dessert world. With minor tweaks, it transforms into entirely different treats:
· Roll them in sprinkles for a birthday party
· Drizzle with white chocolate for an elegant holiday platter
· Add peanut butter for a rich, nutty variation
· Shape them into pops for a fun, portable snack
Crowd-Pleasing Appeal
Kids love them. Adults love them. Even picky eaters can’t resist the combination of crispy cereal and creamy chocolate. These treats are guaranteed to disappear fast at any gathering.
Budget-Friendly
Made with pantry staples like cereal, marshmallows, and chocolate chips, this recipe is easy on the wallet while delivering maximum deliciousness .
Perfect for Gifting
Packaged in a cute box or cellophane bag tied with a ribbon, Chocolate Rice Krispie Balls make homemade holiday gifts that feel personal and thoughtful. They travel well and stay fresh for days .
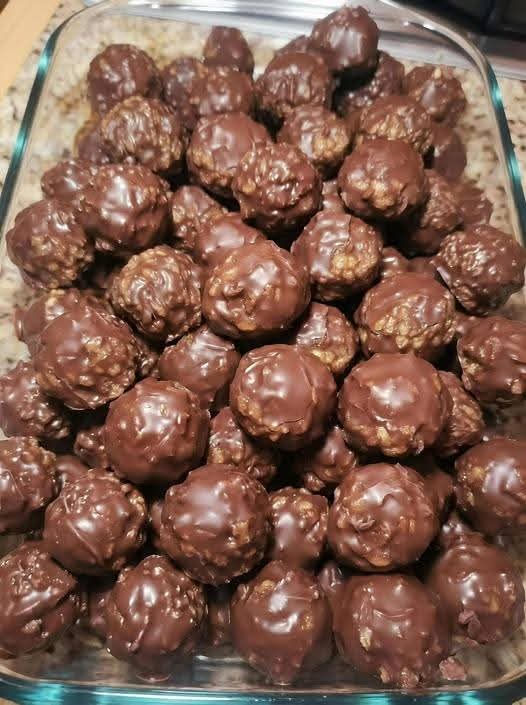
Classic Chocolate Rice Krispie Balls: The Foundation Recipe
Let’s start with the classic version that serves as the foundation for all the variations to come. This recipe produces perfectly round, chocolate-coated balls with a soft, chewy interior and a satisfying crunch .
Ingredients for Classic Version
For the Rice Krispie Balls:
· 6 cups (150 g) crispy rice cereal (such as Rice Krispies)
· 1 (10 oz / 280 g) bag mini marshmallows (about 8 cups)
· 3 tablespoons (42 g) unsalted butter
· 1 teaspoon vanilla extract
· Pinch of salt (to balance sweetness)
For the Chocolate Coating:
· 1 ½ cups (270 g) semi-sweet chocolate chips
· 1 tablespoon coconut oil or vegetable shortening (optional, for smoother coating)
Optional Toppings:
· Sprinkles
· Shredded coconut
· Crushed nuts
· Sea salt flakes
Step-by-Step Instructions
Part 1: Make the Rice Krispie Base
Prepare Your Workspace: Line a large baking sheet with parchment paper or a silicone mat. Set aside.
Melt the Butter: In a large saucepan, melt the butter over low heat. Stir continuously to prevent burning .
Add Marshmallows: Add the mini marshmallows to the melted butter. Stir constantly until the marshmallows are completely melted and the mixture is smooth. This should take about 3-4 minutes .
Add Flavorings: Remove the pan from heat and stir in the vanilla extract and a pinch of salt.
Combine with Cereal: Pour the Rice Krispies cereal into the pot. Gently fold the mixture with a spatula until all the cereal is evenly coated with the marshmallow mixture. Be careful not to crush the cereal—gentle folding preserves that satisfying crunch .
Cool Slightly: Allow the mixture to cool for 5-10 minutes until it’s comfortable to handle but still pliable. If it cools too much, it will become difficult to shape .
Part 2: Shape the Balls
Prep Your Hands: This is the most important tip! Lightly grease your hands with butter, cooking spray, or keep a small bowl of cold water nearby to dip your fingers. This prevents the sticky mixture from adhering to your skin .
Form the Balls: Scoop about 1-2 tablespoons of the mixture (or use a cookie scoop for uniformity) and roll it firmly between your palms to form a smooth ball. The size is up to you—bite-sized for snacking or larger for dessert portions .
Set Aside: Place each formed ball on the prepared parchment-lined baking sheet. Repeat until all the mixture is used.
Chill: Refrigerate the balls for at least 30 minutes, or up to 1 hour. This step is crucial—chilled balls are much easier to dip in chocolate without falling apart .
Part 3: Dip in Chocolate
Melt the Chocolate: In a microwave-safe bowl, combine the chocolate chips and coconut oil (if using). Microwave in 30-second intervals, stirring vigorously after each interval, until the chocolate is completely smooth and glossy . Alternatively, use a double boiler on the stovetop for more controlled melting .
Dip the Balls: Remove the chilled balls from the refrigerator. Using a fork or dipping tool, place one ball at a time into the melted chocolate. Roll it around to coat completely .
Remove Excess: Lift the ball with the fork and gently tap it against the side of the bowl to allow excess chocolate to drip off .
Return to Tray: Carefully place the chocolate-coated ball back onto the parchment-lined sheet.
Add Toppings (Optional): If you’re using sprinkles, nuts, or other decorations, sprinkle them on immediately while the chocolate is still wet .
Set the Chocolate: Refrigerate the dipped balls for 15-30 minutes, or until the chocolate is completely firm and set .
Serve and Enjoy: Once set, transfer to a serving platter or store in an airtight container.
Pro Tips for Perfect Chocolate Rice Krispie Balls
Work Quickly but Gently: The marshmallow mixture sets fast. Have everything prepped and ready before you start .
Keep Hands Greased: Rewet or re-grease your hands every few balls to prevent sticking .
Chill Before Dipping: Never skip the chilling step before dipping. Warm or room-temperature balls will melt into your chocolate and create a mess .
Use Quality Chocolate: Good chocolate makes a noticeable difference. Choose high-quality chocolate chips or melting wafers for the best flavor and texture .
Coconut Oil is Your Friend: Adding a teaspoon of coconut oil to your chocolate creates a thinner, smoother coating that sets with a beautiful shine .
Don’t Overmix: When combining cereal with marshmallow, fold gently. Overmixing crushes the cereal and results in dense, less-crunchy treats .
Room Temperature Setting: For the glossiest finish, allow chocolate to set at room temperature if possible. Refrigeration can sometimes cause bloom (white streaks), though it’s still perfectly delicious .
5 Delicious Variations to Try
One of the best things about this recipe is how easily it adapts to different tastes and occasions. Here are five popular variations to keep your Chocolate Rice Krispie Balls exciting .
- Peanut Butter Chocolate Rice Krispie Balls
This variation adds a rich, nutty depth that peanut butter lovers will adore .
Modifications:
· Add ¼ cup creamy peanut butter to the marshmallow mixture after it melts, stirring until fully incorporated .
· For extra indulgence, use milk chocolate for coating instead of semi-sweet.
· The result tastes like a mashup of Rice Krispie treats and peanut butter cups .
- Festive Holiday Chocolate Rice Krispie Balls
Perfect for Christmas, these colorful treats bring holiday cheer to any gathering .
Modifications:
· After dipping in chocolate, immediately roll the balls in red and green sprinkles .
· For an elegant touch, melt white chocolate chips and drizzle over the finished chocolate-coated balls .
· Add a drop of peppermint extract to the marshmallow mixture for a minty holiday twist .
· Roll some balls in crushed candy canes for a festive crunch .
- Muddy Snowballs
This clever variation combines the flavors of muddy buddies (puppy chow) with Rice Krispie treats .
Modifications:
· After coating the balls in the chocolate-peanut butter mixture, roll them immediately in powdered sugar .
· The powdered sugar creates a snowy, beautiful exterior that contrasts perfectly with the rich interior.
· These are especially popular during winter holidays.
- White Chocolate Rice Krispie Pops
Turn your treats into fun, portable pops—perfect for parties and gift-giving .
Modifications:
· After forming the balls but before dipping, insert a cake pop stick into each ball .
· Dip in white chocolate instead of dark or milk chocolate .
· Decorate with colorful sprinkles while the white chocolate is still wet.
· These are ideal for Valentine’s Day, birthdays, or as after-school snacks .
- No-Marshmallow Chocolate Rice Krispie Balls
For those who prefer a different binding method, this version uses a chocolate-honey mixture instead of marshmallows .
Modifications:
· In a microwave-safe bowl, melt 1 cup semi-sweet chocolate chips with ½ cup peanut butter (optional) in 30-second intervals .
· Stir in ¼ cup honey or corn syrup, 1 teaspoon vanilla extract, and a pinch of salt .
· Pour over 4 cups Rice Krispies cereal and stir until coated.
· Form into balls and refrigerate until firm .
Serving Suggestions
Chocolate Rice Krispie Balls are wonderfully versatile when it comes to serving. Here are some creative ideas :
For Parties and Gatherings
· Arrange them on a tiered dessert platter for an impressive display
· Place them in mini cupcake liners for easy grabbing
· Create a dessert charcuterie board with these balls alongside cookies, brownies, and fresh fruit
· For basketball-themed parties, tint the cereal mixture orange and pipe chocolate lines to look like basketballs
As Gifts
· Package in clear cellophane bags tied with festive ribbon
· Place in decorative tins or boxes lined with parchment paper
· Include a handwritten recipe card for a personal touch
· These make excellent homemade Christmas gifts for neighbors, teachers, and coworkers
Everyday Snacking
· Pack individually in snack bags for lunchboxes
· Keep a container in the fridge for after-school treats
· Serve alongside a glass of cold milk or a warm mug of hot chocolate
· Pair with coffee for an afternoon pick-me-up
Frequently Asked Questions (FAQs)
Q: Can I make Chocolate Rice Krispie Balls ahead of time?
A: Absolutely! These treats are perfect for making ahead. Store them in an airtight container at room temperature for up to 3 days, or in the refrigerator for up to a week .
Q: Can I freeze them?
A: Yes, they freeze beautifully! Place them in a single layer in an airtight container or freezer bag, separating layers with parchment paper. Freeze for up to 2-3 months. Thaw at room temperature before serving .
Q: How do I prevent the mixture from sticking to my hands?
A: This is the most common challenge! Lightly grease your hands with butter, cooking spray, or keep a bowl of cold water nearby to dip your fingers. Reapply every few balls .
Q: Are these gluten-free?
A: They can be! Regular Rice Krispies contain malt flavoring which comes from barley and contains gluten. However, many brands offer gluten-free crispy rice cereal. Also ensure your chocolate and any add-ins are certified gluten-free .
Q: Why did my chocolate coating turn out streaky or white?
A: That white streaking is called “bloom” and happens when chocolate is refrigerated too quickly or experiences temperature changes. It’s completely safe to eat and doesn’t affect flavor. For the glossiest finish, let chocolate set at room temperature .
Q: Can I use different types of chocolate?
A: Yes! Semi-sweet, milk chocolate, dark chocolate, and white chocolate all work beautifully. You can even mix and match for variety .
Q: My balls fell apart when dipping. What went wrong?
A: This usually happens for two reasons: the balls weren’t chilled long enough before dipping, or they weren’t pressed firmly enough when shaped. Make sure to chill for at least 30 minutes and compress the mixture well when rolling .
Q: Can I add mix-ins to the balls?
A: Definitely! Mini chocolate chips, crushed cookies, chopped nuts, or dried fruit can be folded in with the cereal for extra texture and flavor .
Nutritional Information
Please note that these are estimates and will vary based on specific ingredients, portion sizes, and variations.
Classic Version (per ball, based on 24 servings)
Nutrient Amount
Calories 120-140
Total Fat 6-8g
Saturated Fat 3-4g
Carbohydrates 16-18g
Fiber 1g
Sugar 10-12g
Protein 2g
Sodium 80-100mg
Peanut Butter Variation (per ball)
Nutrient Amount
Calories 140-160
Total Fat 8-10g
Protein 3-4g
White Chocolate Variation (per ball)
Nutrient Amount
Calories 130-150
Total Fat 7-9g
Sugar 12-14g
Nutritional information compiled from multiple recipe sources .
Troubleshooting Common Issues
Even experienced bakers sometimes encounter challenges. Here’s how to solve the most common problems:
The Mixture Is Too Sticky to Shape
Solution: Let it cool for another 5-10 minutes. The mixture becomes easier to handle as it cools. You can also refrigerate it for 15-20 minutes before shaping .
The Balls Are Too Hard
Solution: This usually means the marshmallow mixture was overheated or you used too many marshmallows. Next time, melt gently over low heat and measure carefully. For this batch, serve at room temperature—they’ll soften slightly .
The Chocolate Coating Is Too Thick
Solution: Add a teaspoon of coconut oil or shortening to thin it out. This creates a smoother, more professional coating .
The Balls Are Crumbling
Solution: The mixture wasn’t pressed firmly enough when shaped. Next time, compress the balls more tightly. For this batch, you can drizzle the crumbled pieces over ice cream for a delicious sundae!
Storage and Make-Ahead Tips
Room Temperature Storage
Store in an airtight container at room temperature for up to 3 days. Layer between sheets of parchment paper to prevent sticking .
Refrigerator Storage
For longer storage, keep in an airtight container in the refrigerator for up to 1 week. Bring to room temperature before serving for the best texture .
Freezer Storage
· Arrange balls in a single layer on a baking sheet and freeze until solid (about 1 hour)
· Transfer to a freezer-safe bag or container, separating layers with parchment
· Freeze for up to 3 months
· Thaw in the refrigerator overnight or at room temperature for 1-2 hours
Make-Ahead Timeline
· 2-3 days ahead: Make and dip the balls, store in refrigerator
· 1 week ahead: Make undipped balls and freeze; dip the day before serving
· 1 month ahead: Make and freeze completely; thaw and serve
Conclusion
Chocolate Rice Krispie Balls are proof that the simplest recipes often bring the greatest joy. With their satisfying crunch, rich chocolate coating, and endless possibilities for customization, these no-bake treats have earned their place as a beloved classic. Whether you’re making the classic version, trying the peanut butter variation, or dressing them up for the holidays, you’re creating more than just dessert—you’re creating moments of happiness to share with the people you love.
We hope this comprehensive guide has given you everything you need to make perfect Chocolate Rice Krispie Balls with confidence. Remember the key tips: work with slightly cooled mixture, keep your hands greased, chill before dipping, and don’t be afraid to get creative with variations.
Now it’s your turn! Gather your ingredients, put on some music, and enjoy the process of rolling and dipping these delightful treats. When you’re done, we’d love to hear how they turned out. Leave a comment below sharing your experience, tag us in your photos on social media, or tell us about your favorite variation.
And if you’re hungry for more easy no-bake desserts, be sure to check out our recipes for No-Bake Peanut Butter Bars, Chocolate Haystack Cookies, and Easy Marshmallow Treats.
Happy (no-bake) cooking!
Did you make this recipe? We’d love to hear about it! Leave a comment below and let us know which variation you tried and how it turned out. Don’t forget to share this post with friends who love easy, delicious desserts!
More Recipes You Might Like
-
Zero Carb Eggs And Yogurt Flatbread: The 2-Ingredient Miracle
Discover the zero carb, flourless flatbread made with just eggs and yogurt! High protein, gluten-free, and perfect for keto. Easy, quick, and you can eat as much as you like! Let me introduce you to the simplest flatbread you’ll ever make—and one that fits perfectly into a low‑carb, keto, or gluten‑free lifestyle. No flour, no…
-
Roasted Bacon Garlic Butter Cabbage Steaks: The Low-Carb Side Dish That Steals the Show
Discover the ultimate roasted cabbage steaks topped with crispy bacon and garlic butter! This low-carb, keto-friendly side dish is packed with flavor, easy to make, and absolutely irresistible. Let me introduce you to the cabbage dish that turned a humble vegetable into the star of our dinner table. I’ve always loved cabbage, but let’s be…
-
Mexican Chicken Pinwheels: My Nana’s Beloved Recipe (Worth Every Bite!)
Discover the legendary Mexican chicken pinwheels my Nana made every year! Creamy, zesty, and impossible to resist, this homemade appetizer is the ultimate crowd-pleaser. Easy to make and impossible to find in stores! Let me introduce you to the recipe that has been a cherished tradition in my family for decades—and now I’m passing it…