
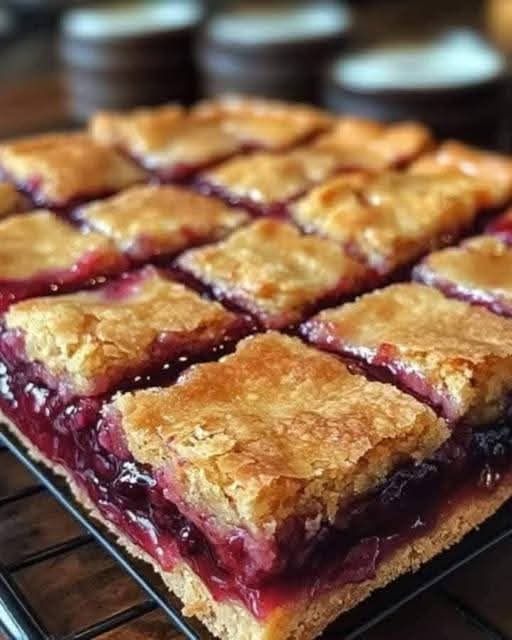
There are some desserts that just feel like happiness. Cherry bars are one of them. With their buttery, golden crust, sweet-tart cherry filling, and that irresistible crumb topping, they’re the kind of treat that disappears from bake sales in minutes and gets requested for every family gathering.
I still remember the first time I tasted cherry bars. It was at a church potluck when I was a kid, and an older woman named Margaret had brought a pan of these golden beauties. I took a small square, not expecting much, and then I took another, and another. The combination of buttery shortbread and bright, fruity cherries was absolutely magical.
Years later, I asked my mom if she knew Margaret, and if she might share the recipe. She did, and I’ve been making these bars ever since. They’ve become my go-to for summer picnics, holiday cookie trays, and those times when only something fruity and buttery will do.
Today, I’m sharing my version of those beloved cherry bars. This recipe has been tweaked and perfected over the years, and I’m confident it will become a favorite in your kitchen too.
Why You’ll Love These Cherry Bars
Perfect balance of flavors. The buttery, slightly salty shortbread crust and topping perfectly complement the sweet-tart cherry filling.
Incredible texture. A tender, melt-in-your-mouth base, a juicy fruit layer, and a crumbly, golden topping.
Versatile. Use fresh cherries when they’re in season, or canned pie filling for year-round convenience.
Crowd-pleasing. I’ve never made these for anyone who didn’t love them. They’re always the first to disappear.
Easy to make. No complicated techniques, no fancy equipment. Just simple, honest baking.
Perfect for any occasion. Summer picnics, holiday cookie trays, potlucks, or just because.
Make-ahead friendly. They actually get better the next day.
Freezer-friendly. Make a double batch and stash some for later.
Better than bakery. Homemade always wins.
The Complete Ingredient Breakdown
For the Shortbread Crust and Topping:
2½ cups all-purpose flour
All-purpose flour gives the perfect structure—tender but sturdy enough to hold the juicy filling.
1 cup granulated sugar
Adds sweetness and helps create that tender, shortbread texture.
1 teaspoon baking powder
Provides just enough lift to keep the crust from being too dense.
½ teaspoon salt
Essential for balancing sweetness and enhancing all the flavors.
1 cup (2 sticks) cold unsalted butter, cut into small pieces
Cold butter is crucial for that tender, crumbly shortbread texture. Keep it in the refrigerator until the last minute.
1 large egg, lightly beaten
Adds richness and helps bind the crust.
1 teaspoon vanilla extract
Enhances all the flavors and adds warmth.
For the Cherry Filling:
3 cups fresh or frozen cherries, pitted OR 2 cans (21 ounces each) cherry pie filling
Fresh cherries are wonderful when they’re in season. Frozen cherries work beautifully too—just thaw and drain them well. Canned pie filling is the convenient option that delivers consistent results year-round.
If using fresh or frozen cherries:
· ¾ cup granulated sugar (adjust based on sweetness of cherries)
· 3 tablespoons cornstarch
· 1 tablespoon lemon juice
· ½ teaspoon almond extract (optional, but amazing with cherries)
If using canned pie filling: Use it as-is, though you might want to add a squeeze of lemon juice to brighten the flavor.
For the Glaze (Optional but Recommended):
1 cup powdered sugar
2-3 tablespoons milk or cream
½ teaspoon vanilla or almond extract
Step-by-Step Instructions
Step 1: Preheat and Prep
Preheat your oven to 350°F (175°C). Grease a 9×13-inch baking pan or line with parchment paper for easy removal.
Step 2: Make the Shortbread Mixture
In a large bowl, whisk together the flour, sugar, baking powder, and salt.
Add the cold butter pieces. Using a pastry blender or your fingertips, cut the butter into the flour mixture until it resembles coarse crumbs with some pea-sized butter pieces remaining.
Add the beaten egg and vanilla extract. Stir with a fork until the mixture comes together and forms a crumbly dough. It should hold together when pressed but still be quite crumbly.
Step 3: Press the Crust
Reserve about 1½ cups of the crumb mixture for the topping.
Press the remaining mixture firmly and evenly into the bottom of your prepared pan. Press down firmly—this creates a solid base that will hold the filling.
Step 4: Prepare the Cherry Filling
If using fresh or frozen cherries:
In a medium saucepan, combine the cherries, sugar, cornstarch, and lemon juice. Cook over medium heat, stirring constantly, until the mixture thickens and comes to a boil. Boil for 1 minute, then remove from heat and stir in the almond extract if using. Let cool slightly.
If using canned pie filling: Simply stir in a squeeze of lemon juice to brighten the flavor.
Step 5: Add the Filling
Spread the cherry filling evenly over the pressed crust.
Step 6: Add the Topping
Sprinkle the reserved crumb mixture evenly over the cherry filling. Don’t press it down—leave it crumbly for that beautiful, textured top.
Step 7: Bake
Bake at 350°F for 35-40 minutes, until the topping is golden brown and the filling is bubbly around the edges.
Step 8: Cool Completely
Let the bars cool completely in the pan on a wire rack. This is crucial—the filling needs time to set. Cutting too soon will result in a runny mess.
Step 9: Make the Glaze
In a small bowl, whisk together the powdered sugar, milk, and extract until smooth. The glaze should be thick but pourable.
Drizzle the glaze over the cooled bars.
Step 10: Cut and Serve
Once the glaze has set, cut into bars. Use a sharp knife and wipe it clean between cuts for neat edges.
Serve and watch them disappear.
Fresh Cherries vs. Canned Pie Filling
Both options work beautifully, and which you choose depends on the season and your preference.
Fresh Cherries:
· Best when cherries are in season (June-July)
· Requires pitting and cooking
· More control over sweetness and thickness
· Brighter, more authentic cherry flavor
· Takes more time and effort
Canned Pie Filling:
· Available year-round
· Ready to use—no prep needed
· Consistent results every time
· Often sweeter and thicker
· Quick and convenient
My recommendation: Use fresh cherries when they’re in season and you have time to pit them. Use canned pie filling for quick, easy, reliable results any time of year.
The Science Behind Perfect Cherry Bars
Cold butter is essential: Cold butter creates steam pockets as it melts in the oven, resulting in a tender, flaky shortbread. If the butter is too warm, it will incorporate into the flour and create a dense, tough crust.
Don’t overwork the dough: Mix just until combined. Overworking develops gluten, which can make the crust tough instead of tender.
Press the crust firmly: A firmly pressed crust holds together better and creates a solid base for the juicy filling.
Cool completely: The filling needs time to set. Cutting into warm bars will result in a delicious but messy puddle. Patience is rewarded.
Cornstarch is the thickener: Cornstarch creates a clear, glossy filling that holds its shape beautifully when cool.
Troubleshooting Common Issues
My Crust Is Too Crumbly
The dough may have been too dry. Next time, add an extra tablespoon of butter or a splash of milk. Also, make sure you’re pressing the crust firmly into the pan.
My Filling Is Runny
Not enough thickener, or the bars were cut too soon. Next time, make sure your cornstarch mixture comes to a full boil to activate. And give the bars plenty of time to cool and set.
The Topping Burned Before the Bars Were Done
Your oven runs hot. Tent loosely with foil for the last 10-15 minutes of baking.
My Crust Is Tough
Overmixed. Next time, mix just until combined and handle the dough as little as possible.
The Bars Stuck to the Pan
Line your pan with parchment paper, leaving overhang for easy removal. This is the best insurance against sticking.
My Fresh Cherry Filling Is Too Tart
Add more sugar next time, or mix in some sweeter cherries. You can also add a tablespoon of honey or maple syrup.
Delicious Variations
Once you’ve mastered the classic, try these variations.
Cherry Almond Bars
Add ½ teaspoon almond extract to the crust and sprinkle sliced almonds over the topping before baking. Almond and cherry are a match made in heaven.
Chocolate Cherry Bars
Add ½ cup mini chocolate chips to the topping mixture. Drizzle with chocolate glaze instead of vanilla.
Cherry Coconut Bars
Add ½ cup shredded coconut to the topping mixture. Toast extra coconut and sprinkle over the glaze.
Sour Cherry Bars
Use tart cherries (like Montmorency) and increase the sugar slightly. The tangy-sweet combination is incredible.
Mixed Berry Bars
Replace half the cherries with raspberries, blueberries, or blackberries. A beautiful and delicious mix.
Cherry Cream Cheese Bars
Spread a layer of sweetened cream cheese (8 oz cream cheese mixed with ¼ cup sugar and 1 egg) over the crust before adding the cherry filling. It’s like cherry cheesecake bars.
Gluten-Free Cherry Bars
Use a 1-to-1 gluten-free baking blend in place of the all-purpose flour. Add ½ teaspoon xanthan gum if your blend doesn’t include it.
Vegan Cherry Bars
Use vegan butter and a flax egg (1 tablespoon ground flaxseed mixed with 3 tablespoons water) in the crust. Ensure your glaze uses plant-based milk.
What to Serve With Cherry Bars
Vanilla ice cream: A warm cherry bar with a scoop of vanilla ice cream is heaven.
Whipped cream: Lightly sweetened whipped cream is lovely.
Coffee or espresso: The bitterness of coffee balances the sweetness perfectly.
Tea: A cup of hot tea is the perfect accompaniment.
Fresh berries: Serve alongside for extra fruity goodness.
On their own: These bars need nothing—they’re perfect solo.
Storage and Make-Ahead Tips
Room temperature: Store in an airtight container at room temperature for up to 4 days.
Refrigerator: Store in the refrigerator for up to a week. Bring to room temperature before serving.
Freezer: These bars freeze beautifully. Cool completely, wrap tightly in plastic wrap and foil, and freeze for up to 3 months. Thaw at room temperature.
Make-ahead for parties: Bake a day ahead and store at room temperature. Add the glaze just before serving for the freshest appearance.
Transporting: Keep in the baking dish, covered, for easy transport. Cut into bars at your destination.
The History of Fruit Bars
Fruit bars have been a part of American baking for generations. They’re the descendants of British fruit pastries and German streusel cakes, adapted to American ingredients and tastes. The combination of a buttery shortbread base, a generous layer of fruit filling, and a crumbly topping is found in countless variations across the country.
Cherry bars became especially popular in the mid-20th century, when canned pie filling made them accessible year-round. They were the perfect potluck dessert—easy to transport, easy to serve, and universally loved.
Today, they remain a beloved classic, a testament to the enduring appeal of simple, honest baking.
Why This Recipe Deserves a Place in Your Baking Rotation
These Cherry Bars represent everything I want in a dessert. They’re simple enough for a beginner to master but impressive enough for any occasion. They use straightforward ingredients but create something special. They’re perfect for sharing. And they’re genuinely, consistently, undeniably delicious.
I’ve made these bars for summer picnics where they sat alongside elaborate desserts and still disappeared first. I’ve made them for holiday cookie trays where they added a pop of color and fruity flavor. I’ve made them for no reason at all except that I had a craving for something sweet and cherry.
Every single time, they deliver. Every single time, people ask for the recipe. Every single time, I’m reminded why this simple dessert is such a winner.
The combination of buttery shortbread, sweet-tart cherries, and that crumbly, golden topping is simply irresistible. It’s comfort food at its finest.
This recipe has become a staple in my baking rotation for good reason. It’s reliable, versatile, and always welcome at the table.
And now it can be that for you too.
So preheat that oven. Get that butter cold. Open that can of cherries (or pit those fresh ones). And get ready to make the most delicious cherry bars of your life.
Your family and friends will thank you.
Have you made these Cherry Bars? What variations did you try? I’d love to hear about your experience in the comments below!
More Recipes You Might Like
-
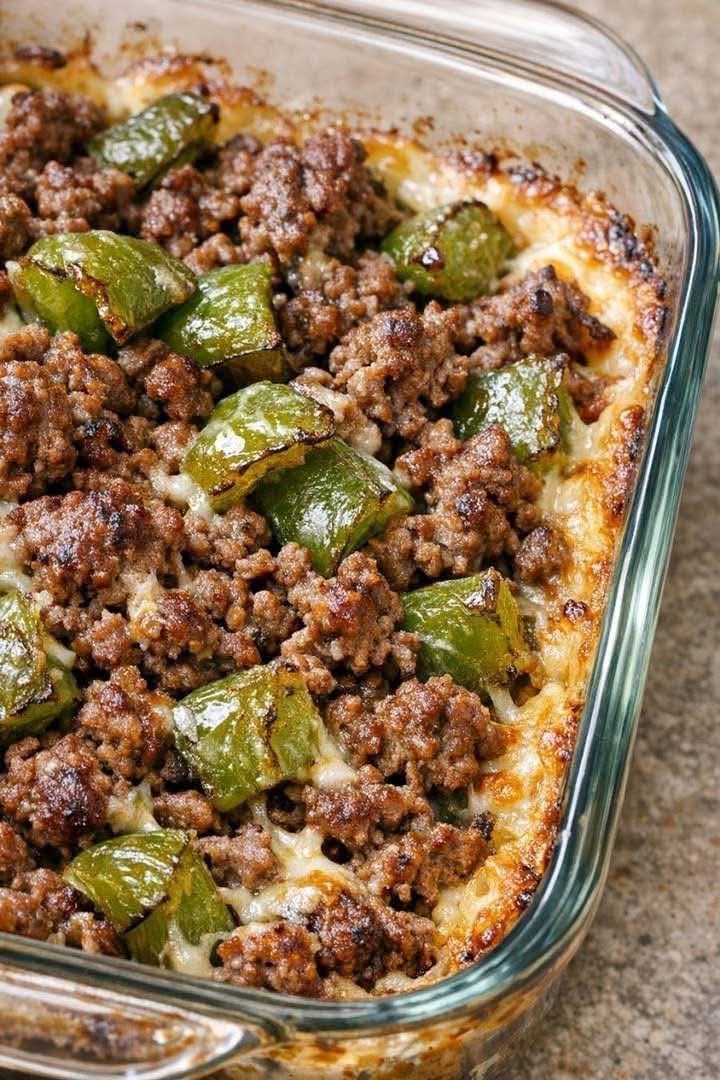
Oven Baked 4 Ingredient Amish Beef and Bell Pepper Bake – The Hearty, No-Fuss Dinner You’ll Make on Repeat
This Amish beef and bell pepper bake uses just 4 ingredients – ground beef, bell peppers, cream of mushroom soup, and onion soup mix. A simple, hearty, oven-baked casserole that tastes like home. Let’s be honest: the best recipes are often the simplest. No fancy techniques, no long ingredient lists, no hours of prep. Just…
-
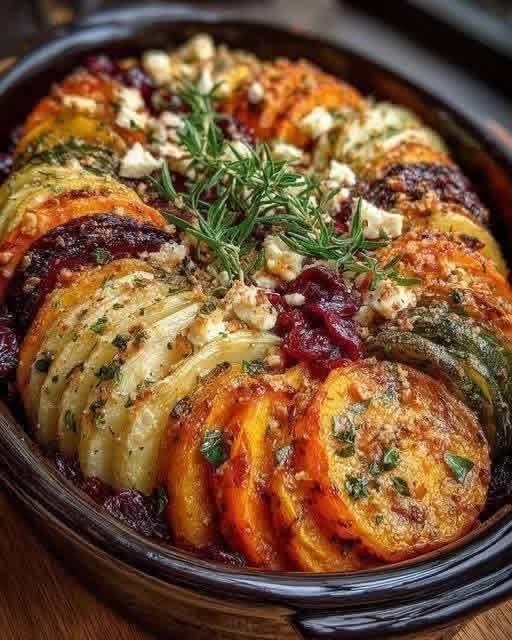
Layered Sweet Potato Gratin – Creamy, Cheesy, and Absolutely Irresistible
This layered sweet potato gratin is a show‑stopping side dish. Thinly sliced sweet potatoes baked in a creamy garlic sauce with Parmesan and thyme. Perfect for holidays, weeknights, or anytime you crave comfort food. Let’s be honest: sweet potatoes are already amazing. They’re naturally sweet, creamy, and packed with vitamins. But when you layer them…
-
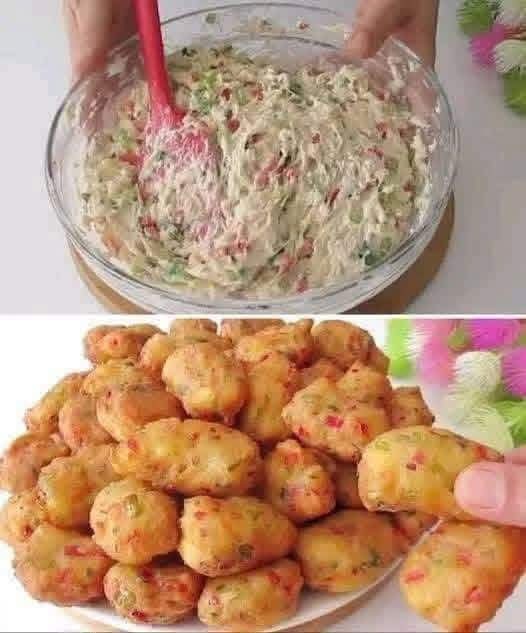
Vegetable Cheese Fritters – Crispy, Cheesy, and Irresistible (Ready in 20 Minutes)
These vegetable cheese fritters are crispy on the outside, tender on the inside, and packed with veggies and melty cheese. A perfect snack, side dish, or light meal – ready in 20 minutes. Let’s be honest: getting kids (and adults) to eat vegetables can feel like a battle. But what if you could hide a…