
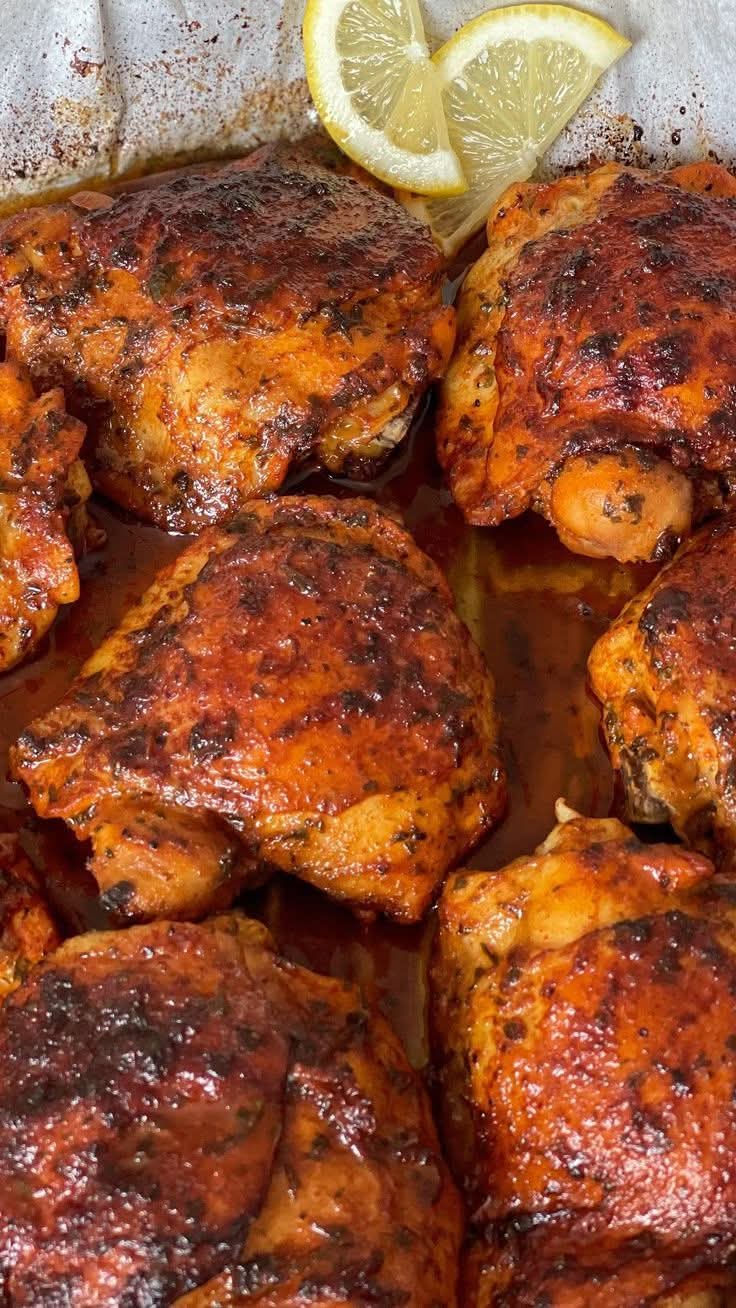
Learn how to bake chicken thighs that are crispy on the outside, juicy on the inside. Easy oven method, simple seasonings, and pro tips for perfect results every time. Low‑carb, keto, and family‑friendly.
Let’s be honest: chicken breasts get all the glory. They’re the “healthy” choice, the lean protein, the default for every diet. But they’re also dry, bland, and unforgiving. Overcook them by 30 seconds, and you’re eating sawdust.
Chicken thighs are the unsung hero of the poultry world. They’re juicier, more flavorful, cheaper, and almost impossible to dry out. And when you bake them correctly – skin on, bone in, seasoned simply – they transform into a crispy, golden, succulent masterpiece that rivals any restaurant dish.
This is the only baked chicken thigh recipe you’ll ever need. It works every single time. No complicated brines, no buttermilk baths, no flipping halfway through. Just a few basic ingredients, one baking sheet, and an oven. The result? Skin that shatters like glass, meat that drips with juice, and a flavor that’s pure comfort.
In this guide, I’ll walk you through the exact method, explain why chicken thighs are superior, share pro tips for maximum crispiness, and answer all your questions about bone‑in vs. boneless, marinades, storage, and variations. Plus, we’ll look at the surprising nutritional benefits of dark meat chicken.
Let’s get baking.
Why Chicken Thighs Are Better Than Breasts (For Most Things)
Before we dive into the recipe, let’s talk about why you should be cooking with chicken thighs more often.
- More Flavor, More Fat
Chicken thighs have a higher fat content than breasts (about 8–10g per thigh vs. 3g per breast). Fat carries flavor. That’s why thighs taste richer, more savory, and more satisfying.
- Virtually Impossible to Overcook
Breasts go from perfect to dry in about 60 seconds. Thighs, on the other hand, can be cooked to an internal temperature of 175°F or even 185°F and still be juicy. The connective tissue breaks down into gelatin, keeping the meat moist.
- Budget‑Friendly
Boneless, skinless chicken breasts often cost $4–6 per pound. Bone‑in, skin‑on chicken thighs? $1.50–2.50 per pound. You get more flavor for half the price.
- Perfect for Meal Prep
Thighs reheat beautifully. The fat keeps them moist even after days in the fridge. Breasts, reheated, are often dry and chalky.
- Keto, Low‑Carb, Paleo, Whole30 Friendly
High protein, moderate fat, zero carbs – thighs fit almost every diet.
Key Ingredients – Simple, But Choose Wisely
You only need a handful of ingredients for perfect baked chicken thighs.
Chicken Thighs (Bone‑In, Skin‑On)
Role: The star.
Why bone‑in, skin‑on: The bone insulates the meat and adds flavor. The skin, when properly dried and cooked, becomes incredibly crispy. Boneless, skinless thighs work too, but you won’t get the same crunchy exterior.
How many: 4–6 thighs (about 1.5–2 lbs) feeds 2–4 people.
Olive Oil or Avocado Oil
Role: Helps the skin crisp and carries seasoning.
Why not butter: Butter burns at high heat. Use an oil with a high smoke point (olive oil is fine at 400°F; avocado oil is even better).
Seasonings (Salt, Pepper, Garlic Powder, Paprika)
Role: The flavor foundation.
· Salt: Essential for crispy skin. Use kosher salt – it adheres better than table salt.
· Black pepper: Freshly ground.
· Garlic powder: Not fresh garlic (burns). Powder gives savory depth.
· Paprika: Adds color and a subtle smokiness. Smoked paprika is even better.
Optional additions: Onion powder, dried thyme, dried rosemary, cayenne pepper, lemon zest.
The Recipe – Perfect Baked Chicken Thighs
Prep time: 5 minutes (plus optional dry‑brining)
Cook time: 35–45 minutes
Total time: 40–50 minutes
Yield: 4 servings
Ingredients
Ingredient Amount Notes
Bone‑in, skin‑on chicken thighs 4–6 (1.5–2 lbs) Pat very dry
Olive oil or avocado oil 1 tbsp
Kosher salt 1 tsp (or to taste)
Black pepper ½ tsp
Garlic powder 1 tsp
Paprika (sweet or smoked) 1 tsp
Optional: onion powder ½ tsp
Optional: dried thyme ½ tsp
Equipment
· Rimmed baking sheet
· Wire rack (optional but recommended for extra crispiness)
· Parchment paper or aluminum foil (for easy cleanup)
· Paper towels
· Instant‑read thermometer
Step‑by‑Step Instructions
Step 1: Preheat and Position Rack
Preheat your oven to 400°F (200°C). Position the oven rack in the middle (not too high, not too low). If you have a convection setting, use it – convection helps the skin crisp evenly.
Step 2: Dry the Chicken (Crucial!)
Remove the chicken thighs from their packaging. Pat every surface completely dry with paper towels. This is the single most important step for crispy skin. Any moisture will steam the skin instead of crisping it.
Pro tip: For extra crispy skin, leave the thighs uncovered in the refrigerator for 4–24 hours. This dry‑brining process dries out the skin even more.
Step 3: Season Generously
In a small bowl, mix the salt, pepper, garlic powder, paprika, and any optional seasonings.
Place the chicken thighs on a rimmed baking sheet (lined with parchment or foil for easy cleanup). If using a wire rack, place the rack on the baking sheet – this allows air to circulate under the chicken, crisping the bottom too.
Drizzle the oil over the chicken. Use your hands to rub it all over, ensuring every surface is coated. Then sprinkle the seasoning mixture evenly over all sides of the thighs. Rub it in gently.
Don’t skimp on salt. Chicken thighs can take a surprising amount of salt, especially if you’re not using a brine.
Step 4: Arrange with Space
Place the thighs skin‑side up on the baking sheet or rack. Make sure they’re not touching – leave at least ½ inch of space between each thigh. Crowding creates steam, which prevents crisping.
Step 5: Bake
Bake for 35–45 minutes, depending on the size of your thighs. Do not flip them. Flipping disturbs the skin and prevents it from getting shatter‑crisp.
Check for doneness: The chicken is done when the internal temperature reaches 175°F (80°C) in the thickest part of the thigh (not touching the bone). Why 175°F and not 165°F? Dark meat needs higher temperatures to break down collagen and become tender. At 165°F, thighs can still be chewy. At 175–185°F, they’re fall‑apart juicy.
Visual cues: The skin should be deep golden brown and crispy. The juices should run clear, not pink.
Step 6: Rest (Briefly)
Remove the baking sheet from the oven. Transfer the chicken thighs to a plate or cutting board. Let them rest for 5 minutes before serving. This allows the juices to redistribute. (Unlike breasts, thighs don’t need a long rest – they’re forgiving.)
Step 7: Serve
Serve hot. The skin will be at its crispiest right out of the oven. If you wait too long, steam will soften it slightly.
What to serve with them:
· Roasted vegetables (broccoli, Brussels sprouts, asparagus)
· Mashed potatoes or cauliflower mash
· Rice or quinoa
· A simple green salad
Pro Tips for the Crispiest Skin Ever
- Pat Dry. Then Pat Dry Again.
Moisture is the enemy of crispiness. Use multiple paper towels. If the towels become saturated, grab fresh ones.
- Dry‑Brine in the Fridge (Game Changer)
Salt the thighs and leave them uncovered on a wire rack in the refrigerator for 4–24 hours. The salt penetrates the meat, and the cold, dry air dehydrates the skin. This produces skin that’s crackling‑crisp, like fried chicken without the oil.
- Use a Wire Rack
Elevating the chicken allows hot air to circulate underneath, crisping the bottom skin too. If you don’t have a rack, flip the thighs halfway through – but only if you must. Flipping can tear the skin.
- Don’t Crowd the Pan
Steam is the enemy. If you’re cooking more than 6 thighs, use two baking sheets or cook in batches.
- High Heat Is Your Friend
400°F is the sweet spot. Too low (350°F) and the skin won’t crisp. Too high (450°F+) and the skin may burn before the meat is cooked through.
- Convection Bake If You Have It
Convection fans circulate hot air, drying the skin faster and more evenly. Reduce the temperature by 25°F if using convection.
- Broil for Extra Crisp (But Watch Closely)
If your skin isn’t as crispy as you’d like after baking, switch the oven to broil (high) for 1–2 minutes. Watch constantly – it can go from golden to burnt in 30 seconds.
Delicious Variations – Keep It Fresh
Once you’ve mastered the basic recipe, try these flavor twists.
Lemon Herb
Add 1 tablespoon fresh lemon juice + 1 teaspoon lemon zest + 1 tablespoon fresh thyme or rosemary to the oil before rubbing on the chicken. Sprinkle with fresh parsley after baking.
Spicy (Cajun or Buffalo)
Add 1 teaspoon cayenne pepper or 2 teaspoons Cajun seasoning to the dry rub. After baking, toss in buffalo sauce (melted butter + hot sauce) and serve with ranch or blue cheese dressing.
Garlic Parmesan
After baking, sprinkle ¼ cup freshly grated Parmesan cheese over the hot thighs and return to the oven for 2 minutes to melt. Add minced fresh garlic (not powder) after baking – raw garlic burns.
Honey Mustard Glaze
Whisk together 2 tablespoons Dijon mustard + 2 tablespoons honey + 1 tablespoon apple cider vinegar. Brush onto the thighs during the last 10 minutes of baking. Watch carefully – honey burns easily.
Asian (Soy Ginger)
Mix 2 tablespoons soy sauce (or coconut aminos) + 1 tablespoon sesame oil + 1 teaspoon grated ginger + **2 cloves minced garlic. Brush onto thighs before baking. Garnish with green onions and sesame seeds.
Balsamic Rosemary
Whisk 2 tablespoons balsamic vinegar + 2 tablespoons olive oil + 1 tablespoon fresh rosemary + 2 cloves garlic. Marinate for 30 minutes (no longer – acid can toughen meat). Bake as directed.
Storage & Make‑Ahead Instructions
Refrigerator
Store leftover baked chicken thighs in an airtight container for up to 4 days. The skin will soften – that’s normal. To re‑crisp the skin, see below.
Freezer
Baked chicken thighs freeze beautifully. Cool completely, then place in a freezer‑safe bag or container. Freeze for up to 3 months. Thaw overnight in the refrigerator.
Reheating (To Restore Crispy Skin)
· Oven (best method): Preheat to 375°F. Place thighs on a wire rack over a baking sheet. Bake for 10–15 minutes until heated through and skin re‑crisps.
· Air fryer: 375°F for 5–7 minutes.
· Microwave (worst method): The skin will become rubbery. Only use if you don’t care about texture.
Meal Prep Tips
· Bake a double batch on Sunday. Use the meat throughout the week: shredded over salads, chopped into soups, or eaten cold as a snack.
· Remove the meat from the bones before storing if you plan to use it for recipes. The bones can be saved for homemade chicken stock.
Nutrition Facts (Per Thigh – Bone‑In, Skin‑On, Baked with Oil)
Nutrient Amount (per 4 oz thigh)
Calories 290
Protein 22g
Fat 21g
Saturated Fat 6g
Carbohydrates 0g
Fiber 0g
Sugar 0g
Sodium 380mg (with ¼ tsp salt per thigh)
Iron 6% DV
Potassium 6% DV
Nutritional information is an estimate. Values vary by thigh size and seasoning.
Why this is healthy: High protein keeps you full. Fat from chicken thighs is mostly monounsaturated and polyunsaturated, with some saturated fat. Compared to processed meats or fried chicken, baked thighs are a nutrient‑dense choice.
Frequently Asked Questions (FAQs)
Q: Can I use boneless, skinless chicken thighs for this recipe?
Yes, but the texture will be different. Boneless, skinless thighs cook faster (20–25 minutes at 400°F) and won’t have crispy skin (obviously). They’re still juicy and delicious, just not crispy. Reduce cooking time and check temperature (175°F).
Q: Why did my chicken skin come out rubbery, not crispy?
Most common cause: The skin wasn’t dry enough before baking. Pat it bone‑dry with paper towels. Also, overcrowding the pan creates steam, which softens skin. And make sure your oven is actually at 400°F – use an oven thermometer.
Q: Can I bake chicken thighs from frozen?
Yes, but add 15–20 minutes to the cooking time. Bake at 400°F for 50–60 minutes. The skin won’t be as crispy. For best results, thaw overnight in the refrigerator.
Q: What’s the ideal internal temperature for chicken thighs?
165°F is safe, but 175–185°F is better for texture. Dark meat needs higher temperatures to break down collagen. At 165°F, thighs can be tough and chewy. At 185°F, they’re fall‑apart tender.
Q: Can I marinate chicken thighs before baking?
Absolutely. Thighs are forgiving and benefit from marinades (unlike breasts, which can become mushy with acid). Marinate for 2–4 hours, but no longer than 8 hours. Pat off excess marinade before baking to ensure crispy skin.
Q: How do I get the skin crispy if I don’t have a wire rack?
Bake the thighs directly on the baking sheet, skin‑side up. Halfway through (at 20 minutes), carefully flip them to crisp the bottom, then flip back for the last 10 minutes. This isn’t ideal (flipping can tear skin), but it works.
Q: Can I use this recipe for drumsticks or other dark meat cuts?
Yes. Chicken drumsticks, legs, and even wings work with the same method. Drumsticks may need an extra 5–10 minutes. Use a thermometer to check.
Q: Are chicken thighs healthy compared to breasts?
Yes – just different. Thighs have more fat and calories, but also more iron, zinc, and B vitamins. For most people, the extra fat is not a concern, and the flavor payoff is worth it. If you’re on a very low‑fat diet, stick with breasts.
Troubleshooting – What Went Wrong?
Problem Likely Cause Fix Next Time
Skin rubbery, not crispy Skin was wet, or oven too low, or pan crowded Pat dry thoroughly; use 400°F; leave space between thighs
Chicken dry (unlikely with thighs) Overcooked to >200°F, or used boneless skinless Use thermometer; pull at 175–185°F
Burnt skin, raw inside Oven too hot (over 425°F) or rack too high Use 400°F; place rack in middle position
Seasoning fell off Didn’t oil the chicken first Rub oil on before seasoning
Chicken stuck to pan No parchment/foil or rack Always line the pan or use a rack
Not enough flavor Underseasoned Be generous with salt and spices; thighs can handle it
Why This Recipe Works – The Science
The success of this recipe comes down to three scientific principles:
- The Maillard Reaction
When the skin reaches about 285°F, amino acids and reducing sugars react to create hundreds of new flavor compounds and that golden‑brown color. High heat (400°F) and a dry surface maximize the Maillard reaction.
- Collagen Breakdown
Chicken thighs contain significant amounts of collagen (connective tissue). At temperatures above 160°F, collagen begins to break down into gelatin, which coats the muscle fibers and makes the meat taste juicy and tender – even when well‑done.
- Fat Rendering
The subcutaneous fat under the skin melts at around 130–140°F. As it renders, it bastes the meat from the inside and helps the skin crisp. This is why you don’t need to add much oil – the chicken provides its own.
Understanding these principles helps you troubleshoot and adapt the recipe to your own oven and preferences.
Final Thoughts – Your New Go‑To Chicken Recipe
These baked chicken thighs are the weeknight dinner you’ve been looking for. They’re cheap, easy, forgiving, and absolutely delicious. The skin shatters, the meat drips with juice, and the seasoning is simple enough to pair with anything.
Forget the dry, bland chicken breasts. Embrace the thigh. Make a batch on Sunday, eat them throughout the week, and wonder why you ever bothered with white meat.
Now it’s your turn! Do you prefer bone‑in or boneless thighs? What’s your favorite seasoning blend? Drop a comment below – I’d love to hear your twist.
And if you found this guide helpful, share it with a friend who thinks chicken thighs are “too greasy” (they’re wrong). Pin it for later, and subscribe to our newsletter for more foolproof, family‑friendly recipes.
Stay crispy, stay juicy, and keep cooking real food. 🍗✨
Loved this recipe? Try our other chicken favorites: Perfect Roast Chicken, 30‑Minute Chicken Stir‑Fry, and Creamy Garlic Parmesan Chicken.
More Recipes You Might Like
-

Garlic Honey And Vinegar: The Powerful Homemade Wellness Tonic Everyone Is Talking About
Garlic, honey, and apple cider vinegar tonic is a traditional wellness remedy. We separate science from hype, share an easy recipe, and explain what it can and cannot do for your health. Let’s be honest: you’ve seen the posts. A mason jar filled with golden liquid, floating garlic cloves, and a caption promising everything from…
-

Hearty Blueberry Breakfast Casserole – I Used to Skip Breakfast… Now I Look Forward to This 47g Protein Bomb Every Morning
This hearty blueberry breakfast casserole packs 47g of protein per serving. Meal prep friendly, naturally sweetened, and loaded with juicy blueberries. The healthy breakfast you’ll actually crave. Let’s be honest: breakfast is the easiest meal to skip. You’re not hungry yet, you’re rushing out the door, or you’re just bored of the same old yogurt…
-
Lemon Garlic Butter Chicken with Creamy Parmesan Pasta – A 30‑Minute Restaurant‑Worthy Dinner
Juicy lemon garlic butter chicken served over creamy Parmesan pasta. This one‑pan meal is rich, comforting, and ready in 30 minutes. Better than takeout – and easy enough for a weeknight. Let’s be honest: weeknight dinners can feel like a grind. You want something that feels special – creamy, savory, bright – but you don’t…