
There are appetizers that are merely an afterthought, and then there are appetizers that steal the spotlight, command the snack table, and have guests hovering for seconds before the main course even hits the table. Mexican Street Corn Cups – inspired by the beloved elote tradition – fall emphatically into the second category. Imagine sweet, smoky grilled corn kernels, slathered in a creamy, tangy sauce, dusted with crumbly cotija cheese, and finished with a punchy sprinkle of chili powder and a squeeze of fresh lime. All of that incredible flavor, neatly portioned into individual cups that are as adorable as they are addictive.
If you’ve ever stood in line at a food truck or a street fair for a warm, messy ear of elote, you already know the magic of Mexican street corn. This recipe takes all that irresistible flavor – the charred sweetness of the corn, the richness of the crema, the salty bite of the cheese, and the smoky heat of the chili – and transforms it into a perfectly portable, mess‑free, party‑friendly format. They’re the ultimate summer side dish, a guaranteed crowd‑pleaser, and they come together in just minutes with a handful of simple ingredients.
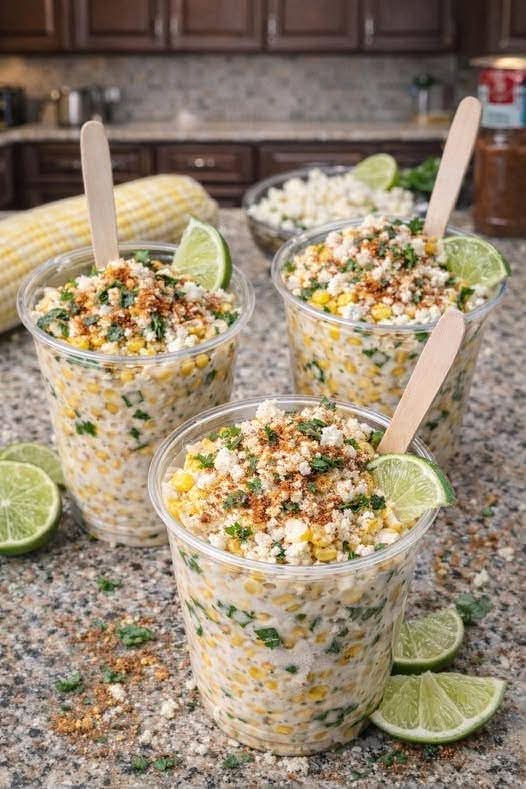
What Are Mexican Street Corn Cups?
At their heart, these cups are a deconstructed version of Mexican elote – the iconic grilled corn on the cob that’s slathered with a creamy mixture of mayonnaise, sour cream, and cheese, then sprinkled with chili powder and served with a wedge of lime. Instead of serving the corn on the cob, this version cuts the kernels off the cob and portions them into small cups or bowls, making them easy to eat with a spoon or fork. It’s essentially a creamy corn salad with all the bold, smoky, tangy flavors of the original.
This dish is known by many names: esquites (the Mexican street corn salad typically served in a cup), elote en vaso (corn in a cup), or simply street corn dip. While traditional esquites are often served warm and may include epazote (a Mexican herb), this version is streamlined for home cooks, using ingredients that are readily available in most grocery stores. It’s the perfect summer appetizer for barbecues, picnics, potlucks, and game day spreads.
The beauty of serving this dish in individual cups goes beyond just convenience. It allows each guest to customize their portion – adding extra chili, more cheese, or an extra squeeze of lime to suit their personal taste. It also makes portion control a breeze and eliminates the need for plates and forks, making it an ideal finger food for casual gatherings.
Why You’ll Love This Recipe
There are countless reasons to fall in love with these Mexican Street Corn Cups. Here are just a few that will have you making them on repeat:
Incredibly fast and easy – comes together in under 20 minutes with minimal prep.
No cooking required – if you use canned or frozen corn (or grill it ahead of time).
Perfect for parties – individual servings make them easy to grab and enjoy.
Bold, crave‑worthy flavor – smoky, creamy, tangy, and spicy all in one bite.
Versatile – serve warm or cold, as a side dish or a standalone snack.
Budget‑friendly – uses affordable ingredients that go a long way.
Naturally gluten‑free – perfect for guests with dietary restrictions.
Customizable – adjust the heat, swap the cheese, or add extra mix‑ins.
Always a crowd‑pleaser – from kids to grandparents, everyone loves it.
Make‑ahead friendly – prepare the corn mixture in advance and assemble just before serving.
This is the recipe that will have your friends asking, “What’s in these cups?” and “Can I take some home?” It’s the appetizer that disappears first and is remembered long after the party ends.
Ingredients for Mexican Street Corn Cups
This recipe uses simple, everyday ingredients to deliver maximum flavor. Here’s what you’ll need to create a batch of about 12–14 cups (using small 4‑ounce cups):
For the Corn Base
4 cups corn kernels (about 4–5 ears fresh corn, or use canned or frozen)
1 tablespoon olive oil or butter (for grilling/sautéing, if using fresh corn)
Salt to taste
For the Creamy Sauce
½ cup Mexican crema or sour cream
¼ cup mayonnaise (full‑fat for the richest flavor)
1 clove garlic, minced (or ½ teaspoon garlic powder)
Juice of 1 lime (about 2 tablespoons), plus extra wedges for serving
½ teaspoon chili powder (or more to taste)
¼ teaspoon smoked paprika (optional, for extra smokiness)
Salt and pepper to taste
For the Toppings
- ½ cup crumbled cotija cheese (or feta cheese as a substitute)
- 2 tablespoons fresh cilantro, chopped
- Extra chili powder or Tajín for sprinkling
- Lime wedges for garnish
Ingredient Notes and Substitutions
Corn: Fresh corn on the cob is ideal when in season – grilling or charring it adds that signature smoky flavor. To grill, brush the ears with oil and cook over medium‑high heat for 8–10 minutes, turning occasionally, until charred in spots. Cut the kernels off the cob. If fresh corn isn’t available, frozen corn (thawed and patted dry) or canned corn (drained and rinsed) work beautifully. For extra flavor, sauté frozen or canned corn in a dry skillet over high heat until charred.
Crema vs. Sour Cream: Mexican crema is thinner and slightly tangier than sour cream, but sour cream is an excellent substitute. You can also use a mix of sour cream and mayonnaise for a texture that’s closer to crema. For a lighter version, use Greek yogurt.
Cotija Cheese: This salty, crumbly Mexican cheese is the classic choice. If you can’t find it, feta cheese is a great substitute – it has a similar salty, tangy profile. Parmesan can also work, but the flavor will be different.
Chili Powder: Use a good‑quality chili powder (like ancho or guajillo) for depth. Tajín – a Mexican chili‑lime seasoning – is a fantastic option for extra tang and heat. You can also use cayenne for pure heat.
Step‑by‑Step Instructions
Follow these simple steps to create flawless Mexican Street Corn Cups every time. The process is quick, easy, and incredibly rewarding.
1. Prepare the Corn
If using fresh corn: grill or char the ears as described above, then cut the kernels off the cob. If using frozen or canned corn: thaw or drain well, then pat dry with paper towels. For extra flavor, sauté the corn in a hot dry skillet for 5–7 minutes until it starts to char and brown, stirring occasionally. Season with a pinch of salt.
2. Make the Creamy Sauce
In a medium mixing bowl, whisk together the crema (or sour cream), mayonnaise, minced garlic, lime juice, chili powder, smoked paprika (if using), and salt and pepper. Taste and adjust the seasoning – you want the sauce to be tangy, creamy, and slightly spicy. Set aside.
3. Combine Corn and Sauce
Add the prepared corn to the sauce and stir gently until every kernel is evenly coated. The corn should be well‑covered but not swimming in sauce – you can add a little more crema or mayo if you prefer it extra creamy.
4. Assemble the Cups
Arrange your small serving cups (4‑ounce paper or plastic cups work well) on a serving tray. Spoon the corn mixture into each cup, filling them about three‑quarters full. You can use a cookie scoop for uniform portions.
5. Add the Toppings
Sprinkle each cup generously with crumbled cotija cheese and fresh chopped cilantro. Add a light dusting of extra chili powder or Tajín on top for a pop of color and heat. Garnish each cup with a small lime wedge tucked into the side.
6. Serve Immediately or Chill
These cups can be served immediately while the corn is still warm (if you sautéed it) or chilled. For the best flavor, let the mixture sit for about 10–15 minutes to allow the flavors to meld. If you’re making them ahead of time, refrigerate the corn mixture and add the toppings just before serving to keep the cheese and cilantro fresh.
Expert Tips for the Perfect Street Corn Cups
This recipe is simple, but a few expert tricks will elevate it to legendary status. Here’s what I’ve learned from making these cups countless times:
Char the corn – whether you’re using fresh, frozen, or canned corn, getting some char on the kernels adds that essential smoky flavor. Use a hot skillet or a grill.
Pat the corn dry – if using frozen or canned corn, excess moisture can make the sauce watery. Pat it thoroughly dry with paper towels before mixing.
Use full‑fat dairy – full‑fat crema, sour cream, and mayo provide the richest, most luscious texture. Low‑fat versions work but won’t be as creamy.
Taste as you go – the balance of salty, creamy, tangy, and spicy is personal. Adjust the chili, lime, and salt to your liking.
Don’t over‑sauce – the corn should be coated but not swimming in sauce. You can always add more, but you can’t take it away.
Serve at the right temperature – these cups are delicious warm, at room temperature, or cold. If serving warm, make sure the corn is freshly charred. If serving cold, chill the mixture for at least 30 minutes.
Garnish just before serving – cotija cheese and cilantro can lose their freshness if they sit too long. Add them at the last moment for the best presentation.
Offer extra toppings on the side – set out small bowls of extra chili powder, lime wedges, and cheese so guests can customize their cups.
Delicious Variations
This recipe is wonderfully adaptable. Here are some of my favorite ways to change it up:
Spicy Jalapeño Street Corn Cups
Add 1 finely minced jalapeño (with or without seeds) to the corn mixture. The fresh heat adds an extra layer of excitement. You can also add a dash of hot sauce or a pinch of cayenne for more fire.
Bacon Street Corn Cups
Fold in ½ cup of crispy, crumbled bacon along with the corn. The smoky, salty bacon is a natural partner for the creamy, spicy corn mixture. This version is a guaranteed hit with meat lovers.
Avocado Street Corn Cups
Add diced fresh avocado to the bottom of each cup before spooning in the corn mixture, or serve it on top. The creamy avocado adds a cool, rich contrast to the spicy corn.
Black Bean and Corn Cups
Stir in ½ cup of drained and rinsed black beans along with the corn. This adds extra protein and makes the cups more substantial – perfect for a light lunch or a heartier appetizer.
Street Corn Dip
Instead of individual cups, serve the corn mixture as a dip in a large bowl. Surround it with tortilla chips, cucumber slices, or bell pepper strips for dipping. This is a fantastic option for large parties.
Vegan Street Corn Cups
Replace the crema, mayonnaise, and cheese with vegan alternatives – vegan sour cream, vegan mayo, and a dairy‑free feta or nutritional yeast. The flavor will still be delicious and creamy.
Grilled Vegetable Street Corn Cups
Add diced grilled zucchini, bell peppers, or red onion to the corn mixture. This turns the cups into a more robust grilled vegetable salad with all the street corn flavors.
Serving Suggestions
These versatile cups can be served in a variety of ways, making them perfect for any occasion:
As a party appetizer – arrange the cups on a large tray for guests to grab and enjoy.
Alongside tacos or fajitas – they’re the perfect side dish for a Mexican‑themed dinner.
At a barbecue or cookout – the smoky corn flavor pairs perfectly with grilled meats.
As a picnic side dish – easy to transport and serve outdoors.
For game day – these cups are a fun, handheld alternative to traditional dips.
As a light lunch – pair a few cups with a simple green salad for a satisfying meal.
With margaritas – the ultimate pairing for a fiesta!
Storage and Reheating Guidelines
This dish keeps beautifully, making it a fantastic make‑ahead option for any gathering.
Refrigeration: Store the corn mixture (without toppings) in an airtight container in the refrigerator for up to 4 days. The flavors will meld and intensify, making it even more delicious the next day.
Reheating: This dish can be served cold, at room temperature, or warm. To reheat, gently warm the corn mixture in a skillet over low heat or in the microwave in 30‑second bursts. Do not overheat – the sauce can separate.
Freezing: The corn mixture (without toppings) freezes well for up to 3 months. Thaw overnight in the refrigerator and stir well before serving. The texture may be slightly softer after freezing, but the flavor remains excellent.
Pro tip: If the sauce seems too thick after refrigeration, stir in a splash of milk, crema, or lime juice to loosen it up before serving.
Want the full truth and the practical next steps?
Page 2 continues with the real explanation, the key details many readers skip, and the simple takeaways that make this guide more useful.