
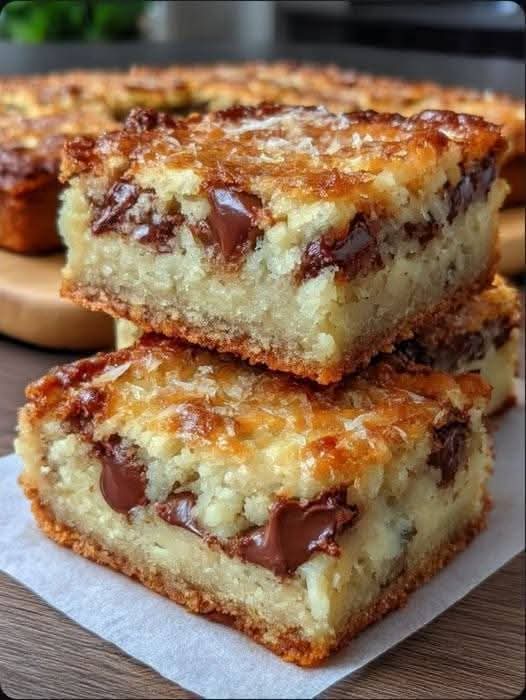
Congo Bars were common in church cookbooks and grandmas’ kitchens for decades, and they taste every bit as good today! These thick, chewy, buttery blondie-style bars are loaded with chocolate chips and often studded with crunchy walnuts or pecans, and sometimes a whisper of coconut. They’re the quintessential back-of-the-box recipe that became a sensation in mid-century America—a one-bowl wonder that could be mixed by hand and baked in a simple 9×13-inch pan, ready to feed a crowd at a potluck, a bake sale, or a Sunday supper. The name “Congo” is a mystery, with no real connection to the African Congo, but the bars themselves are pure magic. With their crackly, golden-brown top, their soft, almost fudgy center, and their deep caramel notes from brown sugar, every bite is a nostalgic trip back to a simpler time. They’re the kind of cookie-bar hybrid that feels like a warm hug, and once you bake a batch, you’ll understand why this recipe has stood the test of time for over half a century.
What makes Congo Bars so beloved is their incredible texture and endless adaptability. The base is a simple blondie dough made with melted butter, which gives them a dense, chewy crumb that’s more substantial than a cookie but less cakey than a brownie. The brown sugar provides a rich, molasses-kissed sweetness that pairs perfectly with semi-sweet chocolate chips, creating that classic chocolate chip cookie flavor in a convenient bar form. The addition of nuts adds a satisfying crunch, and if you’re a fan of the original, a handful of sweetened shredded coconut takes them into tropical territory. Unlike fussy layered bars, Congo Bars are a true dump-and-stir recipe: melt the butter, whisk in the sugars, add the eggs and vanilla, then fold in the dry ingredients and the mix-ins. The batter comes together in a single saucepan or bowl, and after a quick bake, you’re rewarded with a pan of golden, aromatic bars that fill the kitchen with the scent of butter, caramel, and chocolate. They’re perfect for packing in lunchboxes, bringing to a potluck, or enjoying with a cold glass of milk on a quiet afternoon. And because they freeze beautifully, you can always have a stash on hand for unexpected guests or late-night cravings. This is the kind of recipe that’s passed down on stained, handwritten cards, and every family has its own little twist—extra vanilla, a mix of chocolate and butterscotch chips, or a sprinkle of sea salt on top. But the heart of the recipe remains the same, and it’s just as delicious today as it was in your grandmother’s kitchen.
In this comprehensive guide, I’ll walk you through every detail of making the ultimate Congo Bars. We’ll explore the history and the mystery of the name, the secrets to achieving that perfect chewy texture with a shiny, crackly top, creative variations to make them your own, and all the tips for storing and gifting these timeless treats. Whether you’re a lifelong fan or discovering them for the first time, get ready to fall in love with a true American classic. Let’s preheat the oven and fill the house with the smell of butter and brown sugar—it’s time to bake some Congo Bars.
Why You’ll Love These Congo Bars
Pure, nostalgic comfort in every bite. These bars taste like childhood. The combination of melted butter, brown sugar, and vanilla creates a rich, caramel-like base that’s studded with pockets of melted chocolate and the satisfying crunch of toasted nuts. They’re dense, chewy, and utterly satisfying—the kind of treat that makes you close your eyes and smile. The recipe has been a staple at church potlucks, family reunions, and bake sales for generations, and it carries with it a sense of warmth and tradition that’s hard to find in modern desserts. When you pull a pan of Congo Bars out of the oven, you’re not just baking—you’re connecting with decades of home cooks who trusted this simple, perfect recipe.
Incredibly easy one-bowl (or one-pot) recipe. The batter starts on the stovetop: you melt the butter in a saucepan, then stir in the brown sugar until it dissolves into a glossy, smooth mixture. After letting it cool slightly, you whisk in the eggs and vanilla, then fold in the dry ingredients and the chocolate chips and nuts. That’s it—no mixer required, no creaming butter and sugar, and no chilling the dough. It’s a forgiving, foolproof method that yields consistently perfect results, even for beginner bakers. The entire prep takes about 15 minutes, and the bars bake in under half an hour. This is the ultimate last-minute dessert for when you need something homemade and impressive without a lot of fuss.
A perfect balance of textures. Congo Bars are the Goldilocks of bar cookies: not as dense as a brownie, not as cakey as a blondie, but somewhere in between, with a chewy, fudgy interior and a shiny, delicately crackled top. The edges bake up slightly crisp, providing a pleasant contrast to the soft center. The chocolate chips remain gooey when warm and set into firm, melty pockets when cool. The nuts (if using) add a toasty crunch that keeps each bite interesting. And if you include coconut, it adds a subtle chew and a tropical note that many people associate with the original recipe. Every bite is a little different, and that variety is what makes them so addictive.
Endlessly customizable to your family’s taste. While the classic version with chocolate chips and walnuts or pecans is the gold standard, you can easily adapt Congo Bars to suit your preferences or use what’s in your pantry. Swap the semi-sweet chocolate for milk, dark, or even white chocolate chips. Add a combination of chocolate and butterscotch chips for a buttery, caramel-like twist. Stir in dried cranberries, toffee bits, or a handful of M&M’s for a colorful, festive touch. Omit the nuts for a nut-free version, or increase them if you’re a nut lover. You can even swirl in a ribbon of peanut butter or Nutella before baking. The base dough is a perfect blank canvas, and you can make a different version every time you bake them. No matter how you customize, the result is always a pan of warm, comforting, crowd-pleasing bars that disappear in minutes.
A Slice of History: The Story Behind the Bars
The exact origin of Congo Bars is delightfully murky, which only adds to their nostalgic charm. The recipe began appearing in community cookbooks and on the backs of chocolate chip packages in the mid-20th century, likely in the 1950s or 1960s. One popular theory suggests that the name “Congo” was simply a marketing invention—perhaps meant to evoke something exotic, even though the bars themselves are thoroughly American. Another theory posits that they may have been named for the Congo coconut, as many early versions included shredded coconut. Still others claim the name is a playful twist on “conglomeration,” since the bars are a delicious mishmash of ingredients. Whatever the truth, the recipe spread like wildfire through church groups, bridge clubs, and family kitchens. It was beloved for its simplicity, its affordability, and its ability to feed a crowd. In an era when home cooks relied on pantry staples and handwritten recipe cards, Congo Bars were a revelation: a bar cookie that tasted as rich as a chocolate chip cookie but required a fraction of the effort. Over the decades, the recipe has remained largely unchanged, a testament to its perfection. Today, it continues to appear in community cookbooks, food blogs, and family recipe boxes, a delicious reminder that the best things in life are often the simplest.
Ingredient Deep Dive: The Chewy, Chocolatey Lineup
Understanding each ingredient’s role will help you achieve the perfect chewy, golden Congo Bars every time. Let’s break them down.
Melted Butter – The Rich, Chewy Foundation
You’ll need ¾ cup (1½ sticks) of unsalted butter. Unlike many cookie recipes that call for softened butter, Congo Bars use melted butter. This is the secret to their dense, chewy texture: melting the butter means there’s no air beaten into the dough, so the bars bake up fudgy rather than cakey. The melted butter is combined with the brown sugar in a saucepan over medium heat, creating a smooth, glossy mixture that forms the flavor base of the bars. You can melt the butter directly in the saucepan, which saves dishes and infuses the sugar with a warm, buttery richness. Use unsalted butter to control the salt level, and if you only have salted butter, simply reduce the added salt in the recipe. The butter should be cooled slightly before adding the eggs to prevent them from scrambling. This simple, no-fuss step is what gives Congo Bars their signature texture. For an even deeper flavor, you can brown the butter: cook it a few minutes longer until the milk solids turn golden and smell nutty, then proceed with the recipe. The nutty, caramelized notes of browned butter take these bars to an extraordinary level, reminiscent of a gourmet cookie. Just be sure to let it cool a bit so the eggs don’t cook on contact.
Brown Sugar – The Caramel, Chewy Sweetness
Two cups of packed light brown sugar provide the deep, molasses-like sweetness that’s characteristic of Congo Bars. The moisture in brown sugar is what makes the bars so wonderfully chewy and tender. Use light brown sugar for a classic, mild caramel flavor, or dark brown sugar for a more intense, almost smoky molasses taste. The sugar is dissolved into the hot melted butter, creating a smooth, liquid base. This step is important because it ensures the sugar is fully dissolved, which contributes to the shiny, crackly top that forms during baking. When you pack the brown sugar into the measuring cup, press it down firmly to get an accurate amount. The high ratio of sugar to flour is what gives Congo Bars their dense, almost candy-like texture. Do not reduce the sugar, as it also provides structure and moisture. If you’re looking for a slightly less sweet bar, you can replace up to ½ cup of the brown sugar with an equal amount of granulated sugar, but the bars will be a bit less chewy and more crisp at the edges. The brown sugar is the soul of this recipe, so embrace it fully.
Eggs and Vanilla – The Structure and Aroma
Two large eggs, at room temperature, provide structure and richness. They’re whisked into the slightly cooled butter-sugar mixture one at a time, ensuring each is fully incorporated before adding the next. Room-temperature eggs blend more easily and prevent the warm butter from seizing up. The eggs are what help the bars set and give them a bit of lift, though they remain dense. A tablespoon of pure vanilla extract adds a warm, aromatic note that enhances the buttery caramel flavor. This might seem like a lot of vanilla, but it’s traditional in Congo Bars and contributes to their distinctive taste. You can also add a teaspoon of butter extract or almond extract for a different nuance. The vanilla should be added with the eggs, allowing it to meld into the batter smoothly. These simple ingredients transform the melted butter and sugar into a cohesive, pourable batter that bakes into a golden, fragrant masterpiece.
All-Purpose Flour, Baking Powder, and Salt – The Dry Structure
Two and a half cups of all-purpose flour give the bars structure. Measured accurately—spooned into the measuring cup and leveled off—the flour combines with the wet ingredients to form a thick, spoonable batter. Two teaspoons of baking powder provide a gentle lift, ensuring the bars aren’t overly dense. They won’t rise dramatically like a cake, but the baking powder creates a slightly lighter crumb and prevents them from being heavy as a brick. A half teaspoon of salt balances the sweetness and enhances the flavors of the butter, chocolate, and nuts. If you use salted butter, reduce the salt to a pinch. You can also add a pinch of cinnamon or a tiny grating of nutmeg for warmth, though it’s not traditional. The dry ingredients should be whisked together in a separate bowl before being folded into the wet mixture. This ensures the baking powder and salt are evenly distributed. The flour is added gradually, and you should mix just until no streaks remain. Overmixing can develop gluten and make the bars tough, so a light hand is key. The batter will be quite thick and sticky, but that’s exactly what you want. It will spread only a little in the pan, creating thick, chunky bars with a dense crumb.
Chocolate Chips and Nuts (and Coconut) – The Mix-Ins
One and a half cups of semi-sweet chocolate chips are the classic choice. They provide a rich, slightly bitter contrast to the sweet, buttery dough. You can use milk chocolate chips for a sweeter bar, dark chocolate for a more intense, sophisticated flavor, or a combination. A cup of chopped walnuts or pecans adds a traditional, toasty crunch. The nuts should be roughly chopped so they distribute evenly throughout the batter. Toasting them beforehand in a dry skillet or in the oven for 5–7 minutes intensifies their flavor and adds an extra layer of nuttiness. Many original Congo Bar recipes call for shredded sweetened coconut—about ½ cup—which adds a chewy texture and a subtle tropical flavor. This is entirely optional, but if you’re aiming for the old-fashioned church-cookbook version, coconut is often included. You can also add butterscotch chips, white chocolate chips, or a sprinkle of flaky sea salt on top before baking for a salty-sweet finish. The mix-ins are folded in by hand at the end, just until they’re evenly distributed. Don’t overmix, or the chocolate chips may start to melt from the warmth of the batter. The combination of chocolate, nuts, and optional coconut is what makes Congo Bars so distinctive and so beloved. Each bite is a little treasure hunt of flavors and textures.
Step-by-Step: From Saucepan to Perfect Bars
This recipe is a true one-pot wonder. Follow these detailed steps for perfectly chewy, golden Congo Bars every time.
Step 1: Preheat the Oven and Prepare the Pan
Preheat your oven to 350°F (175°C). Grease a 9×13-inch baking pan with butter or nonstick spray, or line it with parchment paper, leaving a little overhang on two sides for easy lifting. The parchment makes it simple to remove the entire slab of bars from the pan for clean, even cutting. A metal pan works best for even browning; if you use a glass pan, reduce the oven temperature by 25°F to prevent the edges from overbaking before the center is set.
Step 2: Melt the Butter and Dissolve the Sugar
In a medium saucepan over medium heat, melt the butter completely. Add the packed brown sugar and stir constantly with a wooden spoon or heatproof spatula until the sugar has dissolved into the butter and the mixture is smooth and glossy. This will take about 2–3 minutes. The mixture will bubble slightly around the edges, but don’t let it boil vigorously. You’re not making candy—you’re simply creating a warm, liquid base. Once the sugar is fully incorporated, remove the saucepan from the heat and let it cool for 5–10 minutes. The mixture should be warm to the touch but not hot; if it’s too hot, the eggs will scramble when you add them. You can speed up the cooling by transferring the mixture to a mixing bowl, but the saucepan method saves dishes. This step is what gives Congo Bars their unique texture; the dissolved sugar creates that shiny, crackly top and the dense, chewy interior. Don’t skip the cooling step—it’s crucial for the eggs to blend smoothly. While the mixture cools, you can measure out your dry ingredients and prepare your mix-ins. The kitchen will already smell incredible from the melted butter and brown sugar.
Step 3: Add the Eggs and Vanilla
Once the butter-sugar mixture has cooled to a warm, comfortable temperature, whisk in the eggs one at a time, beating vigorously after each addition until the mixture is smooth and slightly thickened. The batter will become glossy and a bit lighter in color. Stir in the vanilla extract. The eggs should incorporate easily; if the mixture is still too hot, you’ll see the eggs start to cook and form little white specks. If that happens, don’t panic—the bars will still be delicious, but the texture may be slightly affected. To be safe, test the temperature with your finger; it should feel pleasantly warm, not hot. The egg mixture should be uniform and slightly thick. This step builds the structure of the bars and adds richness. The batter will look silky and smooth, and the vanilla will perfume the entire kitchen. At this point, you’ve created the liquid base that will hold all the dry ingredients and mix-ins, and it already tastes like cookie dough—though I wouldn’t recommend sampling too much raw batter because of the eggs. Now it’s time to bring in the flour and the goodies.
Step 4: Fold in the Dry Ingredients
In a separate bowl, whisk together the flour, baking powder, and salt. Gradually add the dry ingredients to the wet mixture, stirring with a spatula or wooden spoon until just combined. Do not overmix; stop as soon as you no longer see streaks of flour. The batter will be thick and sticky. If you’re using nuts or coconut, fold them in now, along with the chocolate chips. Gently stir until everything is evenly distributed. The batter should be quite stiff, almost like a soft cookie dough. This is exactly right—it won’t pour into the pan; you’ll need to spread it with a spatula. The thick dough is what creates those dense, chewy bars. If you’re adding coconut, you may notice the batter becomes a bit more crumbly; just press it into the pan and it will bake together beautifully. The chocolate chips may start to melt slightly from the residual warmth, which is fine—it will create little ribbons of chocolate throughout the bars. The folding should be done with a light hand to keep the bars tender. Overmixing at this stage can develop the gluten in the flour, resulting in tougher bars. A few streaks of flour are better than overworking the dough. This is a rustic, forgiving recipe, so a little lumpiness is perfectly acceptable.
Step 5: Spread into the Pan and Bake
Scrape the thick batter into the prepared 9×13-inch pan. Use a spatula or your fingers (lightly greased) to press the dough into an even layer, pushing it into the corners. The dough will be sticky, but a little butter or nonstick spray on your hands makes it manageable. Smooth the top as best you can. Place the pan in the preheated oven and bake for 22–28 minutes. The bars are done when the top is a deep golden brown, shiny, and slightly crackled. The edges will be set and pulling away slightly from the sides, and a toothpick inserted in the center will come out with a few moist crumbs but not wet batter. Do not overbake—these bars are meant to be dense and chewy, not dry. They will continue to set as they cool. If the top is browning too quickly but the center isn’t set, tent the pan loosely with aluminum foil for the last 5–10 minutes. The exact baking time will depend on your oven and the type of pan you use; start checking at 22 minutes. The bars will smell incredible—buttery, caramel-like, and chocolatey—and they’ll look like a giant golden cookie. The center should be just slightly soft to the touch, but it will firm up as it cools. Underbaking by a minute or two is better than overbaking, as the bars will remain wonderfully chewy. The toothpick test is your best guide: moist crumbs mean the bars are perfectly done, while clean means they might be slightly overdone and drier.
Step 6: Cool Completely and Slice
Remove the pan from the oven and place it on a wire rack. Let the bars cool completely in the pan before slicing. This is crucial: if you try to cut them while they’re still warm, they’ll crumble and fall apart. As they cool, the texture sets into that perfect chewy, dense consistency. Cooling takes about 1–2 hours at room temperature, or you can speed it up by placing the pan in the refrigerator once it’s cooled slightly. Once the bars are completely cool, use the parchment overhang (if you used it) to lift the entire slab out of the pan. Place it on a cutting board and use a sharp chef’s knife to cut it into squares. Wipe the knife between cuts for the cleanest edges. The bars can be cut into 24 smaller squares or 12 generous rectangles, depending on your preference. They should be dense, moist, and packed with chocolate chips and nuts. The top will be beautifully crackled and shiny, and the interior will be soft and chewy. Serve them at room temperature with a glass of cold milk, a cup of coffee, or a scoop of vanilla ice cream for an extra-special treat. These bars are wonderful on their own, but they also make a fantastic base for a sundae—crumble them over ice cream and drizzle with caramel sauce. However you serve them, they’re guaranteed to bring smiles and a touch of nostalgia to any table.
Pro Tips for the Chewiest, Most Flavorful Bars
- Use melted butter and dissolve the sugar completely. This is the key technique that sets Congo Bars apart from other blondies. Melting the butter with the brown sugar dissolves the sugar crystals, creating a smooth, glossy base that results in a shiny, crackled top and a dense, fudgy texture. If the sugar isn’t fully dissolved, the bars can be grainy and lack that signature crust. Stir the mixture constantly over medium heat, and don’t let it boil. The sugar should be completely incorporated into the butter, leaving no gritty texture. This step takes just a few minutes but makes all the difference in the final result. If you’re in a hurry, you can use the microwave to melt the butter and then stir in the sugar, but the stovetop method gives you better control and more consistent results. The dissolved sugar also helps the chocolate chips stay suspended in the batter rather than sinking to the bottom. A smooth, glossy mixture is what you’re aiming for before you add the eggs.
- Cool the butter-sugar mixture before adding the eggs. If you add eggs to a mixture that’s too hot, they’ll scramble and create little cooked bits in your batter. The bars will still taste good, but the texture won’t be as smooth. After melting the butter and dissolving the sugar, remove the pan from the heat and let it sit for 5–10 minutes. You can speed this up by transferring the mixture to a cool bowl, but it’s not necessary. The mixture should be warm to the touch, not steaming. If you’re unsure, dip a clean finger in quickly—it should feel comfortably warm, like bathwater. This cooling step also helps the flour incorporate more smoothly, preventing a gummy texture. It’s a small pause that ensures your eggs blend in perfectly and your batter is silky and uniform.
- Don’t overmix the flour. Once you add the dry ingredients, fold them in gently with a spatula or wooden spoon just until the flour disappears. Overmixing develops the gluten and can make the bars tough and bread-like. The batter will be thick and sticky, and that’s exactly how it should be. A few small streaks of flour are fine; they’ll bake out in the oven. Treat the batter like a muffin batter—minimal mixing is best. The same goes for folding in the chocolate chips and nuts; a few quick stirs is all it takes. A light hand results in tender, chewy bars with a perfect crumb.
- Slightly underbake for the chewiest texture. Congo Bars should be soft and dense, not dry and crumbly. To achieve this, pull them from the oven when the top is golden and shiny, and a toothpick inserted in the center comes out with a few moist crumbs. If the toothpick comes out completely clean, they may be slightly overbaked. The bars will continue to bake from the residual heat of the pan as they cool, so a little underbaking is actually ideal. If you like an extra-gooey center, you can even reduce the baking time by 2–3 minutes, but make sure the edges are set. The center should look slightly underdone but not raw. As the bars cool, they’ll set into the perfect chewy consistency. If you’ve overbaked them slightly, don’t worry—they’ll still be delicious, just a bit more crumbly. Serve them with ice cream to compensate, and they’ll be irresistible either way.
- Toast the nuts and use high-quality chocolate. Toasting nuts before adding them to the batter intensifies their flavor and adds a satisfying crunch. Spread them on a baking sheet and toast at 350°F for 5–7 minutes, until fragrant. Let them cool before folding them in. For the chocolate, use a good-quality semi-sweet chocolate chip or chop a bar of your favorite chocolate into chunks. The better the chocolate, the better the bars. You can even use a mix of different chocolates—dark, milk, and white—for a more complex, gourmet taste. The chocolate is a major component, so it’s worth using one you love. The nuts and chocolate are what make each bite interesting, and their quality shines through in the final product. These small upgrades take the bars from good to unforgettable.
Flavor Twists & Classic Add-Ins
While the classic Congo Bar is perfect as written, you can have fun with these delicious variations.
- Coconut Congo Bars (The Original Style): Add ½ cup of sweetened shredded coconut to the batter along with the chocolate chips and nuts. The coconut adds a chewy texture and a subtle tropical flavor that many old-fashioned recipes include. If you’re a coconut lover, you can also sprinkle a little extra coconut on top before baking, which will toast to a beautiful golden brown. Toasting the coconut beforehand enhances its flavor even more.
- Butterscotch Congo Bars: Replace half of the chocolate chips with butterscotch chips. The rich, buttery flavor of butterscotch pairs beautifully with the brown sugar and nuts. This version is exceptionally sweet and nostalgic, and it’s a favorite among those who love the combination of butterscotch and chocolate. You can also use all butterscotch chips for a true golden bar, but the chocolate adds a nice contrast.
- Triple Chocolate Congo Bars: Use a combination of semi-sweet, dark, and white chocolate chips. The three chocolates create a more complex flavor and a beautiful mosaic effect when you cut into the bars. For an extra-chocolatey base, replace ¼ cup of the flour with unsweetened cocoa powder. This variation is for the serious chocolate lover and turns the bars into a decadent, fudgy treat.
- Peanut Butter Swirl Congo Bars: Drop spoonfuls of creamy peanut butter over the batter in the pan and use a knife to swirl it in before baking. The peanut butter creates ribbons of salty, nutty flavor throughout the bars. You can also add a handful of peanut butter chips for extra peanutty goodness. This version is reminiscent of a peanut butter chocolate chip cookie in bar form.
- Holiday M&M Congo Bars: Replace the chocolate chips with a cup of M&M’s candies in festive colors. The candy-coated chocolate adds a pop of color and a slight crunch. This version is perfect for Christmas, Easter, or birthday parties. You can use mini M&M’s for a more even distribution, and the bright colors make the bars extra fun for kids. A drizzle of white chocolate over the cooled bars adds a festive finish.
Want the full truth and the practical next steps?
Page 2 continues with the real explanation, the key details many readers skip, and the simple takeaways that make this guide more useful.