
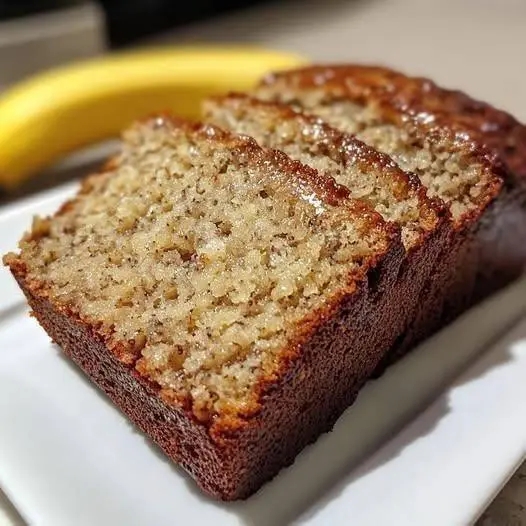
If you’ve ever craved a slice of warm, comforting banana bread but wanted something made entirely from real, nourishing ingredients—no white flour, no refined sugar, no weird additives—this Oat & Banana Bread is about to become your new favorite recipe. It’s the kind of loaf that proves healthy baking can be incredibly delicious. Made simply with rolled oats, ripe bananas, eggs, a splash of plant milk, and a hint of cinnamon, this bread is naturally sweet, wonderfully moist, and has a tender, hearty crumb that satisfies without weighing you down. It’s the perfect breakfast on the go, an after-school snack you can feel good about, or a cozy companion to your afternoon coffee. And because the entire loaf comes together in a blender or food processor in minutes, it’s as easy as it is wholesome. You’re going to love how something so simple can taste so good.
This isn’t just another banana bread; it’s a reset button for how we think about baked goods. By using rolled oats ground into a flour-like consistency, we eliminate the need for all-purpose flour entirely, while keeping the bread satisfying and fiber-rich. The bananas provide all the natural sweetness you need—no sugar, honey, or maple syrup required—and they also add moisture, so the loaf stays soft for days. The eggs bind everything together, the plant milk lends just enough liquid, and a teaspoon of baking powder gives it a gentle lift. A pinch of salt enhances the natural flavors, and a dash of cinnamon adds a warm, cozy aroma that fills your kitchen as it bakes. There’s no butter, no oil, no dairy (if you choose a plant-based milk), and absolutely no refined sugar. It’s the kind of clean-eating recipe that fits into so many dietary lifestyles: gluten-free if you use certified gluten-free oats, dairy-free, and easily made vegan with a simple flax egg swap. And despite its wholesome ingredient list, it tastes like a treat—a tender, subtly sweet slice of banana-infused goodness that even the pickiest eaters will devour.
In this comprehensive guide, we’ll walk through every detail of making the perfect oat and banana bread. We’ll explore why this combination works so brilliantly, how to get the best texture, creative ways to customize it with mix-ins and toppings, and all the storage tips to keep it fresh. Whether you’re a seasoned baker or a total beginner, this loaf is nearly foolproof, endlessly adaptable, and guaranteed to become a staple in your kitchen. Let’s preheat the oven and fill the house with the scent of cinnamon and warm bananas.
Why You’ll Love This Oat & Banana Bread
No flour, no sugar, just real food. This bread is made entirely from whole, unprocessed ingredients. There’s no all-purpose flour, no granulated sugar, no butter, and no oil. The oats provide whole-grain fiber and substance, the bananas bring natural sweetness and moisture, and the eggs give structure. It’s a loaf you can feel genuinely good about eating for breakfast, serving to your kids, or enjoying as a pre-workout snack. And despite the lack of traditional baking ingredients, the texture is spot-on—tender, moist, and sliceable.
Incredibly easy—just blend and bake. The entire batter comes together in a blender or food processor. You simply toss in the oats, bananas, eggs, plant milk, baking powder, salt, and cinnamon, and blend until smooth. There’s no need to mash the bananas separately, no whisking dry ingredients, and no stand mixer required. The batter is poured directly into a loaf pan and baked. In under 10 minutes of active time, you’re sliding a wholesome, homemade loaf into the oven. It’s the ultimate lazy-day baking project that yields impressive results.
Naturally sweet and beautifully moist. Very ripe bananas—the ones with brown spots covering the peel—are nature’s candy. They bring all the sweetness this bread needs, along with a deep, fruity banana flavor. The plant milk and eggs keep the crumb soft, and because there’s no flour to absorb excess moisture, the loaf stays wonderfully moist for days. It never dries out, and the flavor actually improves the next day. A gentle warmth from the cinnamon makes each slice taste like a cozy bakery treat, without a single grain of sugar.
Diet-friendly and easily adaptable. This recipe is naturally dairy-free if you use plant milk, and it’s gluten-free when made with certified gluten-free oats. It can be made vegan by replacing the eggs with flax eggs (2 tablespoons ground flaxseed mixed with 5 tablespoons water). It fits into clean-eating, whole-food, and even some low-sugar lifestyles. You can dress it up with mix-ins like chopped walnuts, dark chocolate chips, blueberries, or shredded coconut, or keep it pure and simple. It’s a versatile base recipe you’ll find yourself making over and over again, each time a little differently.
Ingredient Deep Dive: The Simple, Wholesome Lineup
This bread uses only a handful of ingredients, each one earning its place. Here’s what you need and why.
Ripe Bananas – The Natural Sweetener and Moisture Source
You’ll need 2 medium to large ripe bananas, the kind with plenty of brown spots and a strong banana fragrance. The riper the bananas, the sweeter and more flavorful your bread will be. If your bananas aren’t quite ripe enough, you can speed up the process by placing them (peel on) in a 300°F oven for 10–15 minutes until the peels turn black. Cool them before using. The bananas replace both sugar and much of the fat in a traditional banana bread, providing natural sweetness, moisture, and a tender crumb. They also help bind the oats together. You’ll mash them, but with the blender method, they’ll be pureed smooth along with everything else.
Rolled Oats – The Flour-Free Base
Two cups of rolled oats (also called old-fashioned oats) are the backbone of this bread. When ground in a blender or food processor, they break down into a coarse flour that mimics the texture of whole-wheat flour. Rolled oats are best; quick oats can be used but may produce a slightly denser loaf. Steel-cut oats are too hard and won’t break down enough. For a gluten-free bread, be sure to use certified gluten-free rolled oats. The oats provide fiber, whole-grain nutrition, and a hearty, satisfying texture. They also give the bread a subtle nutty flavor that pairs beautifully with the bananas and cinnamon.
Eggs – The Binder and Structure
Two large eggs provide structure, stability, and a gentle lift. They help the oat flour set as it bakes, so the loaf holds together and slices cleanly. For a vegan version, you can use flax eggs: mix 2 tablespoons of ground flaxseed with 5 tablespoons of water, let it sit for 5–10 minutes until thickened, then add to the blender with the other ingredients. The texture will be slightly more dense and crumbly, but still delicious. Room-temperature eggs incorporate more easily, so if you remember, take them out of the fridge about 20 minutes before baking.
Plant Milk – The Liquid Adjuster
¼ cup of unsweetened almond milk, soy milk, oat milk, or any plant-based milk adds just enough liquid to help the batter blend smoothly. It also contributes to the moist crumb. Soy milk adds a bit more protein, while almond or oat milk are lighter. You can use regular dairy milk if you’re not avoiding dairy. The milk should be plain and unsweetened. This small amount of liquid ensures the batter isn’t too thick to blend properly and helps the baking powder activate.
Baking Powder, Salt, and Cinnamon – The Flavor and Lift
A teaspoon of baking powder gives the bread a little rise and a lighter texture. Without it, the loaf would be quite dense. Make sure your baking powder is fresh. A pinch of salt enhances the sweetness of the bananas and balances the flavors. One teaspoon of ground cinnamon (optional but highly recommended) adds a warm, aromatic note that makes the bread smell like a bakery. You can also add a pinch of nutmeg or a teaspoon of vanilla extract for extra depth. These small seasonings make a big difference in the final flavor, so don’t skip them.
Step-by-Step: The Easiest Banana Bread Ever
This recipe is a one-blender wonder. Follow these steps for a perfectly moist, tender loaf every time.
Step 1: Preheat and Prepare the Pan
Preheat your oven to 350°F (175°C). Grease a standard 8½x4½-inch loaf pan with a little oil or plant-based butter, or line it with parchment paper, leaving a little overhang on the sides for easy lifting. The parchment sling makes removing the bread effortless.
Step 2: Blend the Batter
In a blender or a food processor, add the peeled ripe bananas, rolled oats, eggs, plant milk, baking powder, salt, and cinnamon (if using). Blend on high speed for about 30 to 60 seconds, until the mixture is completely smooth and the oats have broken down into a fine batter. Stop and scrape down the sides if needed. The batter should be thick but pourable, similar to a smoothie. If it’s too thick to blend, add an extra tablespoon of plant milk. If it’s too thin, add a tablespoon of oats and blend again.
Step 3: Add Mix-Ins (Optional)
If you’re adding chopped nuts, chocolate chips, blueberries, or shredded coconut, fold them in by hand after blending. Don’t blend them, or they’ll be pulverized. Gently stir them into the batter with a spatula until just distributed.
Step 4: Pour and Bake
Pour the batter into the prepared loaf pan and smooth the top with a spatula. If you like, sprinkle a few extra oats or a pinch of cinnamon on top for a pretty finish. Place the pan in the preheated oven and bake for 35 to 42 minutes, until the top is golden brown and a toothpick inserted in the center comes out clean or with just a few moist crumbs. The bread should feel firm to the touch and pull away slightly from the edges. Because ovens vary, start checking at 35 minutes.
Step 5: Cool Completely
Let the bread cool in the pan for about 10 minutes, then use the parchment overhang to lift it out and transfer it to a wire rack. Allow it to cool completely before slicing. This cooling time is important: the oat flour needs time to set fully, and cutting into a warm loaf can cause it to crumble. The bread will firm up as it cools. Once completely cool, slice with a serrated knife for the cleanest cuts. Serve at room temperature or lightly toasted.
Pro Tips for the Perfect Texture
Use very ripe bananas. Bananas with deep brown spots are the sweetest and have the most intense banana flavor. If your bananas are still yellow, your bread will be less sweet and less flavorful. The natural sugars in very ripe bananas are what give this bread its sweetness without any added sugar. If you only have yellow bananas, roast them in the oven as described above.
Grind the oats finely. The smoother the batter, the more tender the bread. Blend until the oats are completely broken down and the batter looks like a smooth puree. A few tiny flecks of oat are fine, but you don’t want large, chewy pieces. A high-speed blender works best for this, but a food processor will also do the job—you may need to blend a bit longer.
Don’t overbake. Because this bread contains no flour and no sugar, it can go from perfectly moist to dry if left in the oven too long. Start checking for doneness at the 35-minute mark. A toothpick should come out mostly clean. The top should be golden and the center should spring back when lightly pressed.
Cool completely before slicing. Patience is key. The oat flour structure is delicate when hot and needs time to set. Slicing too soon will cause the bread to crumble and lose its shape. If you can, cool it for at least an hour before slicing. The wait is worth it for clean, beautiful slices.
Experiment with mix-ins. This bread is a blank canvas. Fold in ½ cup of chopped walnuts or pecans for crunch, ⅓ cup of dark chocolate chips for a treat, ½ cup of fresh or frozen blueberries for a fruity burst, or ¼ cup of unsweetened shredded coconut for a tropical twist. Add the mix-ins after blending, stirring them in by hand. Each variation is like a whole new bread.
Flavor Twists & Mix-Ins
This basic recipe is a wonderful starting point for all sorts of flavor adventures. Here are a few of my favorite variations.
Chocolate Chip Banana Bread: Fold in ⅓ cup of dark or semi-sweet chocolate chips after blending. The chocolate melts into little pockets of richness. For a sugar-free version, use stevia-sweetened chocolate chips. The combination of banana and chocolate is a classic for a reason.
Blueberry Banana Bread: Gently stir in ½ cup of fresh or frozen blueberries. If using frozen, don’t thaw them, or they’ll bleed color into the batter. The burst of juicy berries adds a lovely tart contrast to the sweet banana. A squeeze of lemon zest in the batter brightens it up even more.
Nutty Banana Bread: Add ½ cup of chopped walnuts, pecans, or almonds. Toasting the nuts first brings out their flavor. The crunchy nuts add texture and healthy fats. A sprinkle of nuts on top before baking looks beautiful.
Carrot Cake Banana Bread: Fold in ½ cup of finely grated carrot, ¼ cup of raisins, and an extra pinch of cinnamon and nutmeg. The carrot adds moisture and a subtle sweetness, and the spices make it taste like a cozy carrot cake. A handful of chopped walnuts makes it even more authentic.
Pumpkin Spice Banana Bread: Replace ¼ cup of the bananas with ¼ cup of pumpkin puree, and add 1 teaspoon of pumpkin pie spice. This variation is perfect for autumn and adds a dose of beta-carotene. The color is a lovely warm orange, and the flavor is incredibly comforting.
Serving Suggestions & Toppings
This oat and banana bread is delicious on its own, but a few simple additions can take it to the next level. Enjoy a thick slice toasted and spread with nut butter—peanut butter, almond butter, or cashew butter all pair beautifully. A smear of cream cheese or Greek yogurt adds a creamy, tangy contrast. For a sweet treat, drizzle with a little honey or maple syrup (if you’re not strictly avoiding sugar) or top with sliced fresh bananas and a sprinkle of cinnamon. This bread is a wonderful addition to a brunch spread, alongside fresh fruit, scrambled eggs, and coffee. It also makes a fantastic on-the-go breakfast or a satisfying post-workout snack. Pack a slice in a lunchbox or take it on a picnic—it travels well and doesn’t need refrigeration for a day.
Storage, Freezing & Meal Prep
Storing: Because this bread is flour-free and very moist, it should be stored in the refrigerator to prevent spoilage. Place the completely cooled loaf in an airtight container or wrap it tightly in plastic wrap. It will keep in the refrigerator for up to 5 days. The flavor deepens and the texture remains wonderfully moist. Slice as needed. You can also store it at room temperature for up to 2 days if your kitchen is cool, but the refrigerator extends its shelf life.
Freezing: This loaf freezes beautifully. For the best results, slice the completely cooled bread into individual servings, wrap each slice in plastic wrap, and place them in a freezer-safe bag or container. Freeze for up to 3 months. To enjoy, thaw a slice in the refrigerator overnight or on the counter for a couple of hours. You can also pop a frozen slice directly into the toaster or microwave for a quick, warm treat. The texture after freezing is virtually unchanged, making this a perfect meal-prep recipe. You can also freeze the entire loaf; wrap it tightly and thaw in the fridge.
Meal Prep: Make a loaf on Sunday, and you’ll have healthy, grab-and-go breakfast or snack options all week. The bread slices cleanly and holds up well, so it’s easy to pack in lunches. Pre-slice the loaf before storing so you can quickly grab a piece in the morning. You can also double the recipe and bake two loaves at once; they freeze so well that having a spare on hand is always a good idea.
Want the full truth and the practical next steps?
Page 2 continues with the real explanation, the key details many readers skip, and the simple takeaways that make this guide more useful.