
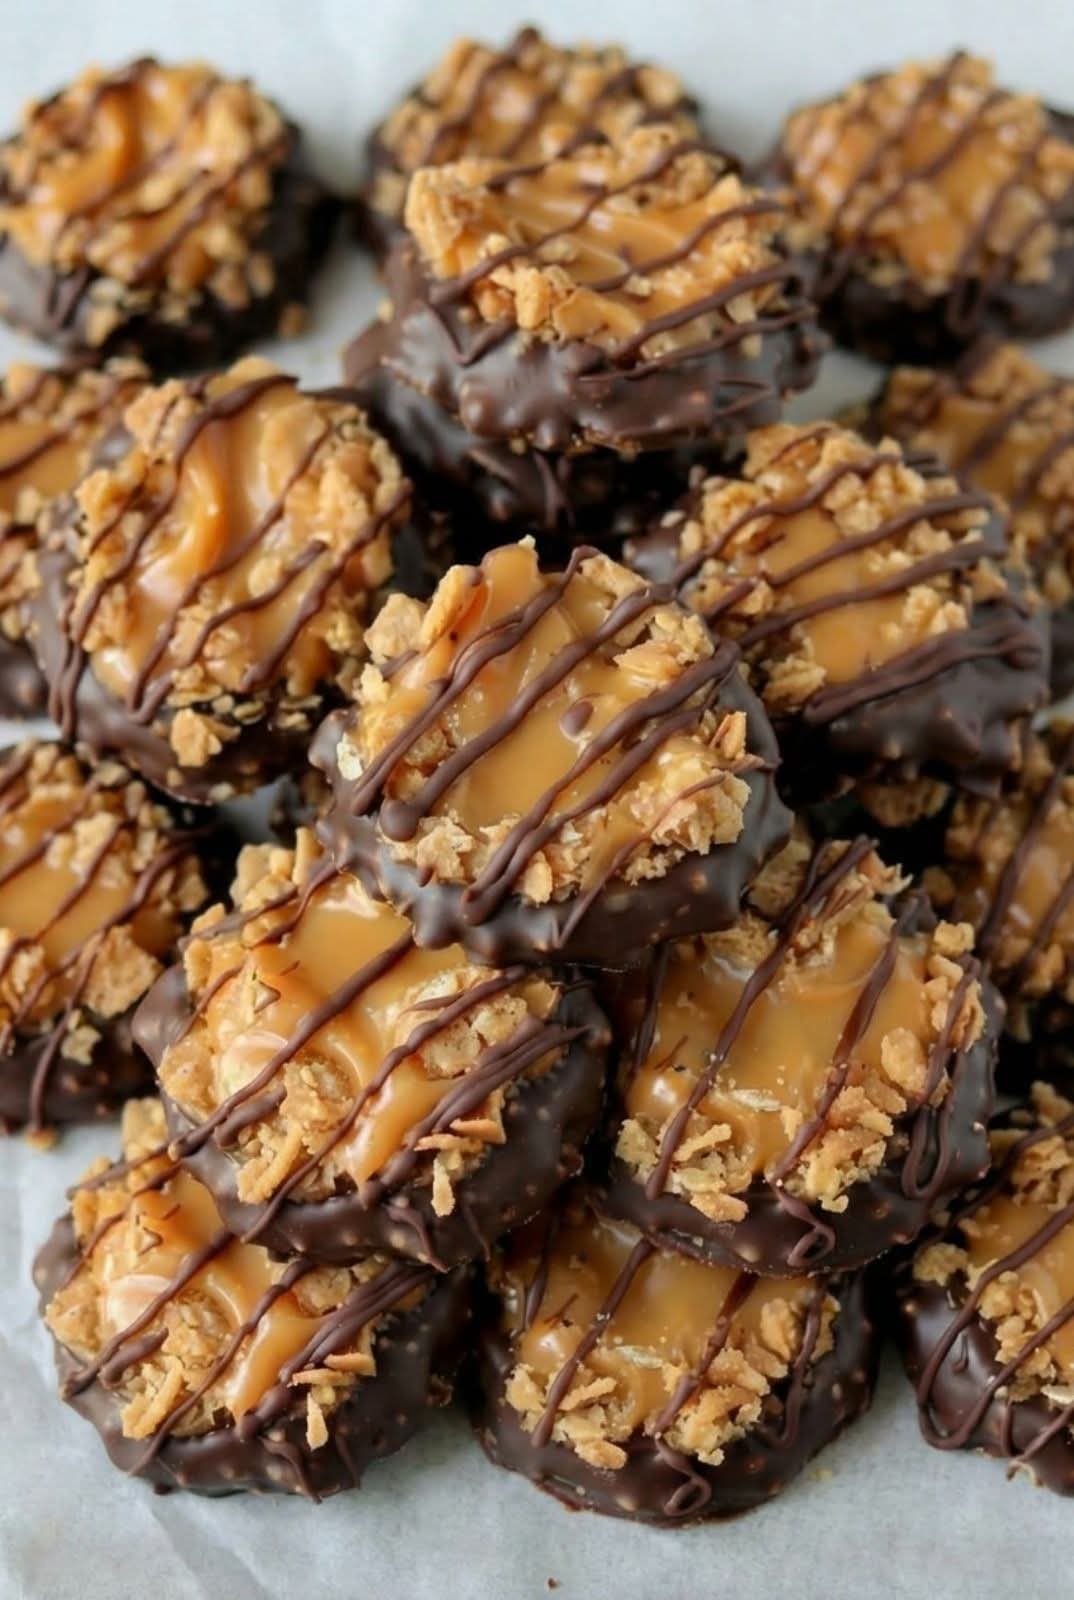
There are cookies that require hours of baking, and then there are these Easy No Bake Samoa Cookies – the kind of caramel, coconut, chocolate, buttery, crunchy, melt‑in‑your‑mouth treats that taste exactly like the beloved Girl Scout cookies (also known as Caramel deLites) but without any oven time. Imagine a crisp, buttery shortbread base made from crushed cookies or crackers, layered with gooey, sticky caramel, sprinkled with golden toasted coconut, and drizzled with rich dark chocolate. Every bite is a perfect balance of sweet, salty, crunchy, and chewy. And the best part? You can make them in under 20 minutes, with just a handful of simple ingredients. If you are searching for a no bake Samoa cookies recipe that is easy, foolproof, and absolutely irresistible, this is the one.
These no bake Samoas are perfect for bake sales, holiday cookie trays, last‑minute cravings, or anytime you need a Girl Scout cookie fix without the wait. They are naturally vegetarian, can be made gluten‑free, and are endlessly customizable. This homemade caramel coconut cookies recipe will become a family favorite.
In this complete guide, you will learn how to make the perfect no bake Samoa cookies, including pro tips for the best texture, delicious variations (add a layer of peanut butter, use dark chocolate, or make them vegan), storage and freezing instructions, and why this simple recipe is a total game‑changer. Let’s get melting.
Why No Bake Samoa Cookies Are a Lifesaver
These cookies are incredibly easy to make (no oven, no mixer), ready in under 20 minutes (plus chilling), made with only 5 main ingredients, perfectly crunchy, chewy, and chocolatey, and great for using up pantry staples. Traditional Samoa cookies require baking the shortbread base, caramelizing coconut, and tempering chocolate. This no‑bake version uses a simple crust of crushed cookies or graham crackers, melted butter, and sweetened condensed milk – no baking required. The caramel layer is made from soft caramels melted with a splash of cream, then mixed with toasted coconut. A drizzle of melted chocolate on top completes the magic. This is a quick Girl Scout cookie copycat that will satisfy any craving.
Here is why you will love it:
Only 20 minutes of active prep – Then chill and slice.
No oven, no baking – Perfect for hot days.
Incredibly crunchy, chewy, and chocolatey – The perfect texture.
Made with simple ingredients – Cookies, butter, caramel, coconut, chocolate.
Perfect for bake sales, holidays, and gifting – Always a hit.
Customizable – Add peanut butter, use dark chocolate, or make them vegan.
Kid‑friendly and adult‑loved – A guaranteed crowd‑pleaser.
Once you try these no bake caramel coconut cookies, you will never spend hours baking the real thing again.
The Complete Easy No Bake Samoa Cookies Recipe
This recipe makes about 20‑24 cookies (using a 9×9 or 8×8 pan). It can easily be doubled for a 9×13 pan.
Ingredients – For the Crust:
2 cups (200g) crushed shortbread cookies or graham crackers (about 20 shortbread cookies)
¼ cup (50g) granulated sugar
½ cup (113g, 1 stick) unsalted butter, melted
Ingredients – For the Caramel Coconut Layer:
2 cups (180g) sweetened shredded coconut
1 bag (11 oz / 310g) soft caramels (about 35‑40 caramels), unwrapped
2 tablespoons heavy cream or milk
¼ teaspoon salt (optional, for salted caramel)
Ingredients – For the Chocolate Drizzle:
1 cup (170g) semi‑sweet or dark chocolate chips
1 teaspoon coconut oil or vegetable oil (for thinning)
Optional Add‑Ins and Variations:
½ cup chopped pecans or walnuts (add to crust)
2 tablespoons creamy peanut butter (swirl into caramel)
White chocolate drizzle instead of dark
Flaky sea salt on top
Equipment:
- 8×8 or 9×9 inch square baking pan
- Parchment paper
- Non‑stick spray
- Microwave‑safe bowl or saucepan
- Spatula
Step‑by‑Step Instructions
Step 1 – Toast the Coconut (Optional but Recommended)
Spread the shredded coconut on a baking sheet and toast at 350°F for 5‑7 minutes, stirring once, until golden brown and fragrant. Watch carefully – coconut burns quickly. You can also toast in a dry skillet over medium heat for 3‑4 minutes. Toasting brings out the nutty flavor and gives the cookies that authentic Samoa taste. Set aside to cool.
Step 2 – Make the Crust
Line an 8×8 or 9×9 inch square baking pan with parchment paper, leaving overhangs on two sides for easy removal. Lightly spray with non‑stick spray. In a medium bowl, combine the crushed shortbread cookies (or graham crackers) and sugar. Pour in the melted butter and stir until the mixture resembles wet sand. Press firmly into the bottom of the prepared pan. Use the bottom of a measuring cup to press down hard – this prevents crumbling. Refrigerate while you make the caramel layer.
Step 3 – Make the Caramel Coconut Layer
In a microwave‑safe bowl or a small saucepan over low heat, combine the unwrapped caramels and heavy cream. Microwave in 30‑second bursts, stirring after each, until the caramels are completely melted and smooth. (If using a saucepan, stir constantly over low heat.) Stir in the salt if using. Fold in the toasted coconut until evenly coated. The mixture will be thick and sticky.
Step 4 – Assemble the Cookies
Remove the crust from the refrigerator. Spoon the caramel coconut mixture over the crust and spread evenly with a spatula. Press down gently to help it adhere. Refrigerate for at least 30 minutes, or until the caramel is firm.
Step 5 – Melt the Chocolate
In a microwave‑safe bowl, combine the chocolate chips and coconut oil. Microwave in 20‑second bursts, stirring after each, until smooth. Alternatively, use a double boiler.
Step 6 – Drizzle and Set
Remove the pan from the refrigerator. Using a fork or a piping bag (or a zip‑top bag with the corner snipped), drizzle the melted chocolate over the caramel layer in a zigzag pattern. For an authentic Samoa look, you can also dip the bottom of the cookie slab in chocolate or spread a thin layer on the bottom before adding the caramel. Return to the refrigerator for 15‑20 minutes until the chocolate is set.
Step 7 – Slice and Serve
Lift the whole slab out of the pan using the parchment overhangs. Place on a cutting board. Use a sharp knife to cut into squares, rectangles, or traditional Samoa cookie shapes. For clean cuts, wipe the knife between slices. Store as directed below.
Pro Tips for the Best No Bake Samoa Cookies
Follow these expert tips for perfect no bake Samoas every time:
Use soft, fresh caramels – Old or hard caramels may not melt smoothly. Kraft caramels work well. You can also use a 14‑oz can of sweetened condensed milk cooked into caramel (dulce de leche) as a shortcut.
Toast the coconut – This step is essential for that authentic Samoa flavor. Do not skip it.
Press the crust firmly – A compact crust prevents crumbling when cutting. Use the bottom of a measuring cup.
Let the caramel layer cool slightly before spreading – If the caramel is too hot, it can melt the crust. Let it cool for 5 minutes before spreading.
Use a sharp knife and wipe between cuts – This prevents the caramel and chocolate from dragging.
Store in an airtight container – These cookies stay fresh for up to 2 weeks in the refrigerator.
Make them ahead – These cookies are perfect for making 1‑2 days before a party.
Delicious Variations (Same No‑Bake Base)
Once you master the classic no bake Samoa cookies, try these fun twists. These Samoa cookie variations will keep your baking exciting.
1. Peanut Butter Samoa Cookies
Add ¼ cup of creamy peanut butter to the caramel mixture (melt it with the caramels). The peanut butter adds a salty, nutty depth. Drizzle with milk chocolate. This is a peanut butter Samoa cookie that is irresistible.
2. Dark Chocolate Samoa Cookies
Use dark chocolate (70% cacao) for the drizzle and also dip the bottom of the crust in dark chocolate. The rich, slightly bitter chocolate balances the sweet caramel perfectly. This is a dark chocolate Samoa cookie for sophisticated palates.
3. Gluten‑Free Samoa Cookies
Use gluten‑free shortbread cookies or gluten‑free graham crackers for the crust. Ensure your caramels and chocolate are gluten‑free. This gluten free Samoa cookie is safe for celiacs.
Use vegan shortbread cookies or vegan graham crackers, vegan butter, and vegan caramel (many brands make vegan soft caramels). Use dairy‑free chocolate chips. This vegan Samoa cookie is just as delicious.
5. Salted Caramel Samoa Cookies
Add ½ teaspoon of flaky sea salt to the caramel mixture. Sprinkle a little extra salt on top of the chocolate drizzle. The sweet‑salty combination is divine.
Drizzle with white chocolate instead of dark. Add a little coconut extract to the caramel for extra coconut flavor. This is a white chocolate Samoa cookie that is sweeter and creamier.
7. Macadamia Samoa Cookies
Add ½ cup of chopped toasted macadamia nuts to the caramel coconut layer. The buttery, rich nuts are wonderful with coconut and caramel.
Press the crust mixture into a mini muffin tin to create individual round cookies. Top with caramel coconut and chocolate. These are perfect for parties.
How to Store, Freeze, and Gift
Room Temperature
These cookies contain dairy and should be stored in the refrigerator for safety. However, if your kitchen is cool, they can be kept in an airtight container at room temperature for 2‑3 days. The chocolate may soften slightly.
Refrigerator
Store the cookies in an airtight container in the refrigerator for up to 2 weeks. The caramel will stay firm, and the chocolate will remain set. Bring to room temperature for 10‑15 minutes before serving for the best texture.
Freezer
These cookies freeze beautifully. Place them in a single layer in a freezer‑safe container, separating layers with parchment paper. Freeze for up to 2 months. Thaw in the refrigerator overnight or at room temperature for 30 minutes. Do not thaw in the microwave – the chocolate can melt unevenly.
Gifting Ideas
Arrange the cookies in a decorative tin or box, separated by parchment paper. Tie with a ribbon and attach a handwritten tag. These make wonderful homemade gifts for neighbors, teachers, and coworkers during the holidays.
Want the full truth and the practical next steps?
Page 2 continues with the real explanation, the key details many readers skip, and the simple takeaways that make this guide more useful.