
There are breadsticks that come in a box, and then there are homemade cheesy garlic breadsticks – the kind that emerge from the oven golden brown, fragrant with butter and roasted garlic, and topped with a blanket of melted, stretchy cheese. These breadsticks are the ultimate side dish for pasta night, the star of game day spreads, and the perfect companion to a big bowl of soup or salad. They are soft and pillowy on the inside, crisp and buttery on the outside, and absolutely loaded with garlicky, cheesy goodness. Best of all, they are surprisingly easy to make from scratch with just a handful of simple ingredients.
In this guide, you will learn the complete recipe for the best cheesy garlic breadsticks, including a simple yeasted dough that comes together quickly, pro tips for the perfect texture, delicious variations (add herbs, use different cheeses, or make them gluten‑free), storage advice, and answers to common questions. Say goodbye to store‑bought frozen breadsticks – once you taste homemade, you will never go back.
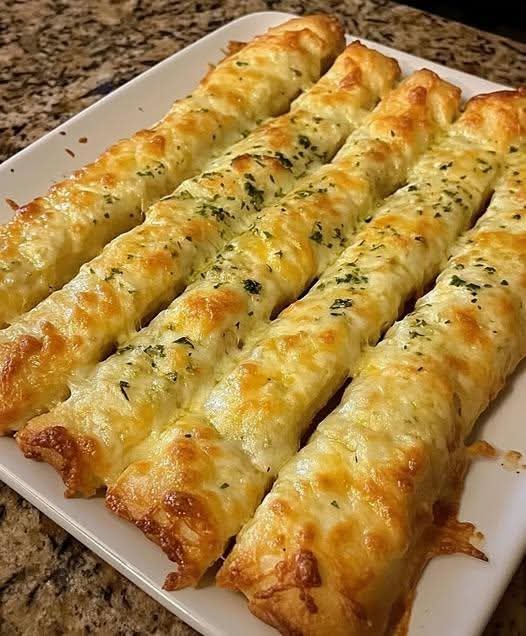
Why Cheesy Garlic Breadsticks Are a Crowd‑Pleaser
Bread and cheese are a match made in heaven, and when you add garlic butter, it becomes irresistible. These breadsticks are versatile enough to serve alongside spaghetti and meatballs, as an appetizer with marinara sauce, or even as a snack on their own. The dough is soft and tender, thanks to generous brushing of garlic butter before and after baking. The cheese melts into every crevice, creating crispy, cheesy edges that everyone fights over.
Here is why you will love them:
· Soft and fluffy – A light, enriched yeast dough.
· Loaded with garlic butter – Brushed before and after baking for double flavor.
· Perfectly cheesy – A blend of mozzarella and Parmesan.
· No fancy equipment – Mix by hand or with a stand mixer.
· Freezer‑friendly – Make a double batch and bake later.
· Customizable – Add herbs, spice, or different cheeses.
· Better than takeout – Fresher, cheaper, and more delicious.
Once you try these, you will never reach for a frozen box again.
The Complete Cheesy Garlic Breadsticks Recipe
This recipe makes about 12‑16 breadsticks, depending on how thick you cut them.
Ingredients
For the Dough:
· 3½ to 4 cups (420‑480g) all‑purposeark
· 1 tablespoon granulated sugar
· 1 packet (2¼ teaspoons) instant yeast
· 1½ teaspoons salt
· 1 cup (240ml) warm water (110‑115°F / 43‑46°C)
· 3 tablespoons olive oil (or melted butter)
For the Garlic Butter Topping:
· 4 tablespoons (½ stick) unsalted butter, melted
· 4 cloves garlic, minced (or 1½ teaspoons garlic powder)
· ½ teaspoon salt
· ¼ teaspoon black pepper
· 1 tablespoon fresh parsley, chopped (or 1 teaspoon dried)
For the Cheese Topping:
· 1½ cups (170g) shredded mozzarella cheese
· ¼ cup (25g) grated Parmesan cheese
For Serving (Optional):
· Marinara sauce for dipping
Equipment
· Large mixing bowl
· Baking sheet
· Parchment paper
· Rolling pin (optional)
· Pastry brush
Step‑by‑Step Instructions
Step 1 – Make the Dough
In a large bowl, combine 3½ cups of flour, sugar, instant yeast, and salt. Add the warm water and olive oil. Stir with a wooden spoon until a shaggy dough forms.
Step 2 – Knead
Turn the dough out onto a lightly floured surface. Knead for 5‑7 minutes, until the dough is smooth and elastic. Add more flour, 1 tablespoon at a time, if the dough is too sticky. The dough should be soft and slightly tacky but not sticky.
Step 3 – First Rise
Place the dough in a lightly oiled bowl, turning to coat. Cover with plastic wrap or a clean kitchen towel. Let rise in a warm place for 1 hour, or until doubled in size.
Step 4 – Preheat and Prepare
Preheat your oven to 400°F (200°C). Line a baking sheet with parchment paper.
Step 5 – Shape the Breadsticks
Punch down the dough and turn it out onto a lightly floured surface. Roll or press the dough into a rectangle about ½‑inch thick. Use a pizza cutter or a sharp knife to cut the dough into 1‑inch wide strips. Gently stretch each strip to about 6‑8 inches long and place on the prepared baking sheet, spacing about 1 inch apart.
Step 6 – Second Rise
Cover the shaped breadsticks with a clean kitchen towel and let them rise for 20‑30 minutes, until slightly puffy.
Step 7 – Make the Garlic Butter
In a small bowl, combine the melted butter, minced garlic, salt, pepper, and parsley.
Step 8 – Brush and Top
Brush the risen breadsticks generously with the garlic butter. Reserve about 2 tablespoons for after baking. Sprinkle the mozzarella and Parmesan cheeses evenly over the breadsticks.
Step 9 – Bake
Bake at 400°F for 12‑15 minutes, until the breadsticks are golden brown and the cheese is melted and bubbly.
Step 10 – Finish and Serve
Remove from the oven. Immediately brush the hot breadsticks with the reserved garlic butter. Sprinkle with extra parsley if desired. Serve warm with marinara sauce for dipping.
Pro Tips for the Best Cheesy Garlic Breadsticks
Use Instant Yeast for a Faster Rise
Instant yeast (or rapid‑rise) can be mixed directly with the dry ingredients. If using active dry yeast, proof it in warm water with a pinch of sugar for 5‑10 minutes before adding.
Do Not Overwork the Dough
Knead just until smooth. Overkneading can make the breadsticks tough.
Let the Dough Rise in a Warm Spot
For best results, let the dough rise in a warm, draft‑free place (like inside your oven with the light on, or on top of the refrigerator).
Stretch Gently
When shaping the breadsticks, stretch gently – if the dough resists, let it rest for 5 minutes and try again.
Brush Twice with Garlic Butter
Brushing after baking adds a final burst of garlic flavor and a beautiful sheen.
Use Fresh Garlic
Freshly minced garlic is far more flavorful than garlic powder. If you only have garlic powder, use 1 teaspoon.
Experiment with Cheeses
A blend of mozzarella (for stretch) and Parmesan (for nutty flavor) is classic. Try provolone, fontina, or a sprinkle of Asiago.
Add Red Pepper Flakes
For a spicy kick, sprinkle red pepper flakes over the cheese before baking.
Want the full truth and the practical next steps?
Page 2 continues with the real explanation, the key details many readers skip, and the simple takeaways that make this guide more useful.