
There are some recipes that are more than just food. They are memories baked into a crust, served warm with a dollop of whipped cream, and passed down through generations. This chocolate pie is exactly that. It is the pie my grandmother made for every holiday, every family gathering, and every time someone needed a little sweetness in their life.
The filling is silky, rich, and intensely chocolatey. It sets into a perfect custard that slices cleanly yet melts on your tongue. And the best part? It comes together with simple pantry staples — sugar, cocoa powder, flour, milk, eggs, and a few other basics. No complicated techniques. No hard‑to‑find ingredients. Just honest, old‑fashioned chocolate pie perfection.
In this guide, you will learn the complete recipe that has been in my family for decades, pro tips for a lump‑free, silky filling, how to make the perfect flaky pie crust (or use a store‑bought shortcut), delicious variations, and storage advice. Do not lose this recipe — it is a keeper.
Why This Chocolate Pie Never Goes Out of Style
Chocolate pie is a classic for a reason. It is not too sweet, not too heavy, and deeply satisfying. Unlike mousse or pudding, this pie has structure — it holds its shape when sliced, yet it is creamy and smooth.
Here is why you will love it:
· Rich, deep chocolate flavor – Made with cocoa powder, not chocolate bars, so it is pantry‑friendly.
· Silky smooth texture – No lumps, no graininess.
· Simple ingredients – You probably have everything in your kitchen right now.
· No fancy equipment – A whisk and a saucepan are all you need.
· Make‑ahead friendly – Tastes even better the next day.
· Crowd‑pleaser – Kids and adults alike go back for seconds.
This is the pie that disappears first at potlucks, the one that earns you the title “best baker in the family.” And now it can be yours.
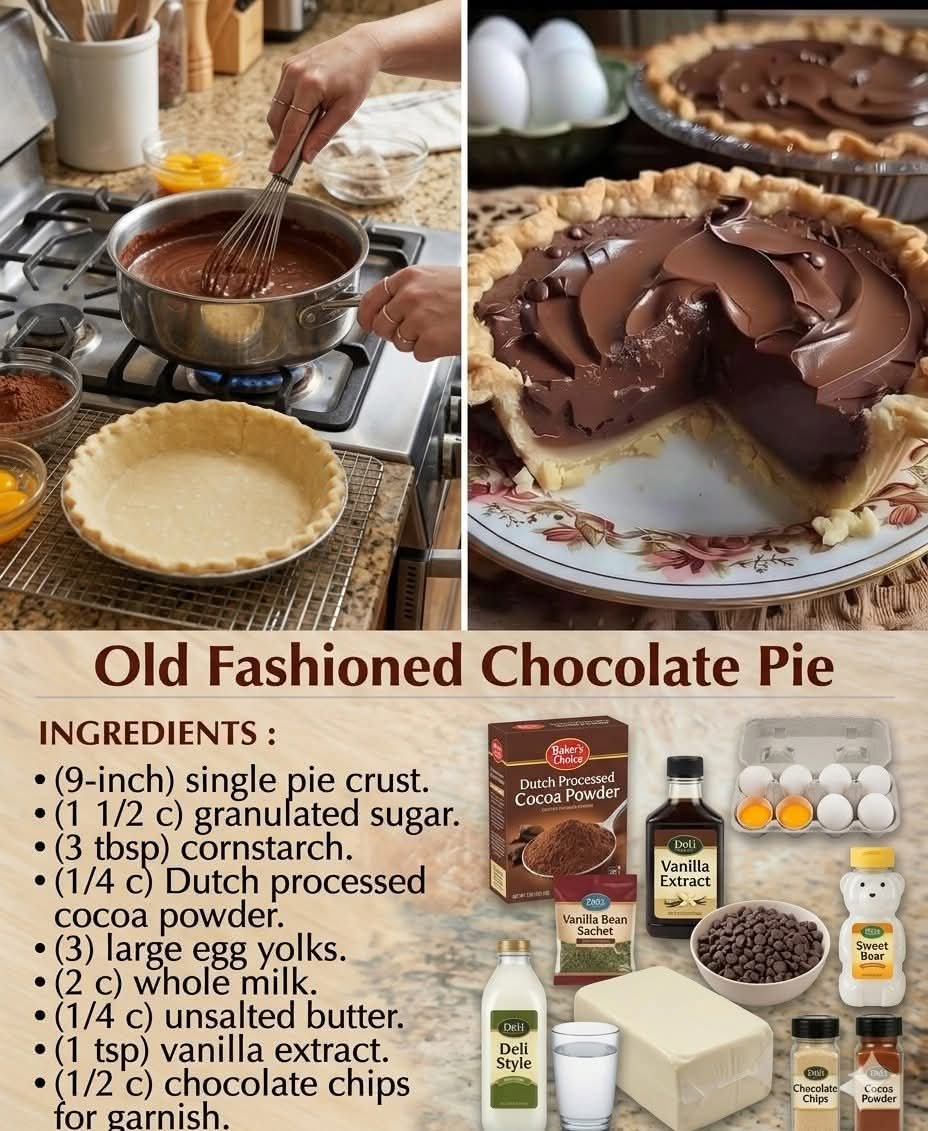
The Complete Grandma’s Chocolate Pie Recipe
This recipe makes one 9‑inch pie, serving 8–10 people.
For the Pie Crust (or Use Store‑Bought)
· 1¼ cups (150g) all‑purpose flour
· ½ teaspoon salt
· ½ cup (113g) unsalted butter, cold and cubed
· 3–4 tablespoons ice water
Or use one refrigerated or frozen 9‑inch pie crust.
For the Chocolate Filling
· 1 cup (200g) granulated sugar
· ¼ cup (25g) unsweetened cocoa powder (natural or Dutch‑processed)
· ¼ cup (30g) all‑purpose flour
· ¼ teaspoon salt
· 3 cups (720 ml) whole milk
· 3 large egg yolks (room temperature)
· 2 tablespoons unsalted butter
· 1½ teaspoons vanilla extract
For the Topping (Optional)
· 1 cup (240 ml) heavy whipping cream
· 2 tablespoons powdered sugar
· ½ teaspoon vanilla extract
· Chocolate shavings or cocoa powder for garnish
Step‑by‑Step Instructions
Part 1: Make the Pie Crust (Or Skip to Store‑Bought)
Step 1 – Combine Dry Ingredients
In a large bowl, whisk together the flour and salt.
Step 2 – Cut in the Butter
Add the cold, cubed butter. Use a pastry blender or your fingers to work the butter into the flour until the mixture resembles coarse crumbs with pea‑sized pieces of butter.
Step 3 – Add Ice Water
Sprinkle 3 tablespoons of ice water over the mixture. Stir with a fork until the dough begins to come together. Add the remaining tablespoon of water if needed. Do not overmix.
Step 4 – Form the Dough
Gather the dough into a ball, flatten into a disk, wrap in plastic, and refrigerate for at least 1 hour.
Step 5 – Roll and Blind Bake
On a floured surface, roll the dough into a 12‑inch circle. Transfer to a 9‑inch pie plate. Trim and crimp the edges. Prick the bottom with a fork. Refrigerate for 30 minutes.
Preheat oven to 375°F (190°C). Line the crust with parchment paper and fill with pie weights or dried beans. Bake for 15 minutes. Remove weights and paper, then bake for another 5–7 minutes until lightly golden. Cool completely.
If using a store‑bought crust, follow package directions for blind baking.
Part 2: Make the Chocolate Filling
Step 1 – Combine Dry Ingredients
In a medium saucepan (off the heat), whisk together the sugar, cocoa powder, flour, and salt. Break up any lumps of cocoa.
Step 2 – Add Milk Gradually
Pour about ½ cup of the whole milk into the dry mixture and whisk to form a smooth paste. Then gradually whisk in the remaining milk, stirring constantly to prevent lumps.
Step 3 – Cook the Custard
Place the saucepan over medium heat. Cook, whisking constantly, until the mixture thickens and comes to a gentle boil. This will take about 8–10 minutes. The mixture should be thick enough to coat the back of a spoon.
Step 4 – Temper the Egg Yolks
In a small bowl, lightly beat the egg yolks. Slowly pour about 1 cup of the hot chocolate mixture into the yolks while whisking constantly. This raises the temperature of the eggs without scrambling them.
Step 5 – Combine and Cook
Pour the tempered yolk mixture back into the saucepan. Whisk to combine. Continue cooking over medium heat for 2–3 minutes, until the filling is very thick and pudding‑like. Do not boil vigorously — keep at a gentle simmer.
Step 6 – Add Butter and Vanilla
Remove the saucepan from the heat. Whisk in the butter and vanilla extract until the butter is fully melted and incorporated.
Step 7 – Strain (Optional but Recommended)
For an ultra‑smooth filling, pour the mixture through a fine‑mesh strainer into a bowl. This catches any accidentally cooked egg bits.
Step 8 – Fill the Crust
Pour the hot filling into the cooled pie crust. Smooth the top with a spatula. Press a piece of plastic wrap directly onto the surface of the filling to prevent a skin from forming.
Step 9 – Chill
Refrigerate the pie for at least 4 hours, preferably overnight. The filling will set completely.
Part 3: Make the Whipped Cream Topping
Step 1 – Chill Bowl and Beat
Place a metal or glass mixing bowl and beaters in the refrigerator for 15 minutes.
Step 2 – Whip the Cream
Pour the heavy cream into the chilled bowl. Beat on medium‑high speed until soft peaks form.
Step 3 – Add Sugar and Vanilla
Add the powdered sugar and vanilla extract. Continue beating until stiff peaks form (peaks stand straight up). Do not overbeat.
Step 4 – Top the Pie
Spread or pipe the whipped cream over the chilled chocolate filling. Garnish with chocolate shavings or a dusting of cocoa powder.
Part 4 – Slice and Serve
Use a sharp knife, wiping the blade clean between slices, for neat pieces. Serve chilled. Store leftovers in the refrigerator.
Want the full truth and the practical next steps?
Page 2 continues with the real explanation, the key details many readers skip, and the simple takeaways that make this guide more useful.