
“Been making this dish for 20 plus years! All my kids requested the recipe when they got their own places and now make it for their kids. This one never goes out of style.”
That is the kind of recipe that becomes family legend. The one that shows up at every birthday, every holiday, every backyard barbecue. The one that people request by name. The one that, no matter how many new desserts you try, always brings you back to the table.
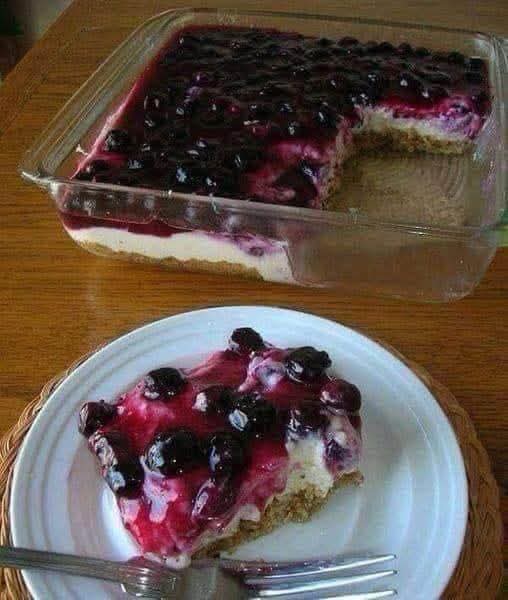
This Blueberry Cheesecake is exactly that. It is creamy, rich, and perfectly balanced with a buttery graham cracker crust, a silky smooth cheesecake filling, and a jewel‑toned blueberry topping that is both sweet and slightly tart. It is impressive enough for a dinner party but simple enough for a weeknight treat.
In this guide, you will learn the complete recipe that has been passed down through generations, pro tips for a crack‑free cheesecake, delicious variations, storage advice, and why this dessert has stood the test of time.
Why This Blueberry Cheesecake Never Goes Out of Style
Cheesecake has been beloved for centuries, but this particular version — with a lush blueberry topping — has a special place in home kitchens. It is not overly fussy. It does not require a water bath (though you can use one). It uses simple, everyday ingredients that you probably already have.
Here is why this recipe is a keeper:
· Rich and creamy – The perfect balance of cream cheese, sugar, eggs, and sour cream.
· Buttery graham cracker crust – Sweet, crunchy, and easy to make.
· Vibrant blueberry topping – Fresh or frozen berries cooked into a glossy, fruity sauce.
· No water bath required – This recipe is forgiving and produces a beautiful, crack‑free top.
· Make‑ahead friendly – Cheesecake tastes even better after a day in the fridge.
· Crowd‑pleaser – Kids, adults, and grandparents all love it.
Once you master this recipe, you will understand why it has been in my family for over two decades.
The Complete Blueberry Cheesecake Recipe
This recipe makes one 9‑inch cheesecake, serving 12–16 people.
For the Graham Cracker Crust
· 1½ cups (180g) graham cracker crumbs (about 12 full sheets)
· ¼ cup (50g) granulated sugar
· 6 tablespoons (85g) unsalted butter, melted
For the Cheesecake Filling
· 32 oz (904g) cream cheese (four 8‑oz blocks), softened to room temperature
· 1 cup (200g) granulated sugar
· 1 cup (240g) full‑fat sour cream (room temperature)
· 4 large eggs (room temperature)
· 1 tablespoon vanilla extract
· 2 tablespoons all‑purpose flour (optional, for extra stability)
For the Blueberry Topping
· 2 cups (300g) fresh or frozen blueberries (if frozen, do not thaw)
· ¼ cup (50g) granulated sugar (adjust to taste)
· 1 tablespoon lemon juice
· 2 tablespoons water
· 1 tablespoon cornstarch mixed with 2 tablespoons cold water (slurry)
Equipment
· 9‑inch springform pan
· Electric mixer (stand or hand)
· Large roasting pan (if using a water bath – optional)
· Aluminum foil
· Saucepan
Step‑by‑Step Instructions
Part 1: Make the Crust
Step 1 – Preheat and Prepare
Preheat your oven to 350°F (175°C). Lightly grease a 9‑inch springform pan. Wrap the outside of the pan with a double layer of heavy‑duty aluminum foil if you plan to use a water bath (optional but recommended for crack‑free top).
Step 2 – Combine Crust Ingredients
In a medium bowl, mix the graham cracker crumbs and sugar. Pour in the melted butter and stir with a fork until the mixture resembles wet sand.
Step 3 – Press into the Pan
Transfer the crumb mixture to the prepared springform pan. Press down firmly and evenly using the bottom of a measuring cup or a flat glass. Press about 1 inch up the sides. Refrigerate while you make the filling.
Step 4 – Bake the Crust (Optional)
For a sturdier crust, bake at 350°F for 8–10 minutes. Let cool slightly. This step is optional but recommended.
Part 2: Make the Cheesecake Filling
Step 1 – Soften the Cream Cheese
Ensure your cream cheese is at room temperature. Cold cream cheese will be lumpy. Leave it out for 1–2 hours before starting.
Step 2 – Beat the Cream Cheese
In a large mixing bowl, beat the softened cream cheese with an electric mixer on medium speed until smooth and creamy, about 2 minutes. Scrape down the sides.
Step 3 – Add Sugar
Add the sugar and beat until well combined and smooth, about 1 minute.
Step 4 – Add Sour Cream and Vanilla
Add the sour cream and vanilla extract. Beat until just combined. Do not overmix.
Step 5 – Add Eggs One at a Time
Add the eggs one at a time, beating on low speed after each addition until just incorporated. Overmixing incorporates too much air, which can cause cracks.
Step 6 – Add Flour (Optional)
If using flour, sprinkle it over the batter and fold in gently with a spatula.
Step 7 – Pour into the Crust
Pour the filling over the prepared crust. Smooth the top with a spatula.
Part 3 – Bake the Cheesecake
Option 1: Without a Water Bath (Easier)
Bake at 350°F for 60–70 minutes. The edges should be set and lightly golden, but the center will still jiggle slightly. Turn off the oven, crack the door open, and let the cheesecake cool in the oven for 1 hour.
Option 2: With a Water Bath (For Extra Insurance)
Place the foil‑wrapped springform pan in a large roasting pan. Pour hot water into the roasting pan until it reaches halfway up the sides of the springform pan. Bake at 350°F for 60–70 minutes. Turn off the oven and let cool in the water bath for 1 hour with the door cracked.
Part 4 – Cool and Chill
Remove the cheesecake from the oven and water bath (if used). Run a thin knife around the edge of the pan to loosen (this prevents cracking as it cools). Let the cheesecake cool to room temperature on a wire rack (about 2 hours). Then refrigerate, uncovered, for at least 4 hours, preferably overnight. Cover once fully chilled.
Part 5 – Make the Blueberry Topping
Step 1 – Cook the Blueberries
In a saucepan over medium heat, combine the blueberries, sugar, lemon juice, and water. Cook for 5–7 minutes, stirring occasionally, until the berries soften and release their juices.
Step 2 – Thicken
Stir the cornstarch slurry (cornstarch mixed with cold water) into the blueberry mixture. Cook for 1–2 more minutes until the sauce thickens and becomes glossy.
Step 3 – Cool
Remove from heat and let the topping cool completely to room temperature. It will thicken further as it cools.
Part 6 – Assemble and Serve
Step 1 – Release the Cheesecake
Run a knife around the edge of the springform pan. Release the latch and remove the outer ring.
Step 2 – Top with Blueberries
Spoon the cooled blueberry topping over the chilled cheesecake, spreading evenly. You can also serve the topping on the side.
Step 3 – Slice and Serve
Use a sharp knife, wiping the blade clean between cuts, for neat slices. Serve chilled.
Want the full truth and the practical next steps?
Page 2 continues with the real explanation, the key details many readers skip, and the simple takeaways that make this guide more useful.