
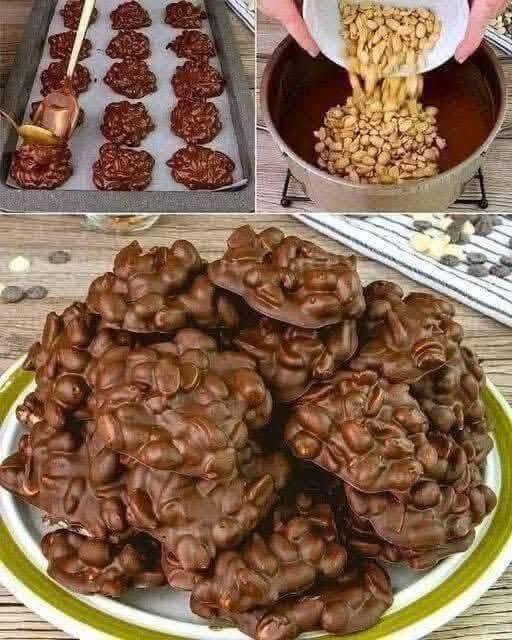
There are some recipes that do not need to be fancy to be unforgettable. Chocolate peanut clusters are exactly that — a humble, crunchy, sweet, and salty cluster of roasted peanuts coated in rich, silky chocolate. They take less than 15 minutes to prepare, require no oven, and use just a handful of pantry staples.
The first time I made these, I could not believe how something so simple could disappear so fast. One cluster turned into three, then five. Before I knew it, the entire tray was empty.
These clusters are perfect for holiday gifting, bake sales, afternoon snacks, or late‑night cravings. They are naturally gluten‑free, easily made dairy‑free, and endlessly customizable. Plus, they keep well in the pantry or freezer — if they last that long.
In this guide, you will learn the complete recipe, pro tips for perfect clusters, delicious variations, storage advice, and why this old‑fashioned candy deserves a spot in your kitchen.
Why Chocolate Peanut Clusters Are a Timeless Classic
Chocolate and peanuts are a match made in dessert heaven. The combination of creamy, melt‑in‑your‑mouth chocolate and crunchy, salty peanuts is addictive. And when you cluster them together, you get the perfect bite‑sized treat.
Here is why this recipe is a winner:
· Only 5 main ingredients – Peanuts, chocolate, butter (or coconut oil), vanilla, salt.
· No baking required – No oven, no candy thermometer, no complicated steps.
· Ready in 30 minutes – Including setting time in the fridge.
· Budget‑friendly – Peanuts and chocolate chips are inexpensive.
· Perfect for gifting – Stack them in a tin or cellophane bag.
· Endlessly customizable – Dark chocolate, white chocolate drizzle, sea salt, or add dried fruit.
Once you master the basic recipe, you will find yourself making batch after batch.
The Complete Chocolate Peanut Clusters Recipe
This recipe makes about 20–25 clusters, depending on size. Double it for gifting or parties.
Ingredients
· 2 cups (300g) roasted peanuts (salted or unsalted – see note)
· 2 cups (340g) milk chocolate chips (or chopped chocolate bar)
· 1 tablespoon butter or coconut oil (adds shine and helps with melting)
· ½ teaspoon vanilla extract
· Pinch of salt (omit if using salted peanuts)
Optional Add‑Ins & Toppings
· ½ cup white chocolate chips (for drizzle)
· Flaky sea salt (for sprinkling on top)
· ¼ cup dried cranberries or raisins
· ¼ cup mini marshmallows (add after mixing)
· ¼ cup crushed pretzels (for extra crunch)
Equipment
· Baking sheet or large plate
· Parchment paper or silicone baking mat
· Heatproof bowl (microwave‑safe or for double boiler)
· Spoon or cookie scoop
Step‑by‑Step Instructions
Step 1 – Prepare Your Workspace
Line a baking sheet or large plate with parchment paper. This prevents sticking and makes cleanup easy. If you are using a silicone baking mat, even better.
Step 2 – Melt the Chocolate
Place the chocolate chips and butter (or coconut oil) in a heatproof bowl.
Microwave method: Heat in 20‑second bursts, stirring well after each burst, until the chocolate is smooth and fully melted. Do not overheat — chocolate can seize or burn.
Stovetop method: Fill a saucepan with 1 inch of water and bring to a simmer. Place the bowl over the saucepan (not touching the water). Stir occasionally until melted.
Step 3 – Add Flavorings
Once the chocolate is smooth, stir in the vanilla extract and a pinch of salt. If you are using salted peanuts, go easy on the extra salt.
Step 4 – Add the Peanuts
Pour the roasted peanuts into the melted chocolate. Stir gently until every peanut is well coated. The mixture should be thick and chunky.
Step 5 – Scoop the Clusters
Use a spoon or a small cookie scoop to drop mounds of the chocolate‑peanut mixture onto the prepared parchment paper. Each cluster should be about 1–2 tablespoons. Leave a little space between them so they do not stick together.
Step 6 – Let Them Set
· For a softer, room‑temperature set: Leave the clusters at room temperature for 2–3 hours, or until firm.
· For faster setting: Place the tray in the refrigerator for 20–30 minutes.
Step 7 – Add White Chocolate Drizzle (Optional)
If you want to make your clusters look extra special, melt ½ cup of white chocolate chips (using the same method) and drizzle over the set clusters using a fork or a piping bag. Sprinkle with flaky sea salt while the drizzle is still wet.
Step 8 – Store and Enjoy
Once fully set, transfer the clusters to an airtight container. Enjoy at room temperature or chilled.
Pro Tips for Perfect Chocolate Peanut Clusters
Use Quality Chocolate
The better the chocolate, the better the clusters. Milk chocolate gives a classic sweet flavor. Dark chocolate (60–70% cacao) provides a richer, less sweet option. Semi‑sweet is a great middle ground.
Salted vs. Unsalted Peanuts
· Salted peanuts – Create that irresistible sweet‑salty contrast. Reduce or omit the added salt.
· Unsalted peanuts – Let you control the salt level. Add ¼ teaspoon of fine salt to the chocolate.
Roast Your Peanuts for Extra Flavor
If your peanuts are raw, roast them first. Spread them on a baking sheet at 350°F (175°C) for 8–10 minutes, until fragrant. Let cool before adding to chocolate.
Do Not Overheat the Chocolate
Chocolate is delicate. Overheating causes it to seize (become thick and grainy). Microwave in short bursts and stir often. If using a double boiler, keep the water simmering, not boiling.
Add Butter or Coconut Oil for Shine
A tablespoon of butter or coconut oil makes the chocolate glossier and helps it set with a nice snap. It also makes the clusters easier to bite into.
Keep Clusters Uniform
Use a cookie scoop for even‑sized clusters. This ensures consistent setting and a professional look.
Chill for Faster Setting, but Room Temperature Is Fine
Refrigerating speeds up the process, but the clusters may develop a slight white bloom (fat migration) if stored in the fridge long‑term. For best texture, set at room temperature and store in a cool pantry.
Delicious Variations (Same Easy Method)
Once you master the classic chocolate peanut cluster, try these fun twists.
- Dark Chocolate Sea Salt Clusters
Use dark chocolate (70% cacao) and unsalted roasted peanuts. Sprinkle flaky sea salt on top immediately after scooping. The salt crystals contrast beautifully with the deep, bittersweet chocolate.
- White Chocolate Peanut Clusters
Replace milk chocolate with white chocolate. Use unsalted peanuts and add a pinch of salt to balance the sweetness. Drizzle with dark chocolate for a striking look.
- Peanut Butter Chocolate Clusters
Add ¼ cup of creamy peanut butter to the melted chocolate before adding the peanuts. Stir until smooth. The clusters will be even more decadent.
- Trail Mix Clusters
Add ¼ cup of dried cranberries, ¼ cup of raisins, and 2 tablespoons of sunflower seeds along with the peanuts. This turns the clusters into a portable, energy‑dense snack.
- Pretzel Peanut Clusters
Replace half the peanuts with broken pretzel pieces. The salty, crunchy pretzels add another layer of texture. Be gentle when stirring to avoid crushing the pretzels.
- Spicy Chocolate Peanut Clusters
Add ¼ teaspoon of cayenne pepper and ½ teaspoon of cinnamon to the melted chocolate. The heat from the cayenne pairs wonderfully with the sweet chocolate and salty peanuts.
- Keto / Low‑Carb Clusters
Use sugar‑free dark chocolate chips (like Lily’s) and unsalted roasted peanuts. Omit the vanilla extract if it contains sugar. These clusters are perfect for low‑carb dieters.
- Vegan Chocolate Peanut Clusters
Use dairy‑free chocolate chips and coconut oil instead of butter. Ensure your chocolate is labeled vegan (many dark chocolates are). The result is just as delicious.
Want the full truth and the practical next steps?
Page 2 continues with the real explanation, the key details many readers skip, and the simple takeaways that make this guide more useful.