
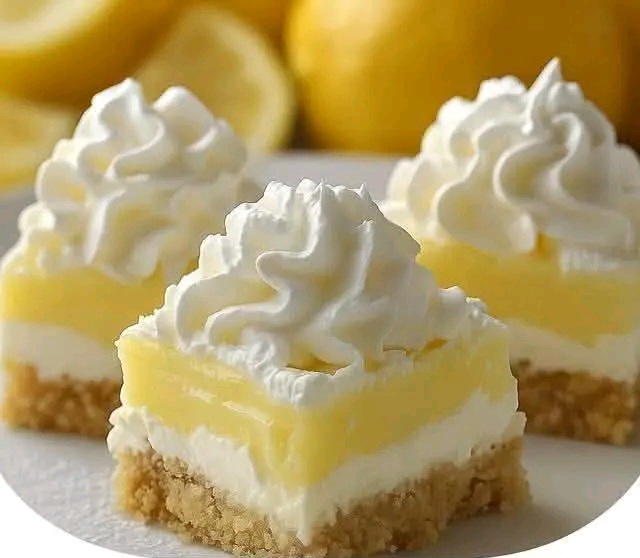
Some days call for a dessert that is effortless, elegant, and bursting with fresh flavor. Lazy Day Lemon Cream Pie Bars are exactly that. They have all the bright, tangy, creamy goodness of a classic lemon cream pie, but in a easy bar form that requires no rolling, no crimping, and no fuss.
A buttery graham cracker crust. A silky, no‑bake lemon cream filling. A light, airy topping. And that perfect balance of sweet and tart that makes lemon desserts absolutely irresistible.
The best part? These bars come together in about 20 minutes of active time. The oven does the crust, the refrigerator sets the filling, and you end up with a dessert that looks like you spent hours in the kitchen.
In this guide, you will learn the complete recipe, pro tips for the perfect lemon flavor, delicious variations, storage advice, and why these bars have become a go‑to for lazy days and busy weeks alike.
Why You Will Love These Lemon Cream Pie Bars
If you are a fan of lemon desserts — lemon bars, lemon meringue pie, lemon curd — you will adore these. They capture the same bright, sunny flavor but in a more forgiving, easier‑to‑serve format.
Here is why they are a winner:
· No‑bake filling – The creamy layer sets in the refrigerator, no oven needed after the crust.
· Simple ingredients – Pantry staples like graham crackers, cream cheese, sweetened condensed milk, and fresh lemons.
· Make‑ahead friendly – Prepare them a day in advance for parties or holidays.
· Perfectly portable – Cut into bars for potlucks, bake sales, or lunchboxes.
· Refreshingly light – Not too heavy, not too sweet. The lemon keeps it bright.
· Beginner‑friendly – No complicated techniques, no candy thermometer.
Whether you need a quick dessert for a summer barbecue, a treat for a baby shower, or just something to brighten a gray afternoon, these lemon cream pie bars deliver.
The Complete Lazy Day Lemon Cream Pie Bars Recipe
This recipe makes one 9×9‑inch pan (or 9×13‑inch for thinner bars). About 12–16 bars.
For the Graham Cracker Crust
· 1 cup graham cracker crumbs (about 8 full sheets)
· ¼ cup granulated sugar
· ½ cup unsalted butter, melted
For the Lemon Cream Filling
· 1 can (14 oz / 396g) sweetened condensed milk
· ½ cup fresh lemon juice (about 2–3 large lemons)
· 2 tablespoons fresh lemon zest (about 2 large lemons)
· 8 oz (226g) cream cheese, softened
· 1 teaspoon vanilla extract
· Pinch of salt
For the Topping (Optional but Recommended)
· 1 cup heavy whipping cream
· 2 tablespoons powdered sugar
· ½ teaspoon vanilla extract
· Additional lemon zest or thin lemon slices for garnish
Step‑by‑Step Instructions
Part 1: Make the Graham Cracker Crust
Step 1 – Preheat and Prepare
Preheat your oven to 350°F (175°C). Line a 9×9‑inch square baking pan with parchment paper, leaving some overhang on two sides for easy removal. You can also use a 9×13‑inch pan for thinner bars — adjust baking time slightly.
Step 2 – Combine Crust Ingredients
In a medium bowl, combine the graham cracker crumbs and sugar. Pour in the melted butter and stir with a fork until the mixture resembles wet sand. All crumbs should be evenly moistened.
Step 3 – Press into the Pan
Transfer the crumb mixture to the prepared pan. Press down firmly and evenly using the bottom of a measuring cup or a flat glass. Press hard enough so the crust holds together when sliced. Make sure to press into the corners.
Step 4 – Bake the Crust
Bake at 350°F for 8–10 minutes, until lightly golden and fragrant. Remove from the oven and let cool completely on a wire rack before adding the filling. Do not skip cooling — a warm crust will melt the cream cheese filling.
Part 2: Make the Lemon Cream Filling
Step 1 – Soften the Cream Cheese
Ensure your cream cheese is at room temperature. Cold cream cheese will be lumpy. Leave it on the counter for 30–60 minutes before starting.
Step 2 – Zest and Juice the Lemons
Wash the lemons well. Zest them before juicing (it is easier). You will need about 2 tablespoons of zest and ½ cup of fresh juice. Strain the juice to remove seeds.
Step 3 – Beat the Cream Cheese
In a large mixing bowl (or stand mixer with paddle attachment), beat the softened cream cheese on medium speed until smooth and creamy, about 2 minutes. Scrape down the sides.
Step 4 – Add Sweetened Condensed Milk
Add the entire can of sweetened condensed milk and beat until fully combined and smooth. The mixture will be thick and pale.
Step 5 – Add Lemon, Vanilla, and Salt
Add the fresh lemon juice, lemon zest, vanilla extract, and a pinch of salt. Beat on low until just combined. The mixture will thicken slightly as the lemon juice reacts with the condensed milk. Do not overmix.
Step 6 – Spread over the Crust
Pour the lemon cream filling onto the cooled crust. Use an offset spatula to spread it evenly to the edges. Tap the pan gently on the counter to release air bubbles.
Step 7 – Chill
Refrigerate the bars for at least 4 hours, or overnight. The filling needs time to set completely. Do not rush — if you cut them too soon, the bars will be soft and messy.
Part 3: Make the Whipped Cream Topping (Optional)
Step 1 – Chill the Bowl and Beat
Place a metal or glass mixing bowl and beaters in the refrigerator for 15 minutes. Cold equipment whips cream faster and more reliably.
Step 2 – Whip the Cream
Pour the heavy cream into the chilled bowl. Beat on medium‑high speed until soft peaks form (the cream holds its shape but the peaks flop over).
Step 3 – Add Sugar and Vanilla
Add the powdered sugar and vanilla extract. Continue beating until stiff peaks form (peaks stand straight up). Do not overbeat, or the cream will turn into butter.
Step 4 – Spread or Pipe
Spread the whipped cream evenly over the chilled lemon filling, or pipe it in decorative swirls. Garnish with additional lemon zest or thin lemon slices.
Step 5 – Chill Again (Optional)
Return the bars to the refrigerator for 30 minutes to set the whipped cream before slicing.
Part 4 – Slice and Serve
Use a sharp knife to cut into bars. For clean cuts, wipe the knife with a damp cloth between slices. Serve chilled. Store leftovers in the refrigerator.
Pro Tips for Perfect Lemon Cream Pie Bars
Use Fresh Lemons
Bottled lemon juice lacks the bright, complex flavor of fresh lemons. Fresh zest is even more important — that is where most of the lemon oil lives. Do not skip it.
Room Temperature Cream Cheese
Cold cream cheese will leave lumps in your filling. Set it out an hour ahead. If you forget, microwave it in 10‑second bursts until softened but not melted.
Do Not Overmix the Filling
Overmixing can incorporate too much air, which may cause the filling to crack as it sets. Mix just until combined.
Press the Crust Firmly
A loosely pressed crust will crumble when you cut the bars. Use the bottom of a measuring cup to press down with authority.
Chill Thoroughly
Four hours is the minimum. Overnight is better. The filling needs time to firm up to a sliceable consistency.
For Clean Slices
Refrigerate for at least 4 hours, then use a sharp knife. Wipe the blade between cuts. For extra clean slices, freeze the bars for 30 minutes before cutting.
Want the full truth and the practical next steps?
Page 2 continues with the real explanation, the key details many readers skip, and the simple takeaways that make this guide more useful.