
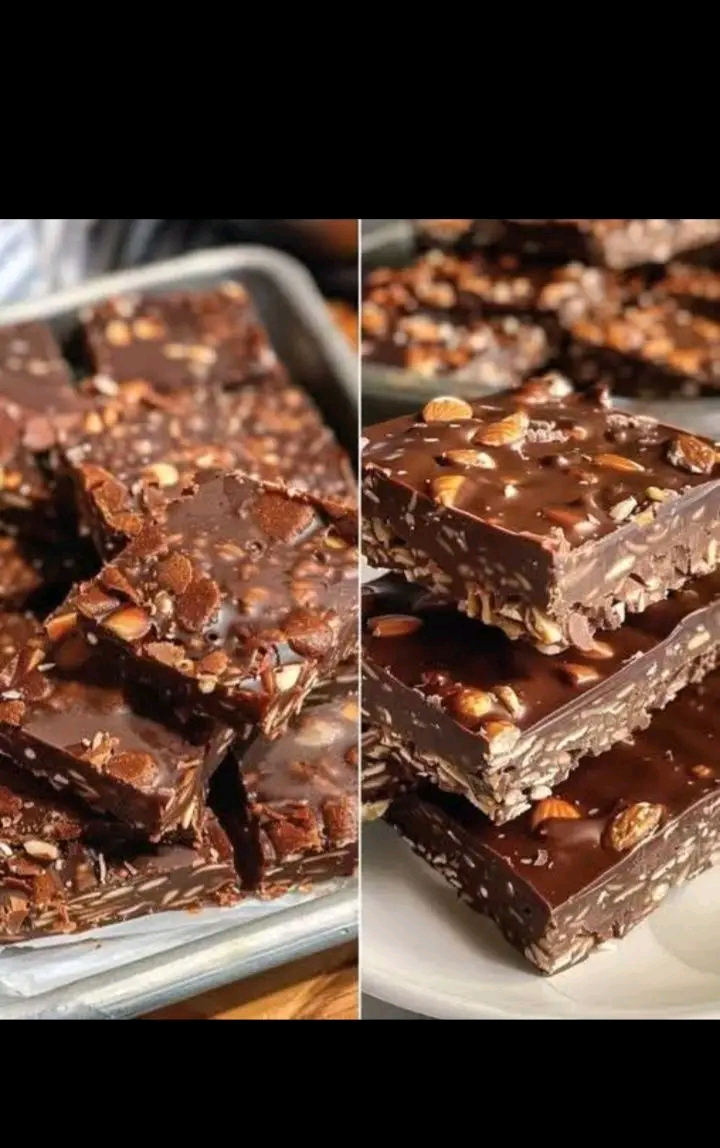
These no-bake chocolate nut bars are the ultimate low‑carb treat! Packed with healthy nuts, rich cocoa, and naturally sweetened, they come together in minutes. Perfect for keto, gluten‑free, and guilt‑free snacking.
Let me tell you about the snack that satisfies my chocolate cravings without derailing my low‑carb lifestyle—and takes almost no effort to make.
I have a serious sweet tooth. Chocolate, in particular, is my weakness. When I switched to a low‑carb, keto‑friendly way of eating, I thought I’d have to give up chocolate bars forever. Store‑bought “sugar‑free” options were either loaded with questionable ingredients or cost a small fortune. I knew there had to be a better way.
Then I discovered no‑bake chocolate nut bars. With just a handful of simple ingredients—nuts, coconut oil, cocoa powder, and a natural sweetener—I could create a treat that tastes like a decadent candy bar but fits perfectly into my macros. The first time I made them, I was hooked. They’re rich, fudgy, packed with crunch, and take less than 15 minutes to prepare. No oven required.
These bars have become a staple in my kitchen. I keep a batch in the freezer for when cravings strike, and they’ve saved me from reaching for the sugar‑laden alternatives more times than I can count. In this guide, I’ll share everything you need to know to make your own no‑bake chocolate nut bars—perfect for keto, paleo, or anyone who loves a healthy chocolate fix.
Why You’ll Love These No-Bake Chocolate Nut Bars
No Oven, No Fuss
These bars come together without turning on the oven. Just mix, press, chill, and slice.
Low‑Carb & Keto‑Friendly
Made with natural sweeteners and wholesome ingredients, they fit perfectly into a low‑carb lifestyle. Each bar has minimal net carbs.
Packed with Healthy Fats & Protein
Nuts provide heart‑healthy fats and protein, keeping you full and satisfied. Coconut oil adds medium‑chain triglycerides (MCTs) for energy.
Rich, Decadent Chocolate Flavor
Unsweetened cocoa powder and optional dark chocolate topping deliver a deep chocolate taste without the sugar.
Customizable
Swap the nuts, add seeds, stir in shredded coconut—make them your own.
Make‑Ahead & Freezer‑Friendly
These bars store beautifully in the fridge or freezer, so you always have a healthy treat on hand.
Ingredients
Ingredient Amount Notes
Almonds 1 cup Raw, unsalted
Pecans or walnuts 1 cup Raw, unsalted
Unsweetened shredded coconut ½ cup Optional, for texture
Coconut oil ½ cup (melted) Unrefined for a hint of coconut flavor
Unsweetened cocoa powder ⅓ cup Dutch‑processed for richer flavor
Powdered sweetener ⅓ cup Erythritol, allulose, or monk fruit blend; sifted for smoothness
Vanilla extract 1 teaspoon
Pinch of salt Enhances chocolate flavor
Optional: sugar‑free dark chocolate chips ½ cup For topping or drizzling
Ingredient Notes
Nuts: Use a mix of your favorite nuts. Almonds, pecans, walnuts, hazelnuts, or macadamias all work. Toast them lightly for extra flavor, but raw is fine.
Coconut oil: Refined coconut oil has a neutral taste; unrefined adds a subtle coconut note. You can also use butter or ghee for a richer flavor, but coconut oil keeps it dairy‑free.
Sweetener: Powdered erythritol or allulose dissolves best and avoids a gritty texture. If using granulated, pulse it in a blender to powder.
Cocoa powder: Use high‑quality unsweetened cocoa for the best chocolate flavor. Dutch‑processed gives a smoother, less acidic taste.
Optional chocolate coating: Melt sugar‑free chocolate chips with a teaspoon of coconut oil for a smooth topping.
Step‑by‑Step Instructions
Step 1: Prepare the Pan
Line an 8×8‑inch square baking pan with parchment paper, leaving overhang on two sides for easy removal. Lightly grease the paper if desired.
Step 2: Chop the Nuts (Optional)
If you prefer smaller pieces, pulse the nuts in a food processor a few times until coarsely chopped. For a chunkier bar, leave them whole or roughly chop by hand.
Step 3: Combine Dry Ingredients
In a large bowl, combine the chopped nuts, shredded coconut (if using), cocoa powder, powdered sweetener, and salt. Stir until well mixed.
Step 4: Add Wet Ingredients
Pour the melted coconut oil and vanilla extract over the dry mixture. Stir thoroughly until every nut piece is coated. The mixture should clump together when pressed.
Step 5: Press into Pan
Transfer the mixture to the prepared pan. Press down firmly with the back of a spatula or a flat‑bottomed glass. Make sure the surface is even and compact—the tighter you press, the less crumbly the bars will be.
Step 6: Optional Chocolate Topping
If adding a chocolate layer, melt the sugar‑free chocolate chips with 1 teaspoon of coconut oil in the microwave (30‑second bursts, stirring between). Spread evenly over the pressed base. Smooth with a spatula.
Step 7: Chill
Refrigerate the pan for at least 2 hours, or until the bars are firm. For quicker results, freeze for 45–60 minutes.
Step 8: Slice and Serve
Lift the bars out of the pan using the parchment overhang. Place on a cutting board and slice into 12–16 bars. Store in an airtight container in the refrigerator or freezer.
Pro Tips for the Perfect No-Bake Bars
- Press Firmly
The key to non‑crumbly bars is pressing the mixture firmly into the pan. Use a flat‑bottomed glass or a second piece of parchment and a heavy object to apply even pressure.
- Toast the Nuts (Optional)
For deeper flavor, toast the nuts in a dry skillet over medium heat for 3–5 minutes until fragrant. Let cool before using.
- Use Powdered Sweetener
Granulated sweeteners can leave a gritty texture. Powder them in a blender or coffee grinder for a smooth mouthfeel.
- Customize the Texture
For a fudgier bar, use a higher ratio of coconut oil and cocoa. For a crunchier bar, reduce the coconut oil slightly and add more nuts.
- Chill Completely
Don’t rush the chilling step. The bars need time to set, or they’ll be soft and messy to slice.
- Store in the Freezer
These bars are perfect straight from the freezer—they won’t freeze solid like ice. Freezing also makes them last longer.
Delicious Variations
- Chocolate Peanut Butter Bars
Replace half the coconut oil with natural peanut butter. Use peanuts instead of almonds. The result is a creamy, peanut‑butter‑infused chocolate bar.
- Coconut Macadamia Bars
Use macadamia nuts and shredded coconut in the base. Add ½ teaspoon of coconut extract for extra tropical flavor.
- Coffee Chocolate Bars
Add 1 teaspoon of instant espresso powder to the dry ingredients. It deepens the chocolate flavor without tasting like coffee.
- Seed & Nut Mix
Replace half the nuts with pumpkin seeds and sunflower seeds for a nut‑free option. Add ¼ cup of hemp seeds for extra protein.
- Mint Chocolate Bars
Add ¼ teaspoon of peppermint extract to the wet ingredients. Top with a thin layer of melted sugar‑free dark chocolate.
- Orange Zest Bars
Add 1 teaspoon of orange zest to the mixture. The citrus brightens the rich chocolate.
- Salted Caramel Swirl
Before pressing, swirl in a few tablespoons of sugar‑free caramel sauce (made from allulose). Sprinkle flaky sea salt on top before chilling.
- White Chocolate Version
Use cocoa butter instead of coconut oil and add unsweetened cocoa powder to make a white chocolate base. Top with white chocolate chips.
ÍServing Suggestions
· As a snack: Grab a bar straight from the fridge for a quick energy boost.
· With coffee: The rich chocolate pairs beautifully with a cup of espresso or black coffee.
· Dessert platter: Serve alongside fresh berries and whipped cream for an elegant treat.
· Gift idea: Wrap individually in parchment and tie with a ribbon for a thoughtful homemade gift.
· Crumbled over yogurt: Crumble a bar over Greek yogurt for a decadent breakfast.
Storage and Make‑Ahead Tips
Refrigerator Storage
Store in an airtight container in the refrigerator for up to 2 weeks. The bars will remain firm but soften slightly.
Freezer Instructions
Freeze in a single layer in a freezer bag for up to 3 months. They’re delicious straight from the freezer, no thawing needed.
Make‑Ahead Timeline
· Up to 3 months ahead: Freeze bars in a single layer.
· Up to 2 weeks ahead: Store in the refrigerator.
Frequently Asked Questions (FAQs)
Q: Can I use a different oil instead of coconut oil?
A: Yes. Butter, ghee, or even almond butter can be used, but the texture will change. Butter adds richness; nut butters make the bars softer.
Q: Are these bars keto‑friendly?
A: Absolutely. With low‑carb sweetener and healthy fats, they fit perfectly into a ketogenic diet.
Q: How many net carbs per bar?
A: Approximately 2–3g net carbs per bar, depending on your choice of nuts and sweetener.
Q: Can I use whole nuts instead of chopped?
A: Yes, but the bars may be harder to slice. Chopping helps create a more uniform texture.
Q: My bars are crumbly. What went wrong?
A: Not enough coconut oil or not pressing firmly enough. Add an extra tablespoon of melted oil and press more firmly next time.
Q: Can I add protein powder?
A: Yes. Replace 2 tablespoons of nuts with vanilla or chocolate protein powder. You may need a little extra liquid (coconut oil) to bind.
Q: How do I make these nut‑free?
A: Use sunflower seeds, pumpkin seeds, and hemp seeds. Sunflower seeds work particularly well; you can also add unsweetened shredded coconut.
Q: Can I use maple syrup or honey instead of sweetener?
A: Yes, but that will add carbs and sugar. For a low‑carb version, stick to sugar‑free sweeteners.
Nutritional Information
Per bar (based on 12 bars, using almonds, pecans, and erythritol)
Nutrient Amount
Calories ~180–210
Total Fat 16–18g
Saturated Fat 7–9g
Carbohydrates 6–8g
Fiber 3–4g
Net Carbs 2–4g
Protein 4–5g
Sugar 1g (naturally occurring)
Values are estimates and will vary with specific ingredients.
Conclusion
No‑bake chocolate nut bars are the answer to every low‑carb chocolate lover’s dream. They’re rich, satisfying, and come together with minimal effort. With wholesome ingredients and no oven required, they’re a treat you can feel good about eating any time.
What I love most about this recipe is its flexibility. You can swap the nuts, add seeds, change the sweetener, or top them with a chocolate drizzle. Once you have the basic formula down, the possibilities are endless.
I hope this guide has given you everything you need to make your own batch of these delicious bars. Keep them in your fridge for when cravings strike, and enjoy a guilt‑free chocolate fix whenever you need it.
Now it’s your turn! What’s your favorite nut combination? Share your creations in the comments below.
And if you’re looking for more low‑carb treats, check out our guides for Keto Fat Bombs, Chocolate Coconut Clusters, and Peanut Butter Cups.
Happy no‑baking! 🍫✨
Did you make these no‑bake chocolate nut bars? We’d love to see your creations! Leave a comment below and share your photos. Don’t forget to pin this recipe for your next sweet craving.
More Recipes You Might Like
-
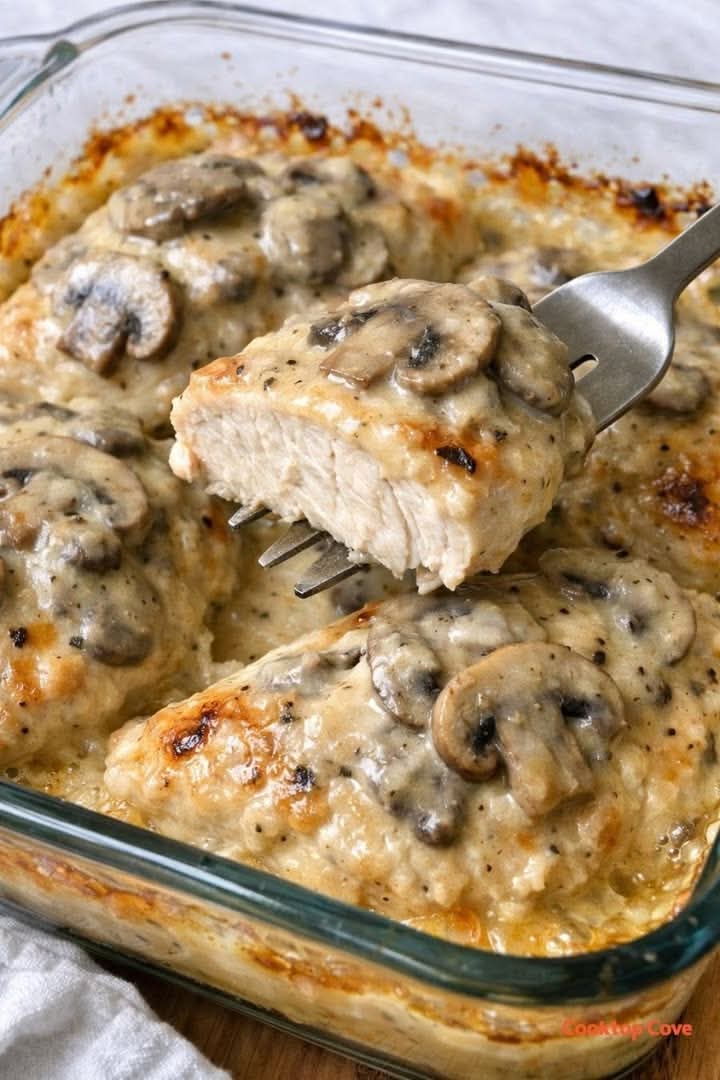
Creamy Mushroom Chicken Bake: The Weeknight Dinner That Has Everyone Scraping the Dish
There are dinners that fill your home with a savory aroma and send everyone wandering into the kitchen before the timer even goes off. This Creamy Mushroom Chicken Bake is exactly that. Tender, juicy chicken breasts baked in a rich, velvety mushroom sauce until they are swimming in flavor. The sauce is so good that…
-

Grated Zucchini Fritters: The Addictive Family Recipe That Traveled from Erie to Butler
There are recipes, and then there are legacy recipes – the ones that inspire road trips, become the stuff of family legend, and get nibbled away by the handful on a boat at sunrise. These grated zucchini fritters are exactly that. Simple, humble ingredients – zucchini, Colby cheese, onion, eggs, and a little flour –…
-
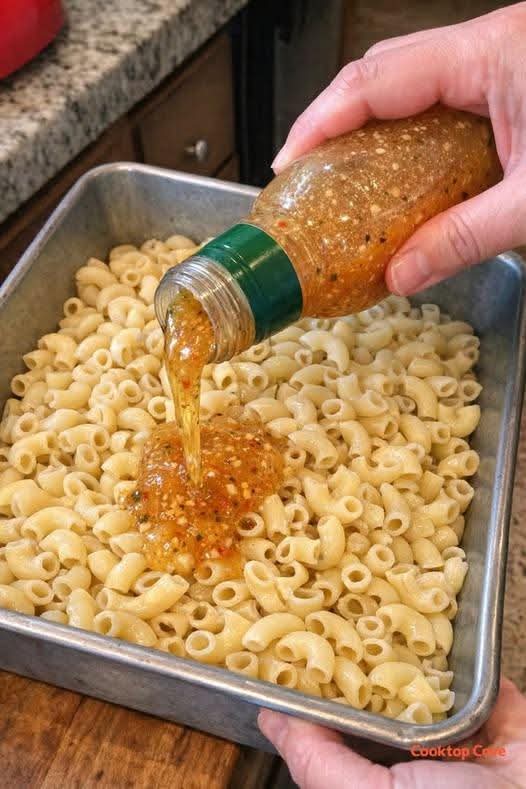
The 3 Ingredient Pasta Everyone Keeps Asking For
Some nights you want a dinner that feels special but takes almost no effort. This is that recipe. I made this 3‑ingredient pasta bake on a whim with elbow macaroni, a bottle of Italian dressing, and shredded mozzarella cheese – and now it is requested almost every week. The tangy, herby dressing soaks into the…