

Discover the joy of baking Classic Homemade Sandwich Bread! This soft, fluffy loaf is perfect for sandwiches, toast, and everything in between. With step-by-step instructions, it’s easier than you think.
Let me tell you about the smell that changed my relationship with bread.
I grew up on store-bought sandwich bread. You know the kind—soft, squishy, perfectly uniform slices that come in a plastic bag with a twist tie. It was fine. It made sandwiches. It toasted okay. But it never felt special.
Then one rainy Saturday, my neighbor—an elderly Italian woman named Rosa—brought over a loaf of bread she’d just baked. It was still warm, wrapped in a clean kitchen towel. The aroma hit me before I even opened the door: yeasty, slightly sweet, utterly intoxicating.
I tore off a piece right there, and that first bite changed everything. The crust was golden and slightly chewy, giving way to an interior so soft and pillowy it practically melted. This wasn’t just bread. This was magic.
“That’s just sandwich bread,” Rosa said with a shrug when I gushed about it. “Nothing special.”
But it was special. It was special because she made it with her own hands, with patience and love and ingredients that cost almost nothing. And in that moment, I realized that the most ordinary things, made well, become extraordinary.
Since then, I’ve baked countless loaves of classic sandwich bread. I’ve learned the secrets to that perfect soft texture, that beautiful golden crust, that satisfying aroma that fills the whole house. And now I’m sharing everything I know with you.
In this comprehensive guide, I’ll walk you through everything you need to create the perfect Classic Homemade Sandwich Bread. We’ll cover the science of yeast, step-by-step instructions with pro tips, delicious variations, and answers to all your burning questions. Get ready to fill your home with the most incredible aroma.
Why You’ll Love This Classic Homemade Sandwich Bread
Incredibly Satisfying to Make
There’s something deeply rewarding about baking your own bread. From mixing the ingredients to watching the dough rise to pulling a golden loaf from the oven, every step is pure satisfaction .
Far Better Than Store-Bought
Homemade bread has a flavor and texture that commercially produced bread simply can’t match. It’s fresher, more flavorful, and free from preservatives and additives .
Surprisingly Simple
If you’ve never baked bread before, this recipe is the perfect place to start. With clear instructions and a little patience, anyone can create a beautiful loaf .
Endlessly Versatile
This basic loaf is a canvas. Use it for sandwiches, toast it for breakfast, serve it alongside soup or salad, or simply enjoy it warm with butter .
Budget-Friendly
Flour, yeast, water, salt, and a little fat—that’s all it takes. Homemade bread costs pennies per loaf compared to artisanal bakery bread .
The Science of Great Sandwich Bread
Before we dive into the recipe, let’s understand what makes sandwich bread different from crusty artisan loaves.
Softness
Sandwich bread is intentionally soft. This comes from:
· Fat (butter or oil) in the dough, which tenderizes the gluten
· Milk instead of water, which adds richness and softness
· Sugar, which feeds the yeast and adds tenderness
Structure
The perfect sandwich bread has a fine, even crumb that holds together when sliced thin. This comes from proper kneading to develop gluten, which creates the bread’s structure .
Shelf Life
Homemade bread doesn’t have preservatives, so it won’t last as long as store-bought. But a good recipe with fat and sugar will stay soft for several days .
Ingredients for Perfect Classic Sandwich Bread
Here’s everything you’ll need for a soft, fluffy, delicious loaf.
For the Bread:
· 4 cups (500g) all-purpose flour or bread flour — Bread flour creates a chewier texture; all-purpose yields a softer loaf
· 2¼ teaspoons (1 packet) active dry yeast (or instant yeast)
· 1½ cups (360ml) warm milk (about 110°F) — Whole milk yields the softest bread
· 2 tablespoons granulated sugar — Feeds the yeast and adds tenderness
· 1½ teaspoons salt
· 3 tablespoons unsalted butter, softened — Adds richness and softness
· 1 large egg, room temperature — Optional, for extra richness
For Finishing:
· 1 tablespoon melted butter — For brushing the top after baking
Ingredient Notes and Substitutions
Flour: Bread flour has higher protein content, which creates more gluten and a chewier texture. All-purpose flour creates a softer, more tender loaf perfect for sandwiches . You can also use a combination.
Milk: Whole milk yields the richest, softest bread. You can use 2% or even water, but the bread will be less tender. For a dairy-free version, use unsweetened almond or oat milk .
Yeast: Active dry yeast needs to be proofed in warm liquid; instant yeast can be mixed directly with dry ingredients. Both work beautifully .
Butter: Unsalted butter gives you control over the salt level. You can substitute with vegetable oil or shortening, which will also create a soft texture .
Sugar: This feeds the yeast and adds tenderness. You can reduce it slightly, but don’t omit it entirely—it’s important for texture, not just sweetness .
Step-by-Step Instructions
Follow these steps for a perfect loaf of classic sandwich bread.
Step 1: Proof the Yeast (If Using Active Dry)
- In a small bowl, combine the warm milk (110°F), 1 tablespoon of the sugar, and the yeast .
- Let it sit for 5-10 minutes until foamy. If it doesn’t foam, your yeast may be dead, and you’ll need to start over .
Step 2: Mix the Dough
- In a large mixing bowl or the bowl of a stand mixer, whisk together the flour, remaining sugar, and salt .
- Add the yeast mixture (or if using instant yeast, add it directly to the flour along with the warm milk), softened butter, and egg (if using) .
- Stir with a wooden spoon or spatula until a shaggy dough forms .
Step 3: Knead the Dough
By Hand:
- Turn the dough onto a lightly floured surface.
- Knead for 10-12 minutes, pushing the dough away with the heel of your hand, then folding it back over itself. The dough should become smooth, elastic, and slightly tacky but not sticky .
By Stand Mixer:
- Fit your mixer with the dough hook.
- Knead on medium-low speed for 8-10 minutes until the dough is smooth and elastic and pulls away from the sides of the bowl .
Step 4: First Rise
- Place the dough in a lightly greased bowl, turning once to coat all sides .
- Cover with plastic wrap or a clean kitchen towel and let rise in a warm, draft-free place until doubled in size, about 1 to 1.5 hours .
Step 5: Shape the Loaf
- Gently punch down the risen dough to release the air .
- Turn it onto a lightly floured surface and pat it into a rectangle about 8×12 inches .
- Starting from a short end, roll the dough tightly into a log, pinching the seam to seal .
- Pinch the ends and tuck them under .
- Place the shaped loaf seam-side down in a greased 9×5-inch loaf pan .
Step 6: Second Rise
- Cover the pan loosely with a clean kitchen towel and let rise in a warm place until the dough has risen about 1 inch above the rim of the pan, about 45-60 minutes .
- While it rises, preheat your oven to 375°F (190°C) .
Step 7: Bake
- Bake the loaf for 30-35 minutes, until the top is golden brown and the bread sounds hollow when tapped on the bottom .
- If the top is browning too quickly, tent loosely with foil for the last 10 minutes .
- For accuracy, the internal temperature should reach 190-200°F .
Step 8: Cool Completely
- Remove the bread from the pan immediately and transfer to a wire rack .
- Brush the top with melted butter for a soft, flavorful crust .
- Let the bread cool completely before slicing —at least 1-2 hours . This is crucial! Slicing warm bread will result in a gummy, compressed texture .
Pro Tips for the Best Sandwich Bread
- Use Room Temperature Ingredients
Cold ingredients can slow down yeast activity. Take your milk, butter, and egg out of the refrigerator 30-60 minutes before starting .
- Don’t Add Too Much Flour
A slightly sticky dough is okay. Adding too much flour during kneading will result in a dense, dry loaf. The dough should be smooth and tacky but not sticking to your hands .
- Trust the Windowpane Test
To check if you’ve kneaded enough, take a small piece of dough and stretch it gently. If it stretches thin enough to see light through without tearing (the “windowpane”), it’s ready .
- Create a Warm Rising Environment
If your kitchen is cool, create a warm spot for rising. Turn your oven to the lowest setting for a few minutes, then turn it off and place the covered dough inside with the door slightly ajar .
- Don’t Over-Rise
The second rise should stop when the dough is about 1 inch above the rim of the pan. Over-risen dough can collapse in the oven .
- Cool Completely
I know it’s tempting to slice into warm bread, but patience is essential. Cooling allows the crumb structure to set. Warm bread will be gummy and difficult to slice .
Delicious Variations to Try
- Whole Wheat Sandwich Bread
Substitute half the all-purpose flour with whole wheat flour. You may need to add an extra tablespoon of water, as whole wheat absorbs more liquid .
- Honey Wheat Bread
Use whole wheat flour and replace the sugar with ¼ cup honey. Add the honey with the wet ingredients .
- Oatmeal Sandwich Bread
Replace 1 cup of flour with 1 cup rolled oats (not instant). Add an extra 2 tablespoons of milk, as oats absorb liquid .
- Potato Bread
Add ½ cup mashed potato (cooled) to the dough. Potato bread is incredibly moist and stays soft for days. Reduce the milk slightly .
- Milk Bread (Hokkaido-Style)
Use the tangzhong method: cook 3 tablespoons of flour with ½ cup of milk into a paste, cool, then add to the remaining ingredients. This creates an incredibly soft, fluffy loaf .
- Cinnamon Swirl Bread
After rolling the dough into a rectangle, brush with melted butter and sprinkle with a mixture of ¼ cup sugar and 1 tablespoon cinnamon. Roll up tightly and bake as directed .
- Seeded Sandwich Bread
Add 2 tablespoons of mixed seeds (sesame, poppy, sunflower) to the dough during the last few minutes of kneading. Sprinkle more on top before baking .
Serving Suggestions
Classic Sandwiches
This bread is perfect for:
· Grilled cheese
· BLTs
· Turkey and avocado
· PB&J
· Tuna or chicken salad
Toast
Slice thick and toast until golden. Top with:
· Butter and jam
· Avocado and eggs
· Peanut butter and banana
· Cream cheese and smoked salmon
With Soup or Salad
Serve thick slices alongside tomato soup, vegetable soup, or a hearty salad for a satisfying meal.
French Toast
Day-old slices of this bread make the most incredible French toast. The sturdy crumb soaks up the custard without falling apart .
Storage and Freezing
Room Temperature Storage
Store cooled bread in an airtight container or bread bag at room temperature for up to 3-4 days . The crust will soften slightly over time.
Freezer Instructions
This bread freezes beautifully for up to 3 months .
- Cool completely.
- Wrap tightly in plastic wrap, then foil, or place in a freezer bag.
- Thaw at room temperature. For toast, you can slice and toast directly from frozen.
Reviving Day-Old Bread
To refresh day-old bread, wrap it in foil and warm in a 300°F oven for 10-15 minutes . This restores some of the fresh-baked texture.
Frequently Asked Questions (FAQs)
Q: Why didn’t my bread rise?
A: Several reasons: yeast may be expired, liquids may have been too hot (killing the yeast), or the environment may have been too cold. Always proof your yeast to check it’s active .
Q: Why is my bread dense and heavy?
A: Dense bread can result from not kneading enough (underdeveloped gluten), adding too much flour, or not letting it rise long enough .
Q: Why is my bread dry?
A: Dry bread usually means too much flour or overbaking. Measure flour correctly (spoon and level) and check for doneness early .
Q: Can I use bread flour instead of all-purpose?
A: Yes! Bread flour will create a chewier, more structured loaf with a slightly higher rise .
Q: Can I make this recipe without a stand mixer?
A: Absolutely! Kneading by hand takes a little more time and effort, but it’s completely doable and even meditative .
Q: How do I know when the bread is done?
A: The loaf should be golden brown and sound hollow when tapped on the bottom. An instant-read thermometer inserted into the center should read 190-200°F .
Q: Can I double this recipe?
A: Yes! This recipe doubles easily to make two loaves. You may need to bake them one at a time depending on your oven space .
Nutritional Information
Please note that the following is an estimate and will vary based on specific ingredients and portion sizes (based on 1 loaf, 12 slices).
Nutrient Amount per Slice
Calories ~140-170
Total Fat 3-4g
Saturated Fat 1.5-2g
Cholesterol 15-25mg
Sodium 250-300mg
Total Carbohydrates 24-28g
Dietary Fiber 1-2g
Sugars 2-3g
Protein 4-5g
Conclusion
Classic Homemade Sandwich Bread is more than just a recipe—it’s a skill, a comfort, and a connection to generations of home bakers who understood that the best things in life are often the simplest. With just a few basic ingredients and a little patience, you can create something far greater than the sum of its parts: a warm, fragrant, absolutely delicious loaf of bread that will make your house feel like home.
What I love most about this recipe is its reliability and versatility. Once you master the basic technique, you can adapt it endlessly—add seeds, swap flours, create swirls, and make it your own. It’s a recipe that grows with you.
I hope this guide has given you everything you need to create perfect Classic Homemade Sandwich Bread in your own kitchen. Remember the key tips: use room temperature ingredients, knead thoroughly, let it rise fully, and cool completely before slicing. Follow these, and you’re guaranteed success.
Now it’s your turn! Gather your ingredients, clear your counter, and experience the joy of pulling a beautiful, golden loaf from your oven. When you do, we’d love to hear about it. Leave a comment below and let us know how your bread turned out, or share which variation you tried.
And if you’re looking for more baking recipes, be sure to check out our guides for Soft Dinner Rolls, Classic French Baguettes, and Easy No-Knead Bread.
Happy baking! 🍞✨
Did you make this Classic Homemade Sandwich Bread? We’d love to see your creations! Leave a comment below and let us know how it went. Don’t forget to pin this recipe for your next bread-baking day!
More Recipes You Might Like
-

Honey Garlic Pork Tenderloin – A Sticky, Savory Oven‑Baked Masterpiece
There are dinners that are merely fuel, and then there are dinners that make you pause mid‑bite, close your eyes, and let out a satisfied sigh. Honey Garlic Pork Tenderloin is emphatically the latter. Imagine a perfectly seared, oven‑roasted pork tenderloin – impossibly juicy, tender, and succulent – enveloped in a glossy, sticky, sweet‑savory glaze…
-
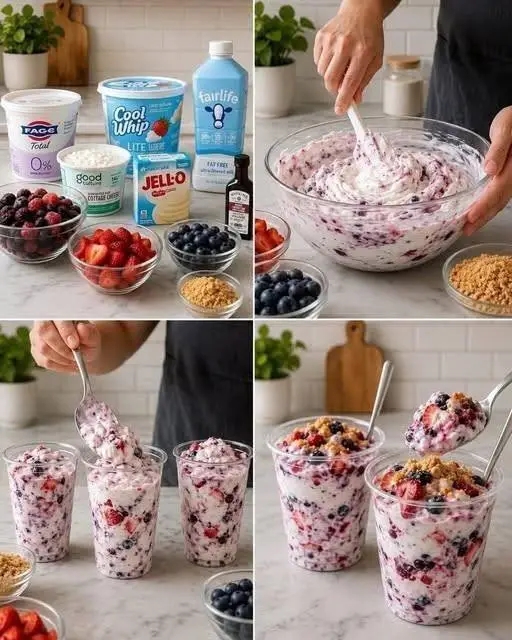
Low Carb Berry Cheesecake Fluff Cups – A Creamy, Fruity, No-Bake Dessert That Feels Like a Guilty Pleasure
There are desserts that require hours of baking, precise measurements, and a dozen specialty ingredients – and then there are desserts that come together in a blender, chill in the fridge, and taste like a cloud of cheesecake heaven. Low-Carb Berry Cheesecake Fluff Cups are emphatically the latter. Imagine a creamy, tangy, velvety mousse that…
-

Cheesy Zucchini Carrot Bake – A Golden, Creamy Vegetable Casserole That Steals the Show
There are side dishes that are merely an afterthought, and then there are side dishes that become the main event – the dish everyone reaches for, the one that disappears before the entrée even hits the table. Cheesy Zucchini Carrot Bake is emphatically the latter. Imagine tender, garden‑fresh zucchini and sweet carrots, enveloped in a…