
I have a confession to make. For years, I was convinced that good bread required hours of work, precise techniques, and a level of patience I simply didn’t possess. I’d watch videos of bakers kneading dough with practiced ease, proofing for hours, scoring perfect loaves—and I’d just buy my bread at the store like a normal person.
Then I discovered this recipe. And everything changed.
This isn’t just easy bread. This is ridiculously easy bread. Three ingredients. Fifteen minutes of actual work. No kneading. No yeast. No waiting around for hours. And the result? The softest, fluffiest, most delicious bread you’ve ever pulled from your own oven.
The first time I made this, I honestly couldn’t believe it worked. I mixed the ingredients, shaped the dough, and popped it in the oven. When that golden loaf emerged, I actually teared up a little. It was beautiful. It was perfect. And I’d made it with almost no effort.
Since then, this bread has become a staple in my kitchen. I make it for dinners, for sandwiches, for toast, for no reason at all except that I want my house to smell like a bakery. And every single time, people ask for the recipe.
Today, I’m sharing it with you.
The Secret: No Yeast, No Problem
Traditional bread gets its rise from yeast, which takes time—sometimes hours—to ferment and produce the gases that make bread light and airy. This recipe takes a different approach. It uses chemical leaveners (baking powder and baking soda) that react immediately with liquid and acid to create lift.
The result? Bread that’s ready to bake in minutes, not hours. It’s a game-changer for anyone who loves fresh bread but doesn’t have the time or patience for traditional methods.
Now, let’s be honest: this isn’t going to taste exactly like a slow-fermented artisan sourdough. That’s a different thing entirely. But for what it is—incredibly fast, incredibly easy, incredibly delicious everyday bread—it’s absolutely perfect.
Why You’ll Love This No-Knead Artisan Bread
Only 3 ingredients. Flour, buttermilk, and a leavening combo. That’s it. Things you probably already have.
15 minutes of work. From mixing to oven in about 15 minutes. No kneading, no waiting for dough to rise.
No yeast required. No proofing, no worrying about water temperature, no waiting for dough to double.
Soft and fluffy. This bread has the most incredible texture—soft, tender, and absolutely perfect for sandwiches.
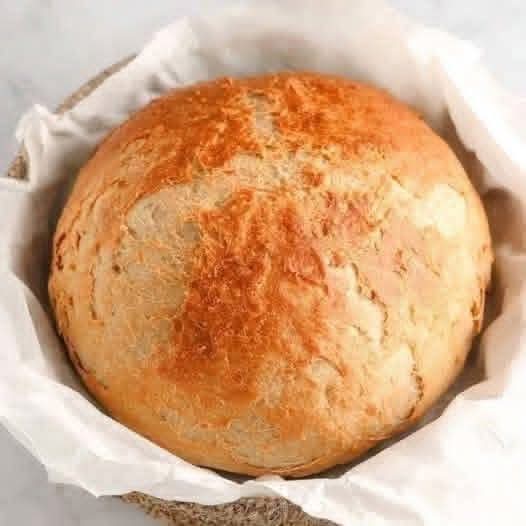
Crusty on the outside. Despite the quick method, you still get that satisfying golden crust.
Versatile. Use it for sandwiches, toast, dipping in soup, or just slathered with butter.
Beginner-friendly. If you’ve never baked bread in your life, you can make this. It’s foolproof.
Customizable. Add herbs, cheese, garlic—make it your own.
Budget-friendly. Pennies per loaf, bakery-quality results.
The Complete Ingredient Breakdown
The Foundation:
3 cups all-purpose flour (plus more for dusting)
All-purpose flour gives the perfect texture—tender but with enough structure to hold its shape. You can substitute up to 1 cup with whole wheat flour for a heartier loaf.
Why not bread flour? Bread flour has higher protein content, which creates more gluten. For this quick bread, all-purpose is perfect.
The Leaveners:
1 tablespoon baking powder
Baking powder provides most of the lift. Make sure it’s fresh—old baking powder won’t give you the rise you need.
½ teaspoon baking soda
Baking soda reacts with the acid in buttermilk to create additional lift and helps with browning.
1 teaspoon salt
Essential for flavor. Don’t skip it—bread without salt tastes flat and sad.
The Liquid:
1½ cups buttermilk
Buttermilk is the secret to this bread’s incredible texture. The acid in buttermilk reacts with the baking soda to create lift, and it adds a subtle tang that makes this bread so delicious.
No buttermilk? Make your own by adding 1½ tablespoons lemon juice or white vinegar to 1½ cups regular milk. Let it sit for 5-10 minutes until it curdles slightly.
Step-by-Step Instructions
Step 1: Preheat and Prep
Preheat your oven to 400°F (200°C). Place a Dutch oven (with its lid) in the oven while it preheats. If you don’t have a Dutch oven, you can use a heavy baking sheet, but the Dutch oven creates the perfect steamy environment for a beautiful crust.
Step 2: Mix the Dry Ingredients
In a large bowl, whisk together:
· 3 cups flour
· 1 tablespoon baking powder
· ½ teaspoon baking soda
· 1 teaspoon salt
Whisking ensures the leaveners are evenly distributed throughout the flour.
Step 3: Add the Buttermilk
Pour the buttermilk into the dry ingredients. Stir with a wooden spoon or spatula until a shaggy dough forms. It will be sticky—that’s correct.
Do not overmix. Stir just until the flour is incorporated. A few lumps are fine.
Step 4: Shape the Dough
Turn the dough out onto a generously floured surface. With floured hands, gently shape it into a round loaf. Don’t knead it—just shape it gently. The dough will be sticky, so use plenty of flour on your hands and the surface.
Step 5: Score the Top
Using a sharp knife or lame, score an X or a few slashes on the top of the loaf. This allows steam to escape and gives the bread room to expand.
Step 6: Bake
Carefully remove the hot Dutch oven from the oven. Place the dough inside (use parchment paper to lower it in if you like). Cover with the lid.
Bake covered for 30 minutes.
Remove the lid and bake for another 10-15 minutes, until the crust is deep golden brown and the bread sounds hollow when tapped.
Step 7: Cool
Transfer the bread to a wire rack and let it cool completely before slicing. I know it’s hard to wait, but cutting into hot bread can make it gummy.
Step 8: Enjoy
Slice and serve with butter, jam, or your favorite toppings.
The Science of No-Yeast Bread
Chemical leaveners do the work. Baking powder and baking soda create carbon dioxide bubbles when they react with liquid and acid. These bubbles expand in the oven’s heat, creating lift and a light, airy texture.
Buttermilk provides acid. The acid in buttermilk activates the baking soda and adds a subtle tang that makes this bread so delicious.
No gluten development needed. Traditional bread relies on kneading to develop gluten, which creates structure. This bread uses chemical leaveners and a different approach—the structure comes from the steam and the reaction, not from gluten networks.
Dutch oven creates steam. Baking in a covered Dutch oven traps steam, which keeps the crust from setting too quickly, allowing maximum rise. Removing the lid at the end lets the crust dry out and become golden and crispy.
Troubleshooting Common Issues
My Bread Is Dense
Several possible causes:
· Baking powder was old (test by adding to hot water—it should bubble)
· Overmixed the dough (mix just until combined)
· Oven wasn’t hot enough (use an oven thermometer)
My Bread Is Too Dry
Too much flour. Next time, measure carefully—spoon flour into your measuring cup and level it off, don’t scoop directly from the bag.
The Crust Is Too Hard
Your oven may be too hot, or you baked too long without the lid. Next time, check at the minimum baking time.
The Bread Stuck to the Dutch Oven
Use parchment paper to lower the dough in. It’s a lifesaver.
It Didn’t Rise Enough
Check your baking powder freshness. Old baking powder won’t give proper lift.
The Inside Is Gummy
Undercooked. Next time, bake a little longer, and make sure it’s completely cool before slicing.
Delicious Variations
Once you’ve mastered the basic recipe, try these variations.
Cheddar Herb Bread
Add 1 cup shredded sharp cheddar and 2 tablespoons fresh chopped herbs (rosemary, thyme, chives) to the dry ingredients.
Garlic Parmesan Bread
Add 3 cloves minced garlic and ½ cup grated Parmesan to the dry ingredients. Brush the hot loaf with garlic butter.
Everything Bagel Bread
Add 2 tablespoons everything bagel seasoning to the dry ingredients. Sprinkle extra on top before baking.
Jalapeño Cheddar Bread
Add 2 diced jalapeños (seeded for less heat) and 1 cup shredded cheddar. The spicy, cheesy combination is incredible.
Sun-Dried Tomato and Basil Bread
Add ½ cup chopped sun-dried tomatoes and ¼ cup fresh chopped basil. Brush with olive oil after baking.
Olive and Rosemary Bread
Add ½ cup chopped kalamata olives and 2 tablespoons fresh rosemary. The briny olives are wonderful.
Cinnamon Raisin Bread
Add 2 tablespoons sugar, 1 tablespoon cinnamon, and ½ cup raisins. This version is perfect for breakfast toast.
Seeded Bread
Add ¼ cup mixed seeds (sesame, poppy, sunflower) to the dough and sprinkle extra on top.
What to Serve With This Bread
With butter and jam: The classic. Nothing beats warm bread with good butter and your favorite jam.
For sandwiches: Use it for turkey, ham, grilled cheese, or any sandwich. It’s sturdy enough to hold up but soft enough to be delicious.
With soup: Perfect for dipping into tomato soup, potato soup, or any creamy soup.
For toast: The best breakfast. Top with butter, eggs, avocado, or cinnamon sugar.
With olive oil and balsamic: Tear off pieces and dip in good olive oil with a splash of balsamic.
For garlic bread: Slice, butter, add garlic, and toast.
With cheese and charcuterie: Serve alongside a cheese board.
Storage and Make-Ahead Tips
Room temperature: Store in a paper bag or bread box at room temperature for up to 3 days. Plastic bags can make the crust soft.
Refrigerator: Not recommended—it speeds up staling.
Freezer: This bread freezes beautifully. Slice it first, wrap tightly in plastic wrap and foil, and freeze for up to 3 months. Toast slices directly from frozen.
Reviving day-old bread: Sprinkle with water and warm in a 350°F oven for 5-10 minutes. It’ll taste almost fresh-baked.
Why This Recipe Is Perfect for Beginners
If you’ve never baked bread before, this is where you should start. Here’s why:
No yeast anxiety. You don’t have to worry about killing yeast with water that’s too hot or too cold. Baking powder is foolproof.
No kneading required. There’s no technique to learn—just mix and shape.
No waiting. From craving to eating in under an hour. Instant gratification.
Simple ingredients. You probably already have everything you need.
Forgiving. This recipe is hard to mess up. Even if it’s not perfect, it will still be delicious.
Instant confidence boost. The first time you pull a beautiful golden loaf from the oven, you’ll feel like a real baker. And you’ll be hooked.
Why This Recipe Deserves a Place in Your Kitchen
This No-Knead Artisan Bread represents everything I love about simple, accessible cooking. It proves that you don’t need years of experience or fancy equipment to create something genuinely delicious. It’s proof that good food can be fast, easy, and satisfying.
I’ve made this bread for busy weeknight dinners and for casual weekend lunches. I’ve made it for friends who couldn’t believe how easy it was. I’ve made it for my family who now request it by name.
Every single time, it delivers. Every single time, that warm, golden, buttery bread makes everything better.
This recipe has become a staple in my kitchen for good reason. It’s reliable, versatile, and always welcome at the table.
And now it can be that for you too.
So preheat that oven. Mix that dough. Shape that loaf. And get ready to pull the most beautiful, delicious bread from your oven.
Your 15-minute journey to fresh, homemade bread starts now.
Have you made this No-Knead Artisan Bread? What variations did you try? I’d love to hear about your experience in the comments below!
More Recipes You Might Like
-

Tomato Basil Garlic Bread – A Fresh, Flavorful, Italian‑Style Appetizer
There are appetizers that are merely a bite, and then there are appetizers that are a celebration – the kind that make you close your eyes, savor every crisp, garlicky, juicy, herb‑infused bite, and reach for another before you’ve even finished the first. Tomato Basil Garlic Bread is emphatically the latter. Imagine a perfectly toasted,…
-

Bundt Pan Choux Ring with Cheesecake Fluff – A Bakery‑Style Cream Puff Cake
There are cakes that are merely a dessert, and then there are cakes that are a masterpiece – the kind that make you close your eyes, savor every light, airy, creamy, tangy bite, and wonder how something so beautiful can be so easy to make. Bundt Pan Choux Ring with Cheesecake Fluff is emphatically the…
-

Ham and Cheese Puff Pastry Pockets – A Flaky, Cheesy, Crowd‑Pleasing Treat
There are snacks that are merely a bite, and then there are snacks that are a celebration – the kind that make you close your eyes, savor every flaky, buttery, cheesy, savory bite, and reach for another before you’ve even finished the first. Ham and Cheese Puff Pastry Pockets are emphatically the latter. Imagine golden,…